Gigabyte bios update utility. Gigabyte EasyTune is a utility that speeds up the overclocking process on boards from Gigabyte. Choosing the only and trouble-free update method
If you have reached this topic, there is most likely something wrong with your computer. Updating (also called "firmware") the BIOS can help solve some problems, such as incorrect operation of peripheral devices or lack of support for modern processors. But don’t rush to change things; let’s first study the theoretical part.
How to update BIOS Gigabyte
The first and most important thing you need to know is that the BIOS update operation must be treated with extreme caution. If you turn off the computer's power during the update process, there is a high chance that the motherboard will fail. If your PC is working properly, then you should not chase the latest updates so as not to sacrifice performance.
Have you decided? Then go ahead! If possible, connect your PC to an uninterruptible power supply, and fully charge the battery on your laptop.
There are two main ways to update Gigabyte BIOS:
Method 1: Q-Flash
Q-Flash is a utility from the manufacturer Gigabyte built into the BIOS. “Firmware” with its help is a simple and understandable process, and the update can be carried out by an ordinary user who does not have deep knowledge of computer technology. If you have an older BIOS version that does not have Q-Flash, proceed to method No. 2.
We will analyze the update using the example of the Gigabyte GA-H110M-S2H motherboard:
- Go to Gigabyte official website.
- Click on the magnifying glass (search button) in the upper right corner of the screen.

- Enter the equipment model (in our case GA-H110M-S2H) and select a model from the drop-down list.

- Click on the link "Advantages", then click on "Support".

- Click on the button "BIOS", select the latest version and click on the download icon.

- Unpack the downloaded archive, from it you only need one firmware file, in this case it is "H110MS2H.F21".

- Copy this file to a flash drive, first save it in FAT32.
It is advisable that the flash drive only contains the firmware file!
- Restart the computer, after starting press the key "END" until the Q-Flash utility loads.
- Select an item "Update BIOS from Drive" and press "ENTER".

- From the drop-down list, select a flash drive, most likely its name will be “HDD 1-0” (depending on the number of media connected to your computer) and click "ENTER".
- Select the file with the firmware (if you listened to our advice in step 7, then there is only one and you won’t have to look for it) and click twice "ENTER".
- Wait until the update process completes and a completion message appears.
- Press any key and you will be taken to the initial menu. Next click "ESC" And "ENTER", after which the computer will reboot.
Method 2: @BIOS Utility
@BIOS Utility is a utility for Windows OS that can update the BIOS directly from the system. In order to use the @BIOS utility, you must first download and install the .Net Framework version 4.5 or higher and APP Center (an application from Gigabyte for making the most of the motherboard's capabilities).
- Follow the first four steps from method No. 1.
- Click on the button "Utilities", and then to the loading icon in the line with the phrase "APP Center".

- Unpack and install APP Center.
- Find the phrase in the table "@BIOS" and click on the download icon.

- Unpack and install @BIOS Utility.
- Launch the utility.
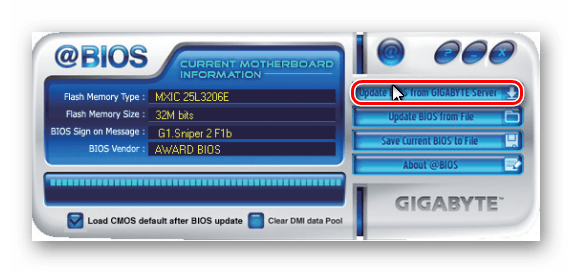
- Click on the button with the text "Update BIOS from GIGABYTE Server". The firmware file will be automatically downloaded and the program will update the BIOS.
When downloading the firmware, stable power supply to the computer and Internet connection must be provided!
- You can also use the firmware file downloaded manually in method No. 1, to do this, click "Update BIOS from File" and select the file.
- Wait for the update to complete and restart your computer.
In this article, we looked at two ways to update the Gigabyte BIOS. It turns out that there is nothing complicated about “reflashing”. The main thing to remember is that you must not allow a power outage or internet connection (if the second method is used).
Key Features
- displaying detailed information about the device’s central processor (parameters of voltage, frequency, cache, manufacturer, etc. are displayed);
- obtaining information about the important characteristics of RAM (type, frequency, manufacturer, etc.);
- graphics card overclocking function;
- displaying current information about the computer (temperature readings, voltage, etc.);
- five separate points to ensure efficient operation of the device.
Advantages and disadvantages
- separate operating modes for experienced users and beginners;
- You don't even need to go into the BIOS to perform operations.
- During installation, you must have a network connection, otherwise the program will not be updated to the latest version.
Analogs
SetFSB. A program for quickly overclocking a processor. It can adjust the FSB frequency. The application works with many motherboards. To work with it, you only need to know the PLL that is used by your device.
ASUS Ai Booster. Utility for overclocking boards from ASUS. It can also monitor almost all computer parameters and promptly solve problems that arise in the operation of the PC.
ClockGen. System overclocking program. It can change the frequency of the processor, buses, memory, and monitors OS parameters. It contains a Frequency Generator module, as well as tools that conduct detailed monitoring of the system.
Work principles
The main program window consists of six tabs.
The "CPU" is responsible for providing information to the central processing unit.
"Tuner" provides system overclocking.

"Smart" is intended to enable smart functions. For example, dynamic speed control.
In the “Monitoring” tab, you can view the current temperature of the chipset and processor, and fan speed.

Monitoring
The Graphics section displays information about the GPU.
In “Memory” you can view the memory status.
Three buttons can be used for overclocking – for minimum, medium and maximum overclocking.

To save changes, click the “Save” button, after which you must reboot the system.
To check the stability of your PC, you can run special tests in the application.
Gigabyte EasyTune will help you find out all the necessary information about the components of your PC and ensure its maximum performance by overclocking the board.
Let's look at how to properly update the Gigabyte BIOS on your computer or laptop. This procedure will optimize the system and eliminate any errors that may arise.
Gigabyte is a popular Taiwanese company that develops and produces hardware components for computers and laptops (motherboards, video cards, peripherals, cases, graphics accelerators and other products)
TodayGigabyteis the largest manufacturer of motherboards. The corporation's market share is 38% (according to 2017 data). Mainly boards are produced for processors fromIntel(75%), the rest are used in computers with processors fromAMD (25%).
To maintain normal processor operation and eliminate errors, the manufacturer recommends regularly updating the BIOS for boards from Gigabyte.
Let's take a closer look at how to prepare your computer for updating the system menu and how to select the desired firmware version.
Why update?BIOS?
BIOS is the main system menu of the computer. Translated, the abbreviation stands for “basic input-output system.”
Using BIOS, you can control your computer even if it does not have an operating system installed.
You can also view or change settings for hardware components.
BIOS is the built-in program of the motherboard, so this menu is available on all computers and laptops with processorsIntelAndAMD.
The system menu needs to be updated at least once every few months, as the developer regularly makes adjustments and new features.
This allows increase productivity computer without harming the board , eliminates possible bugs or errors.
Also, it is always easier to work with an updated BIOS version.
The old version's system menu is difficult to use for regular users.
New versions are much easier to interact with, and some firmware even support mouse control.
The following data is updated in the menu:
- Built-in drivers for interaction of connected components;
- Menu interface. The arrangement of tabs, design and appearance of the main menu may change from version to version;
- New features may be added;
- Improvement of the security system;
- Updating local networks;
- Other firmware.
New BIOS components are usually indicated by the manufacturer next to each firmware version:
It is necessary to update the BIOS if you have recently noticed low speed of your computer, problems have begun to appear. system errors or the PC turns off spontaneously.
Also, if you purchased a more powerful processor and the installed motherboard is compatible with it (the sockets are the same), for normal interaction of the components you will only need to update the BIOS.
Please note that most updates do not bring major changes. If you regularly install new system menu firmware, your computer will always work stably and you will not encounter problems with the board.
Preparing your computer
Installing a BIOS update is a fairly simple process that even a novice user can handle.
At the same time, it is necessary to be aware of all warnings and recommendations, since in any case there is a danger of disrupting the functioning of the system.
If you do everything according to the instructions, no problems will arise.
Remember:
- You can download BIOS updates only from the manufacturer’s official website gigabyte . com . Otherwise, you can damage the system with a virus or erroneous code, and only a specialist can roll back the update. Also, the board often comes with a disk with a program that automatically searches for the latest updates;
- It is not recommended to install beta or trial versions of the firmware;
- The firmware version must match your motherboard version. Failure to match these parameters will result in a fatal installation error;
A difference in at least one character between the model and firmware is unacceptable. The only exception is in cases where developers fromGigabyteare releasing a general update for the boards. For example, your PC uses a motherboard modelGA- B73- D3 A, and the update is suitable for devices in the seriesGA- B73- XXX. In this case, the update can be installed.
- Never download assemblies modified by other users , even if these installers contain new features or a changed interface;
- During the installation of the update, make sure that the laptop is connected to the power supply. . Losing the power source and shutting down the computer may cause the installation to fail;
- Before installing updates, you need to clean your PC hard drive from temporary files and other “garbage” . The drive must have sufficient free space (at least 1 GB). Also, the disk should not have bad sectors. If they are, defragment them.
Working with disk
1. To clean up your hard drive, go to the “This PC” window and right-click on the drive icon.
2. Select "Properties" from the drop-down list:
3. In the new window, click on “Disk Cleanup”:
4. Wait for the window with the list of parameters to be deleted to load.
Check the box for various temporary files, error data, reports, thumbnails, cache, trash contents. Click OK to complete the action. Removal may take a long time.
To carry out defragmentation (redistribution of sectors and the logical structure of the disk as a whole), go to the “Tools” tab of the “Disk Properties” window.
First, run a utility to check your disk for errors, and then run defragmentation.
All tasks will be completed automatically.
After working with the hard drive, restart your computer and proceed to update the BIOS.
View versionBIOS
Before downloading the firmware, you should find out what version of BIOS is installed on your computer.
You can do this as follows:
- Look in the instructions for the motherboard;
- If the documentation indicates only the general series of the board family, and not the exact model, or you do not have documentation, download and install the Everest utility;
- Launch the application and open the tab on the left side of the window "Motherboard" or "Motherboard";
- On the right side of the window, detailed information about the board will be indicated, in particular the version of the installed BIOS.
The firmware number is designated as a serial number or a set of numbers. For example,GIGABYTE GA- B73-1613 or simply 1613.
Firmware selection
Step 1. Remember or write down the current BIOS version of your computer.
Step 2. After that go to Gigabyte.ru and select your country or region. This is necessary to display information in your language. Next, you will be redirected to the official page of the site.
Step 3. The site menu is displayed at the top of the window. Go to the tab "Support". In the new window, click on the field "Select Product Category". Select from the list "Motherboard":
Step 4. In the new window, enter the socket number, chipset or board model. You can view this information in the Everest utility. Next, click on the search key and wait for a list of results with available updates to appear.
Step 5. A tab will open with detailed information about your motherboard. Open the “BIOS” item as shown in the figure below. A table with the latest updates will appear.
“Whatever you name the yacht, that’s how it will sail”
from the cartoon "The Adventures of Captain Vrungel"
The Taiwanese company GIGABYTE is rightfully considered one of the leaders in the global computer components market: its product range is extensive and the quality is high. GIGABYTE motherboards, which are presented in all price categories, are especially and deservedly popular. In the class of budget solutions, they combine good functionality with an optimal price. As their price increases, GIGABYTE motherboards, like Swiss army knives, include more and more features, reaching their apogee in flagship solutions. It is in the latter that all the intellectual power of the research department is manifested, which from year to year pleases us with new innovative moves. At the same time, GIGABYTE specialists do not forget to equip cheaper models with support for unique technologies and proprietary utilities, which undoubtedly enhances their competitiveness in the market.
But in the modern world, sometimes it is not enough just to develop a unique technology or create a convenient utility, since competitors tirelessly monitor the needs of the market, quickly improving their own products with similar or even better technical solutions. Therefore, you should also come up with a succinct and consonant name for the new technology or utility so that it reflects the essence of its work, is harmonious and does not violate copyright. And in this matter, GIGABYTE has something to be proud of. Such well-known names as: “3D Power”, “3D BIOS”, “Ultra Durable”, “On/off Charge”, “EasyTune”, “EZ Setup” and a number of others are already firmly associated in the minds of consumers with the motherboards of this company .
The list of supported technologies and available utilities for GIGABYTE products is constantly expanding (which is good news), but it is not always possible to quickly find help on a topic of interest (and in your native language). Therefore, we decided to collect in one review the current technologies and utilities that are used in modern GIGABYTE motherboards, give them a brief description, provide colorful screenshots - in a word, consider the fruits of the intellectual activity of the research department, which are generously dotted with GIGABYTE products.
Proprietary technologiesGIGABYTE
Let's start, perhaps, with technologies, and we will arrange them in alphabetical order for the convenience of finding what you need if needed.
This technology has practically lost its uniqueness, the peak of which was several years ago. But even now it can be found in the form of a logo on some GIGABYTE models.
The essence of the 333 Onboard Acceleration technology is the use of USB 3.0 and SATA 3.0 ports on the board, also known to us as SATA 6 Gb/s. GIGABYTE was one of the first to integrate these interfaces into its products, and at the moment they have already become a standard that is present even in entry-level models.
As you can see, the two digits “3” in the name of the technology give the versions of the ports used. The third “troika” is also provided by USB 3.0 ports, which are capable of delivering a current power 3 times higher than standard analogues (3 x Power Boost function). This ensures the most stable operation of connected peripheral devices, primarily portable storage devices, and faster charging of mobile gadgets.
This unique development combines hardware and software. It was first implemented in GIGABYTE motherboards based on the Intel X79 chipset, which are used to create high-performance systems. The hardware involves the use of three digital sliders to adjust the power parameters of the central processor and RAM. As you know, the Intel X79 chipset supports up to eight DIMM slots, which makes it possible to divide the load of servicing them equally between digital engines.
The use of GIGABYTE 3D Power technology ensures high stability of the processor power subsystem and RAM, and also gives owners an incredibly convenient and effective tool for monitoring the optimization potential of their motherboards. In particular, by increasing the “Load-line Calibration” and “PWM frequency” parameters in real time, they increase the performance of their systems. And when the second is lowered, the stability of work increases.
Also, GIGABYTE 3D Power technology allows you to install protection for the used RAM modules from short circuit current and overvoltage, which will protect them during overclocking experiments.
It is worth noting that in GIGABYTE Z77 series motherboards, 3D Power technology involves the use of four digital controllers for more accurate and reliable control of the voltage of the processor, integrated graphics core, RAM, and VTT parameter.
This technology is one of the key advantages of the GIGABYTE G1.Sniper 5 gaming motherboard. It provides an increased level of quality audio playback thanks to a complex of hardware and software components, which includes:
- modern multi-core audio processor Creative Sound Core3D;
- high-quality audio capacitors of the Nichicon MUSE ES and MW series;
- replaceable operational amplifier (you can use one of several available in the sales kit or buy any other compatible model);
- a special headphone amplifier, which is designed for loads up to 600 Ohms;
- shielding audio subsystem components on the PCB board from electromagnetic interference that can be created by other elements;
- gold-plated connectors for audio and video interfaces on the rear panel;
- efficient SoundBlaster and SBX ProStudio software.

The use of UEFI BIOS technology allows all motherboards to provide a more convenient interface for accessing BIOS settings with support for mouse control. It also ensures correct operation with drives larger than 2.2 TB. GIGABYTE has gone further and integrated a second BIOS chip into many models, which saves a backup copy of the settings and allows you to automatically restore the functionality of the main chip if it fails. This is the essence of the proprietary Dual UEFI BIOS technology, which has now become an integral part of the Ultra Durable concept.
Gaming Headphone Amplifier is another competitive advantage of GIGABYTE 8 Series solutions, which consists of the integration of a special headphone amplifier that is capable of providing high-quality operation of professional models with an impedance of up to 600 Ohms. This will allow gamers and audiophiles to experience all the subtleties and high quality sound of their favorite games or passages of musical compositions with minimal noise and distortion.

Gold Plated CPU Socket, DDR, PCI Express Slots and Solid Power Connectors
This is not a technology, but rather a feature of GIGABYTE motherboards based on Intel 8-series chipsets. It involves the use of gold-plated contacts in the processor socket, DIMM and PCI Express x16 slots, as well as in the main power connectors (24-pin ATX and 4/8-pin ATX12V). Gold is known to be one of the best conductors. This guarantees high stability of signal transmission over a long service life, regardless of the number of times the accompanying components (processor, video cards or RAM modules) are changed. GIGABYTE also mentions the higher anti-corrosion properties of gold-plated contacts.
It is worth adding that not all GIGABYTE 8 Series models use all four types of gold-plated contacts. This combination is inherent only in flagship solutions, and in other cases - one or a combination of several types, depending on the price class of the board.
HD or

This is also not the name of a specific technology, but a series of motherboards that combines solutions from different price segments (including budget) and from different platforms (Intel Maho Bay and AMD Virgo). All of them are united by the presence of two (DVI and HDMI) or three (DVI, HDMI, DisplayPort) digital video interfaces in addition to the standard analog D-Sub. This approach provides even entry-level models with the ability to transmit a higher-quality digital signal to the connected display. Users also have support for multi-screen configurations based on the integrated graphics core, higher-resolution monitors and 3D content playback.
High ESD Protection for USB and LAN
GIGABYTE 8 series motherboards boast support for this technology. It involves the use of a special filter that can protect the LAN (RJ45) and USB ports on the interface panel from electrostatic discharge. Moreover, thanks to this technology, GIGABYTE guarantees the integrity of the internal components of the user's computer in the event of a direct lightning strike on a part of the network equipment and the resulting electromagnetic pulse, which in normal cases would lead to the destruction of the network card / controller or even the entire computer.
This is a technology from Marvell that is used in some GIGABYTE motherboards. Provided that the Marvell SE9230 controller is used (to implement additional SATA 6 Gb/s ports on the board) and connected SSD and HDD drives, HyperDuo technology allows you to implement a hybrid mode of their operation. With it, the SSD drive is perceived by the system as a fast cache memory, where the most important (from a performance point of view) data is transferred, which leads to a significant increase in the productivity of the computer as a whole.

This is also not a proprietary technology from GIGABYTE, but it is actively used in its motherboards, so it deserves a place in this review. Lucid Universal MVP technology allows you to optimize the performance of the video subsystem. It can operate in two modes: Hyperformance and Switchable Graphics. The first allows you to combine the computing capabilities of the graphics core integrated into the processor with an installed discrete video card to increase performance levels. Lucid Universal MVP is unique in its support for any configuration of integrated and discrete GPUs from different manufacturers.
Switchable Graphics mode allows the system to select a source for processing graphic information depending on the load level, which helps achieve high energy efficiency of the video subsystem. Also, Lucid Universal MVP technology allows you to improve the image quality in games without losing performance thanks to the Virtual Vsync function.

It is a metal frame that allows you to install up to four large video cards on an open test bench and securely fasten them, which significantly reduces the risk of damage to PCI Express connectors and increases the quality of contact. The OC Brace frame will help overclockers securely install video accelerators with bulky cooling systems, including modified solutions based on liquid nitrogen.

Another technology of GIGABYTE 8 series motherboards, which is designed to simplify the work of overclockers and testers. It provides integration of two USB ports directly on the PCB near the SATA interfaces, which guarantees quick access to them. Thanks to this, you do not need to look for similar ports on the interface panel (especially if access to the back side is difficult for some reason), but immediately connect an external USB drive to write or read data, update BIOS settings, save information about successful configuration settings and etc.
A unique feature of some overclocking and high-performance models, which involves the use of two BIOS chips, a switch to activate one of them, and an LED indicator. Unlike Dual UEFI BIOS technology, OC-Dual BIOS is not intended for emergency recovery of the main microcode, but for the existence of two versions of BIOS settings, for example, standard and overclocker. In this case, the user can switch between them depending on current needs.
Another option for using OC-Dual BIOS technology is the ability to test new (especially beta version) BIOS firmware without erasing the main one, which is very convenient during system operation.
Technology for separate power supply of motherboard components, which is activated by pressing a special button on the PCB or interface panel. It allows continuous power supply to peripheral devices and system fans when the CPU power is turned off. This is necessary in some cases of diagnosing problems or at the stage of debugging the operation of a liquid cooling system. Also, OC Ignition technology will allow modders to demonstrate or test the fruits of their work without turning on the entire system.


This technology provides for the presence on the printed circuit board of two additional power connectors (usually SATA), which are used for more stable operation of configurations with three or four discrete video cards. In this case, each additional connector is connected to different 12V lines of the power supply (subject to their availability), which guarantees a more uniform load.
Using OC-PEG technology allows you to achieve higher optimization results even when using only one video card. It also avoids overcurrent loading on the primary 24-pin ATX connector in systems with multiple high-end graphics cards.
It is a series of specialized buttons and switches that are located on the PCB of some GIGABYTE models and provide users with quick access to particularly important functions.

The OC-Touch kit may include the following items:
- diagnostic LED indicator for displaying the error code that occurs, which greatly simplifies the procedure for detecting a malfunction;
- OC Turbo button, which allows you to load optimized profiles for overclocking;
- “+” and “-” buttons - provide the ability to change some key processor parameters (BCLK and CPU Ratio);
- a Settings Lock switch that automatically remembers the settings of previous successful sessions, even after the CMOS reset procedure;
- Clear CMOS button to clear CMOS memory settings without losing user-created profiles for various configurations;
- Reset Button, designed to reboot the system;
- Memory Safe button, which is used to load optimal DDR3 timings in order to eliminate problems associated with RAM module compatibility;
- Direct to BIOS (DTB) button - provides access to the BIOS Setup menu after rebooting the system without pressing the “Delete” key;
- OC Tag button for loading user settings from a preinstalled OC profile;
- OC PCIe switch, which allows you to selectively disable/enable power to PCI Express connectors;
- The OC Trigger switch instantly switches between two frequency values (low and extreme), which makes it possible to use the minimum frequency to guarantee loading of Windows OS and optimize system parameters, followed by switching to increased performance mode;
- BIOS switch provides the ability to compare different versions of BIOS settings to find optimal performance and troubleshoot problems;
- DualBIOS switch, which enables or disables the GIGABYTE DualBIOS feature.
Provides higher overclocking results by using the ability to optimize PWM controller parameters in real time.
This useful technology involves using each USB port on the interface panel with its own self-resetting fuse. Thus, when emergency situations occur, only one port fails, while the rest remain fully operational.
Provides the presence on the printed circuit board of a second 4-pin connector for connecting an additional processor fan (for example, when using high-performance cooler models with two turbines) or a water pump.
It is a logical continuation of the 3 x USB Power Boost function of the proprietary concept 333 Onboard Acceleration. It uses the unique developments of GIGABYTE specialists to increase the power of some USB ports (on the PCB of motherboards, these connectors are usually highlighted in red), which allows for 40% faster charging of connected Apple gadgets. Another undeniable advantage of GIGABYTE On/Off Charge technology is the ability to charge a connected device, even if the computer itself is in sleep mode or turned off by software (not disconnected from the power supply). Note that to activate it, you need to install a special driver, which is available on the official website of GIGABYTE.
It is an improved version of GIGABYTE On/Off Charge, the description of which already includes the possibility of using it not only with iOS devices, but also with Android tablets and smartphones, which significantly expands the range of compatible products.

This is the motherboard packaging concept of GIGABYTE, which was introduced in 2011. It involves the use of four comprehensive advantages, each of which is represented by a set of its own components and technologies:
- Super Safe - achieved by supporting One Fuse per USB Port, Dual UEFI BIOS and Japanese solid-state capacitors with a service life of at least 50,000 hours;
- Super Speed - ensured through the use of a special Overclocking IC chip (to optimize processor / memory / graphics parameters), Ultra Durable 2 concept and 3 x USB Power Boost and On/Off Charge technologies;
- Super Savings (Super-saving technologies) - comes from the use of high-quality element base of the Ultra Durable 2 concept, which can significantly increase the performance and energy efficiency of the system;
- Super Sound - manifested in the use of high-quality Realtek ALC889 audio codec, which provides a signal-to-noise ratio of 108 dB.
Ultra Durable
This technology first appeared in the motherboards of the Taiwanese company in 2006 and since then has become one of their integral attributes, combining more and more useful developments.

It assumed the use of exclusively Japanese solid-state capacitors with greater efficiency and a longer service life, as well as Dual UEFI BIOS technology (then just Dual BIOS).

Appeared in the 2007 model range and brought with it additional support:
- field-effect transistors with low channel resistance in the open state (Low RDS(on) MOSFET), which are characterized by minimal energy losses, lower operating temperatures and smaller sizes than standard analogues;
- chokes with a ferrite core, in which energy losses are reduced, the level of electromagnetic interference is significantly reduced and corrosion resistance is increased.

A less functional concept that involves the use of Japanese solid-state capacitors and field-effect transistors with reduced channel resistance.
AND Ultra Durable 3 Classic
Following a good tradition, these concepts retained all the developments of their predecessors and added support for twice as much copper in the power and grounding layers. This made it possible to reduce the impedance of the board, which at the same time reduced heat dissipation and optimized temperature conditions, improved optimization potential and higher system efficiency. The Ultra Durable 3 Classic version is distinguished by the lack of support for field-effect transistors with reduced channel resistance and chokes with a ferrite core.
It was introduced in 2011, but even now it can be found in some current GIGABYTE models for Intel and AMD platforms. In its description, marketers decided to move away from direct mention of the improved element base, and concentrated on the final benefits that users receive from this. As a result we have:
- Improved protection from moisture, which is achieved by using a fundamentally new glass fiber at the base of the board with better placement, reducing the distance between the fibers and making the weave tighter. Thus, it is much more difficult for moisture to penetrate into the inner layers, which provides more reliable protection of the product from short circuits and malfunctions caused by dampness.

- Electrostatic protection, the implementation of which is ensured through the use of high-quality microchips with higher electrostatic discharge (ESD) resistance than traditional components. This allows you to reliably protect key components, the motherboard and the PC as a whole from possible damage.

- Protection against voltage surges, which is implemented through the use of special microcircuits. This also implies the use of Dual UEFI BIOS technology.

- Protection against high temperatures, which became a reality thanks to the support of high-quality element base. It can withstand higher temperatures even in extreme conditions, providing reliable protection for your PC from overheating.

Introduced in 2012 and differs only in the additional use of double the amount of copper in the power and grounding layers of the components.
This concept debuted just recently with GIGABYTE's 8-series motherboards. It uses an updated description of benefits, which are now grouped into three bullet points:
- Ultra Cool - assumes a more efficient design of the passive cooling system for the chipset chip and processor power circuits. In some cases, the latest radiator will support the ability to connect to a liquid cooling system to further increase its efficiency, which will be required for significant optimization of key parameters (overclocking).
- Ultra Performance - is ensured through the use of high-quality field-effect transistors with reduced channel resistance, which help achieve higher performance when optimizing parameters.
- Ultra Safe - it hides support for Dual UEFI BIOS technology.
Note that in the description of motherboards with the Ultra Durable 4 Plus concept, solid-state capacitors are also mentioned, and on the support page for the technology itself there are icons for protection against humidity, voltage surges, temperature and electrostatic discharge. All this suggests the continuity of these options in the new concept.
Appeared last year in flagship models designed for overclocking. It retains all the advantages of the Ultra Durable 4 concept, adding support for digital PWM controllers and specialized International Rectifier PowIRstage voltage regulators. They are able to withstand a current of 60 A, providing continuous high-quality power to key system components. During operation, their temperature is 60° lower than that of standard field-effect transistors, which perform similar functions.
This is the most effective concept in GIGABYTE's arsenal, which combines time-tested and advanced technologies that are grouped into several key advantages:
- Ultra Cool - improved design of the chipset cooling system and processor power lines, which includes efficient radiators, fans (in some models) and the optional ability to connect a liquid cooling system;
- Ultra Performance - involves the use of digital PWM controllers and specialized International Rectifier PowIRstage voltage regulators for better power supply of key components;
- Ultra Safe - ensured by the use of Dual UEFI BIOS technology for higher protection of the main microcode of BIOS settings;
- Ultra USB3+ - guarantees support for a higher number of implemented USB 3.0 interfaces on the motherboard, as well as their protection using One Fuse per USB Port technology.
Also in the description of the exclusive features of the Ultra Durable 5 Plus, mention is made of support for high-quality solid-state capacitors Durable Black Solid, which can operate for 10,000 hours at a temperature of 105 ° C, technology for protecting USB and LAN ports from electrostatic discharge (High ESD Protection for USB and LAN), double the amount copper in the power and grounding layers, an increased amount of gold in the contacts of the processor socket (Gold Plated CPU Socket).
Branded utilities and softwareGIGABYTE
Now let's take a closer look at the utilities developed by the Taiwanese company's specialists for more convenient access to all the functionality of its motherboards.
It is a convenient utility with a simple and intuitive interface that allows you to obtain information about the vendor and the current BIOS firmware version, as well as the type and amount of available flash memory.
If the user wants to update the current version, then he has the opportunity to select the required official server to download the new one. If the new version was previously downloaded to the computer, then it is possible to indicate to the system its location on the drive. And, of course, there is a function to save the current settings to a file so that they can be restored later.
This is a unique BIOS settings environment, which is based on the use of UEFI technology. It can operate in two modes: Advanced and 3D BIOS. The first mode uses a familiar interface in which, using the mouse and keyboard, you can select the desired section and set the necessary parameters; fortunately, GIGABYTE has always left users with ample opportunities to fine-tune the system.

But the 3D BIOS mode is an original and unique look at how to make it easier for inexperienced users to configure system parameters. It displays on the screen a simplified 3D model of the motherboard in use with interactive elements. When you move the mouse cursor over them, they are highlighted in inverse color, and a small text hint is displayed on the screen indicating the name of the selected subsystem and the settings that are included in it. And when you click on the selected component, the corresponding menu opens with the ability to change the parameters specified in it.
This is a software part that works in tandem with the hardware technology of the same name. It greatly simplifies the configuration of three key aspects of power supply to the processor and memory: voltage, phase and frequency.
In voltage control mode, you can adjust the voltage parameters and calibrate the processor power circuits, with which you can avoid the effect of voltage sags by maintaining the voltage at the proper level, despite increasing current load levels. You can also adjust the surge protection to suit the required range of values for the processor, memory controller, VTT and RAM.
Phase control mode will help establish peak current protection for the processor, integrated memory controller, and system memory load levels. This allows the phase control system to provide better power supply when needed.
And by adjusting the operating frequency of the PWM controller, you can achieve the optimal speed of power supply to the processor. Thus, the user has at his disposal a functional and convenient tool for fine-tuning the operation of the power subsystem of key components.
This is a useful utility that provides quick access to a number of other software tools: @BIOS, USB Blocker, EasyTune, EZ Setup and Live Update.
As can be seen from the screenshot presented, it uses a pleasant interface, allowing you to activate the necessary program at any time.
The EasyTune utility is an incredibly functional and useful tool that will be useful to overclockers and ordinary users. It allows:
- collect basic information about the system, including: processor type and main parameters, motherboard model, BIOS settings version, RAM type and parameters, voltages on key lines and components, as well as current temperatures of the main components;
- configure the emergency notification system by setting the scanning interval and setting the temperature limits of the processor or system, as well as the rotation speed of the installed fans;
- configure power supply parameters to the processor and memory, including: voltage, number of phases and frequencies.
- viewing all available information about the system;
- fine-tuning key parameters;
- personalization of the graphical interface - from setting a new background image to creating your own tab with the necessary settings;
- automatic opening of a certain tab with settings when the BIOS settings are subsequently displayed (for example, if you are experimenting with memory timings, it is convenient for the system to automatically open the desired tab for you every time you reboot);
- changes in key parameters, which in real time modifies the operation of the corresponding components without the need to reboot the system for them to take effect.

This is an incredibly simple, but at the same time very useful utility for those who plan to use technologies: Intel Smart Response, Intel Rapid Start, Intel Smart Connect, or RAID mode for multiple drives. To independently activate and correctly configure these technologies, you need prior experience or a desire to “bravely surf the Internet” for a certain time (depending on the level of the user) in search of the necessary information, simultaneously looking for answers to system error messages that often arise in such cases.
And owners of GIGABYTE motherboards can perform all these operations in a few mouse clicks, and the system will automatically install the specified components and configure all the parameters necessary for this. The user will only need to restart the computer after all operations are completed. Everything is very simple, clear and convenient!
The utility is designed for those models of GIGABYTE motherboards that use the Realtek 8111E gigabit network controller or a newer version. It allows you to manage network resources by selecting one of the preset priority modes (Game, Streaming, Browsing, Automatic) or manually setting priorities for the corresponding programs. It is also possible to block a specific program from accessing network resources.


A useful utility that monitors available updates for drivers or other installed programs, allowing you to quickly update them without leaving the utility environment. Thus, the user is always aware of the availability of a new version of a certain component, and a simple and user-friendly interface allows you to quickly download and update it.
This is a software component of a new version of the technology of the same name, which allows you to activate fast charging mode for an iOS or Android device connected to a special USB port. This will speed up its charging by 40%, even if the computer itself eventually goes into sleep mode or is turned off by software.

Allows you to recover accidentally or intentionally deleted files from the system. Smart Recovery 2 will also help you create a backup copy of a system image or restore a separate file / entire system from a previously saved image. Therefore, having installed the operating system and all the necessary drivers and programs, you can save this image so that in the event of a virus or unintentional user errors during operation, you can quickly restore the functionality of the entire system or individual components.

This is a useful utility for parents who want to prevent their children from sitting all day in front of a monitor screen. Also, its capabilities can be used by companies or educational institutions that do not want their computers to be used at odd hours.

It provides a very convenient menu, which is divided into two parts: Weekdays and Weekends. In each of them, you can specify the maximum possible operating time of the computer (in hours), and also set the boundaries of the interval in which access to the computer will be automatically blocked (for example, from 22:00 to 7:00).
UEFI DualBIOS with Dashboard mode
This is a completely new graphical BIOS settings interface that provides the user with the ability to:
It is a useful utility that can restrict access to the system for certain types of USB devices. The possibilities of its application are quite wide. For example, you can prevent USB flash drives from being connected to the system to prevent the transmission of viruses or copying of information from the computer. In this case, all USB ports in the system will work properly with printers, communication class and other devices, but will not detect connected flash drives.

When setting a certain status, the computer administrator enters a password, so an ordinary user will not be able to change it independently without knowing this password.

This utility allows you to select for automatic installation the necessary drivers, utilities and related software components for installation on a new system. Near each component the necessary information is displayed: version, size in megabytes, short information about the functional purpose, a button to activate the installation process in the system and status (installed or not yet).
When preparing the review, information was used from the official website of GIGABYTE.
Article read 21826 times
| Subscribe to our channels | |||||
Many people wonder how to flash the BIOS, but after reading forums and abstruse articles, they think that it’s so difficult - it’s not even worth trying. Is it really? Oddly enough, updating or reinstalling the BIOS firmware is quite simple, provided that it starts for you. Otherwise, only go to the service and there are no options.
First, let's look at why we need to flash the BIOS? And to ensure that the BIOS firmware, like any software, is periodically updated by the developers, corrections and additions are made, and improvements in operation. For example, when I bought the GIGABYTE GA-B75-D3H motherboard, it had the F3 BIOS version installed, but now F15 is already available.
I should immediately note that these methods are available for motherboards from other manufacturers, be it Asus or something else. Both on laptops and desktop computers. I’ll give an example using the popular GIGABYTE.
When firmware may be needed:
- BIOS does not always see the USB flash drive. If everything is fine with the flash drive and you tried inserting it into different ports, then 90% of the time it’s the BIOS that’s buggy.
- Every other time he goes into the Bios settings. When you press the settings key, the download continues.
- There is a long list of available bootloaders, but in reality there are none. During installation, many systems create an entry in the BIOS, which can be easily removed using third-party programs from Windows, but in other systems, you cannot do without special knowledge and tambourines. Reflashing is the easiest way. By the way, this fact entails the next point...
- When you turn on the computer after BIOS, the screen is illuminated in black and gray, the operating system does not automatically load. Loads only when you force the drive to be selected from the BOOT MENU.
- Every other time the BOOT MENU is called. When you press the hotkey, the BOOT MENU does not enter, the download continues. If everything is fine with the keyboard, then 99% of the time the BIOS is stuck.
- Easy firmware update to a newer version.
Methods for flashing BIOS GIGABYTE
There are two ways to update and flash the GIGABYTE BIOS:
- Via Windows. Using the free @Bios utility that comes with the motherboard on disk. If there is no disk, then go to the official GIGABYTE website, look for our motherboard model, go to SUPPORT, and download the utility. It is important to choose the version that suits your system so that it can be installed on Windows. If the version is not compatible you will receive an error.
- Using a USB flash drive. This method is suitable for computers that do not have Windows installed. And incompatible systems are installed, for example Mac OS X (Hackintosh) - this trend has been gaining popularity lately, or Linux, and maybe other operating systems. In this method, we still need Windows, but only to unpack the self-extracting archive with the .EXE extension.
Firmware using @Bios utility
This is what the @BIOS GIGABYTE utility for Windows looks like, the interface may be slightly different, but it’s not the interface that’s important to us, but the menu items on the right.
Save Current BIOS to File— Save the current BIOS firmware to a file. It was not for nothing that I started from this point. Before making changes to the BIOS, be sure to save the current firmware to a USB flash drive, so that in the event of a failure, you can restore the data. You never know what might happen: the light will blink, Windows will go dark, and the like.
Update BIOS from GIGABYTE Server- the easiest way to flash and update the firmware, but you definitely need access to the Internet from this computer. In this case, the firmware will be downloaded and installed automatically from Gigabyte servers, you will only need to select a region from the list Asia, China, America, Europe, Europe (Russia) - I think there will be no difficulties with this. After selecting, confirm the action and wait for completion. After which, for the changes to take effect, we reboot, and do not forget to reconfigure the BIOS, because all settings after the firmware are reset to default.
Update BIOS from File. Completing this step does not require constant computer access to the Internet, but we will still need it, no matter what device, in order to download the firmware file. So, let's go to the website http://www.gigabyte.com/Support/Motherboard, so as not to spend too much time searching - we enter the motherboard model into the search from above.

We choose our version. press ENTER. On the page with various modifications, select ours and in the menu on the right, immediately click BIOS.  We select the operating system, but for our method this is not important, since we already have the utility running. If it weren’t for this, we would have chosen the appropriate version of Windows and downloaded it with it. In any case, they are downloaded with the utility, whatever one may say.

Click on the region we need and download the .EXE file. We launch it, it unpacks and 3 files are available.

Click Update BIOS from File and specify the file with the firmware, in my case it is B75MD3H.F15, in yours it will correspond to your model and BIOS version. We confirm the action and reboot after completion. Setting up an updated BIOS.
Firmware via BIOS using Q - Flash
For this method, the operating system on the computer is not important to us; it is important to us that the BIOS starts and enters the settings. Let's move on to execution.
Just like in the previous method, go to the manufacturer’s website and download the firmware. We unpack it in Windows, on any available computer or laptop, the firmware file B75MD3H.F15 in my case, in yours it will correspond to your model and BIOS version - we transfer it to a USB flash drive.
When loading, press DEL to get into the settings. Perhaps, depending on the motherboard model, the keys for entering settings and calling Q-Flash will be slightly different, but the essence does not change.

In my BIOS, the Q-Flash is called by F8, on the Z chipset, if I’m not mistaken, F12, but you will see this yourself in the right menu in Bios. Confirm your login to Q-Flash. And then everything is the same as in the previous method.
- Click Save Current BIOS to File, choose where to save it, to a flash drive or hard drive. Enter the name and save.
- Click Update BIOS from File, select our flash drive from the list. We specify the firmware file and confirm the action. Once finished, the computer will reboot. In some cases, after a reboot, it starts and turns off almost immediately. But after a couple of seconds it starts in full. We are not afraid of this moment, this is how it should be - this is not a glitch.
- Setting up an updated BIOS.
As you can understand, BIOS firmware is not such a complicated thing and anyone can handle it. But you shouldn’t rewrite the firmware very often. Frequent repetition of this procedure can lead to failure of the BIOS chip, since it is essentially the same flash drive, which has a limited rewriting resource.