How to set the page number. How to number all pages except the first one in Word? Visual numbering setup
Do you want to know how to consistently earn money online from 500 rubles a day?
Download my free book
=>>
I have already written more than once how much I like working in Word. I create almost all my documents in this program and only then convert them into the format I need.
There are already quite a few articles on my blog in which I reveal the capabilities of Word.
For those interested, here are a few articles of this kind:
And today I will continue to tell you about Word. And the topic of our lesson is how to put page numbers in Word 2010 not from the first page.
So, you can number pages in the Word text editor quite quickly, automatically. It is enough to note the appropriate settings, which I will discuss in detail below.
But what to do in a situation where you need to number the pages without affecting the first one? Let me tell you everything in order.
How to number pages in Word
To number pages, go to the “tab” section. Find the subsection in the top menu - headers and footers. Click on the sheet icon with a hash mark and the signature - page number.
You have to make a choice about where the page numbers will appear. That is, decide what your footer will look like.

After these simple steps, all pages of your document will automatically be numbered from one to the end.
Numbering from the second sheet
In the case when numbering is needed from the second sheet, we proceed as follows:
Go to the first sheet and go to the “designer” section. Here you should select a special header and footer for the first sheet.

After your selection, there will be no digital indication (numbering) on the first sheet.
However, the page numbering on the next sheet will begin with the number 2. That is, in this way we will simply hide the number on the first sheet.
When you need to start numbering from the second sheet, but from the number 1, you should set one more setting. Find the icon - page numbers, which I wrote about above.
Click on it once and click on the line responsible for the format of page numbers. As you understand, all numbering starts from one. And if we specify to start numbering from zero, then the second sheet will have the number 1.

As you remember, on the first page we closed the display of the number and our zero will not be visible.
Thus, the page numbering will begin from the second sheet, from the number one. That's what needed to be done.
How to start numbering from page 3
Sometimes there are situations when numbers on the main page and the second page, with the contents, cannot be placed. What to do in this case? Don't be upset, there is a way out.
Not everyone knows that when pages break, each subsequent page becomes the first page of the next section. That is, you can apply a special footer to it for the first page. So we will take advantage of this opportunity.
Instructions:

After that, mark a special header and footer on the first and second pages. The numbering will only be visible from the third page. That's what we needed to get.
P.S. I am attaching a screenshot of my earnings in affiliate programs. And I remind you that anyone can earn money this way, even a beginner! The main thing is to do it correctly, which means learning from those who are already making money, that is, from Internet business professionals.
Get a list of proven Affiliate Programs in 2017 that pay money!
Download the checklist and valuable bonuses for free
=>> “The best affiliate programs of 2018”


All the best to everyone!
One of the most popular programs for working with documents, for which people have bought, are buying and will continue to buy computers, is, of course, Microsoft Word! The program is already more than 2 decades old, but it has not lost its relevance, and is now considered almost a basic program on a PC - without it it’s both wrong and wrong...
Many actions in Word are performed quite simply and intuitively. But some of them are not so obvious, and I get asked questions about them quite often. This is how, in fact, such an article was born...
Purpose of this article: not to teach how to work in Word, not to show everything that can be done in it, but to answer the most popular questions that arise for any unprepared user who starts making, for example, a report, essay, diploma and any other document.
Advice! Many people are in no hurry to update Word - meanwhile, in the new version, as a rule, most actions are done much faster than in the previous one (there are many new and convenient tools that make everyday work easier). Errors and shortcomings have also been fixed. Moreover, in the new version you will be able to open documents with more progressive markup, while in the old version something may go wrong and you will have to “fix” it. In general, my message is - try to work in the new version of Word...
Note: all screenshots and descriptions of the lessons below are made using Word 2016, as the newest one today. If you have Word 2014, 2010, 2007, almost all actions will be performed in the same way. Word 2003 and Word XP are a completely different aspect, you are unlikely to find any tips on them here...
Sorted in order of most frequently asked questions (at my discretion)
How to number pages (except first/second)
In general, inserting pages in itself is not difficult. Usually, problems are created when you need to number from a specific page, for example, from the 2nd, 3rd, etc. Let's try to solve them...
To add page numbers in Word, you need:
- go to section "Insert" ;
- choose "Page number" ;
- choose page number format: top, bottom, center, left/right. Here, in general, I don’t give any recommendations - choose the option you need;
- in fact, after the selected option, all your pages will be numbered.

How to number pages from 2, 3, etc./How to use Roman numerals
First, you need to double-click on the page number with the left mouse button: a link should appear at the top of the window: "Working with headers and footers" . Once you open it, open it "Page Standard/Page Number Format" . On the screen below - see arrows 1, 2, 3, 4.


How to remove numbering from the first page
To remove the page number on the first sheet, you must:
- double-click on the page number with the left mouse button;
- then open the tab "Working with headers and footers"(it should appear after your clicks);
- then open the tab "Options";
- tick (see screenshot below, arrows 1, 2, 3, 4).

How to remove numbering from the 2nd, 3rd sheet (etc.)
This method is suitable for numbering from any page, and for skipping any number of sheets. In general, first decide which page you want to insert the numbers from.
1) Let's say, if you want to insert numbers from the third page, then go to the second and place the cursor after the last character on it (arrow-1 in the screenshot below). Then open the section Layout, Breaks, Next Page(see screenshot below).

3) Then click 2 times with the left mouse button on the third page number, open the section "Working with headers and footers"(will appear at the top), and uncheck connections with the previous section(see screenshot below).

4) Now you can safely go to the second page, select the header and footer and delete it (Delete button). Now you will have numbering starting from the third sheet, and the first two will be blank. That's basically it!
How to put a degree
Degree is usually understood as superscript text. Quite often needed in various formulas, tolerances, etc.
Let's say you want to write the number 35 to the power of 2. Then you need to write the number 352, then highlight the number 2. Then open the "Home" tab and select the icon with X2- . The degree will be delivered, the task will be completed!

Statement of degree
More opportunities can be obtained by selecting the desired text (the same “2”), and pressing the button combination, and then you can specify "Superscript" (degree), "subscript", strikethrough text, etc.

How to write a formula
By the way, since we are talking about degrees, I think it’s right to say a few words about formulas. It is much more effective and correct to set formulas not in text (as many do), but through a special formula editor: they look better, and nothing will go anywhere when you further edit the text.
To insert the formula, you need:
- open section "Insert";
- then click on "Symbols" and choose "The equation"(as in the screenshot below).

After that, left-click on "room for the equation", open "Working with the equation", and write the formula. In general, the writing process itself is easy: just choose what you want to add fractions, sines, cosines and add numerical values.
My formula is written!

How to make a line
By this term, different users understand everything differently (I apologize for the tautology). However, here are a few ways to draw a line in a document.
Method 1 - dash
Just press the dash (minus) button several times and a dotted line will appear in Word. If you hold down the button Shift+dash- then you will see an underscore - the same straight line (see screenshot below).
Method 2 - underline text
To do this, just select the desired text, then open the "Home" tab, and select the icon "h".

3 way - across borders
Open section "home", then click on the borders icon - and you can select the desired line: bottom border, top, left, right, etc.

Method 4 - inserting an arbitrary line
And, lastly, probably the most universal - inserting an arbitrary straight line, which can be drawn in any way you like!
To do this, open the section "Insert", then click the button "Shapes" and select a tool "Line". Next, draw a random line on the page.

How to create a bibliography
Most novice users create a bibliography manually. While Word has a special tool that seriously makes life easier and speeds up the process of working with a document.
Let's try to create an automatic (and convenient) list of references. For this:
- open the section "Links";
- then click on "Bibliography";
- insert "Bibliography"(see screenshot below).

Your list of references will be empty for now, so we have not made any references to it.
- place the cursor in the place where there will be a link to the list of references;
- open section "links";
- press "Insert link";
- next select "Add new source". You will then be asked to provide the book's author, source, website address, etc. Basically, fill it out as required.

Once the links are in place, simply go to the bibliography and click on it "Updating references and bibliography" - all your links will be placed automatically! In general, a very convenient and fast tool, I recommend it!

How to make footnotes
- this is special. a tool that allows, for example, to decipher complex terms or explain a paragraph. As a rule, a small number will be shown at the end of the sentence/paragraph, and a transcript will be given at the bottom of the page. In general, such footnotes make the page easier to read and understand; I recommend that you always include them when there is any doubt whether you will be understood.
To insert a footnote:
- place the cursor in the place where the footnote number will be;
- open the section "Links";
- then click the button "Insert Footnote".

Actually, all you have to do is write the explanatory text at the bottom of the page. The screenshot below shows what a typical footnote looks like.

How to make a page frame
A page frame will help you design your document more beautifully and clearly (besides, sometimes there are special requirements when it is simply necessary).
To insert a frame: open the section "Design" and then click the button "Page Borders" .

- First select the frame type. In principle, for most tasks, the default frames in Word are sufficient (see arrow-1 in the screenshot below);
- then indicate the type of frame: for example, solid or dotted;
- then specify the color, line width, design;
- last - set whether to apply the frame to the entire document or to a separate section of it (if you need a frame for only one page/section, use the “Page Break” tool, similar to setting page numbers, see point 1 in this article);
- Click OK - and the frame will be ready!

An example of a finished frame is shown in the screenshot below.
How to make a table of contents
From my own experience, I can say that most users do it manually, and then add pages and are tormented that if the page has changed, they need to change and edit the entire table of contents. While in Word there is automatic table of contents, which frees your hands.
And this is how to insert a table of contents:
- open the section "Links" ;
- then click on "table of contents/automatic table of contents" . I recommend working with automatic, because... it's easier and faster.

When all the headings in the document are arranged, just click on the table of contents "Update table" - all pages will be added automatically! This way you can edit the entire document multiple times, change headings/subheadings, and at the end, click again "Update table" - and all your pages are relevant again!

Note: by holding the Ctrl key and hovering the mouse over the desired subheading on the page, you can automatically go directly to the desired page of the document. This is another advantage of creating a table of contents this way (there will be quick links to jump to any part of the document).
How to make a landscape sheet (a separate sheet in a document)
Quite often, a sheet in Word needs to be placed not vertically (portrait page), but vertically (landscape orientation).
To make the sheet landscape orientation: open the section "Layout", then click on "Orientation/Landscape"(see screenshot below).

In general, your sheet will turn and become horizontal.
Quite often, it is not necessary to make all the sheets in a document landscape, but only some of them. To do this you need to use special. tool "Page Break" (in the "Layout" section).

After the page break is set, you can rotate the next page and make it landscape, while the previous page remains in portrait orientation (see screenshot below).

How to make a paragraph (red line)
Method No. 1
The easiest and fastest way to indent (red line) is to press the key TAB.
Method No. 2
It is more effective to use another method - using rulers. This tool will allow you to adjust the exact size of the indentation (note: when preparing different documents, the requirements may be different).
To enable the ruler tool, go to the section "View" .

Then place the cursor before the first character of the line you want to move (i.e. where you want the red line). Then, on the ruler, pull the top slider - the text will automatically move.

Red line
And one more thing, if you want to adjust the exact indentation in centimeters: select the paragraph, then right-click - select from the pop-up menu "Paragraph..." .

How to write text vertically
Vertical text in Word can be written in several ways. I'll give you a couple of them that I use quite often.
Method No. 1 - inserting a block of text
First, place the cursor at the place on the page where you want to insert a text block. Next, open the section "Insert", press "Test field/simple text" .

Then you can easily use the rotate icon to rotate the text field to any position: vertically, horizontally, at any angle...

Method number 2 - using a table
First, we insert a table - it can consist of one column and a row.
Note: to insert a table, open the "Insert" section, then select "Table", and specify the number of columns and rows (I recommend 1 - if you just need to write text vertically).

Then select text direction and click OK. The text in the cell will become vertical - the problem is solved (see screenshot below).
How to write Roman numerals
In general, Roman numerals are not needed very often. But if you are a historian, or doing work on history, then you may well need it. I'll look at a couple of ways...
Method No. 1
I won't be original, just use Latin characters on your keyboard: I, V, X.
Method No. 2
It’s much more interesting if you need to get a specific number - shouldn’t you calculate it manually?!
To do this, press the button combination Ctrl+F9, then two brackets will appear {} .
Between these brackets you need to write something like (=2017\* Roman)(Where 2017 is the number you want to get in the Roman count).
After you have written the formula, press the F9 button - and the problem will be solved!

How to make a diagram
In my opinion, it is much more convenient to build a diagram in Excel and then insert it into Word (although many people immediately do it in Word).
And so, to insert a diagram into Word, you need:


Once you select the chart type, a small Excel window will open asking you to enter numbers. Enter the required numbers, your diagram will change depending on them. In general, a convenient and visual representation of any dependencies, calculations, indicators, etc.
Filling out the chart with numbers for a visual representation
To be continued...
Often, when writing long materials in Word, you need to quickly number pages. For diplomas, abstracts, books, articles. In this article you will learn how to automatically number pages in the Microsoft Word text editor. How to number from the first, second or third sheet, and exclude some pages.
I have itWord 2016. Also tested in versions 2007 and 2010.In other versions, the interface is slightly different, but the actions are very similar.
Numbering from the first page
Let's start with the standard task - number all pages in order, without exception.
In the top panel in Word, select the “Insert” tab → “Page Number” → “Page Number”.
A window will appear allowing you to choose where to display the number (top or bottom) and alignment. Some versions will instead have a drop-down window to select a footer template.

Changing the numbering format
When setting numbering, there is a “Format” button. With its help you can change the display and numbering order. For example, make numbering in letters, Roman numerals, start counting numbering from an arbitrary number.

Double clicking on the page number opens the footer designer. You can also change the format using the Page Number button.

Numbering from the second page
To avoid putting the first page number, follow the steps from the previous paragraph: on the insert tab, click “Page Number” and in the window that appears, uncheck the “Number on the first page” checkbox.

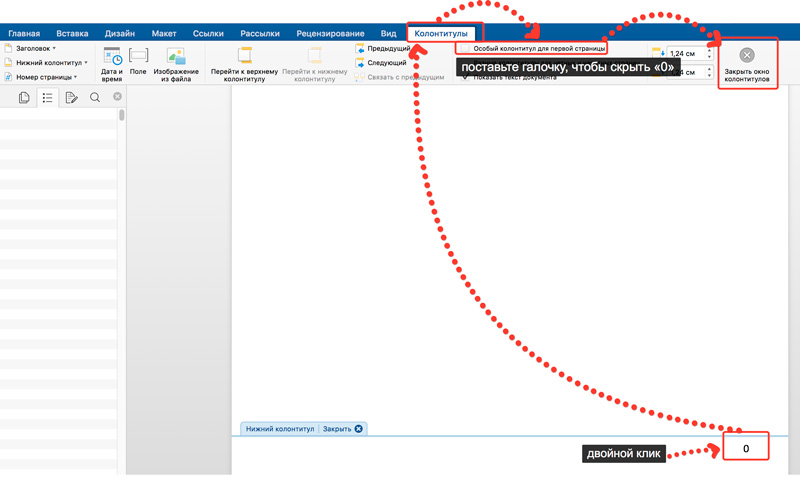
A similar result can be obtained by double-clicking on the numbering, and on the tab that opens with the header and footer designer, click the “Special header and footer for the first page” checkbox.
The countdown starts from the first page, but the number will not be displayed on it.
To exit the header and footer designer, its tab has a special button: “Close header and footer window.”
Change starting digit
If you need to start counting from the second page from the number 1, you need to set 0 as the starting number. To do this, double-click on the page number, in the tab that appears, open “Page number” → “Page number format” → “Start from” → specify 0.

At the same time, do not forget to click the “Special footer for the first page” checkbox so that the zero is not shown.
If you want to start numbering from 3, 4, 5 or another page other than the second, you won’t be able to simply add a special header and footer; it only works for the first page. In such cases, go to the first page, place the cursor on the last line of the first page and click on the Layout tab → Breaks → Next Page.

Then double-click on the number of this page and check the box “Special footer for the first page” (as in the previous paragraphs). Repeat this step for each page that does not need a number.

Using the “Numbering Format”, specify the number from which to start counting. As a result, you can make sure that there are no numberings on the first five pages, and then on the sixth the countdown starts from 1 or 6.
Exclude pages from numbering
You can ignore some pages in the numbering, that is, skip them.

After you have numbered, click on the bottom line on the page you want to exclude. On the Layout tab, click Breaks → Next Page. After this action, there will be one number on this and the next page. Now you can hide one of the numbers: double-click on it and click the “Special footer” checkbox.
As you can see, Word has very flexible page numbering settings. You can enter numbers in just a minute.
Video on page numbering in Word 2010:
In the process of writing an essay, diploma or book, we all use the text editor for Microsoft Word documents. Proper formatting should generally include page numbering within the document. Many people have difficulties and do not know how to number pages in Word, although it is quite simple to do.
This article describes in detail how to number pages in Word, choose the numbering location, format, and also exclude numbering of any document page.
Page numbering in Word 2007, 2010, 2013 and 2016
In all versions older than Word 2003, numbering is the same. The screenshots below are based on Word 2017, but they will also work for older versions.
To add numbering in an open document, go to the “Insert” tab. In the “Header and Footer” section, click “Page Number” and select a numbering position. In the screenshot below, I have chosen the footer location with centered placement.
After this action, numbering will appear at the end of each page, as well as displaying a header and footer. To close the display of headers and footers, click the “Close Header and Footers Window” button.
If desired, you can change the numbering format, for example, by making the numbers not Arabic, but Roman. To do this, again go to the “Insert” tab and in the “Page Numbers” item open “Page Number Format”.
Here you can choose the appearance, as well as which number the numbering will begin with. Why this may be required you will find out in the next paragraph.

Removing numbering from the title page
In most educational institutions, one of the requirements for document formatting is the absence of numbering on the title (first) page. If you simply enable page numbering, as shown above, then the numbering will be on the first sheet. To start numbering from the first page, but not display it on the title page, you must do the following.
Go to the “Layout” tab and click on the “Page Setup” link, as shown in the picture below.
Go to the “Paper Sources” tab and check the “Distinguish between first page headers and footers” checkbox. After that, click OK.

Now numbering is carried out as before, but its number is not displayed on the first page, in our case number 1.
When you want the numbering not to be displayed on the first page (title page), but on the second so that it starts with the number 1, you need to set the numbering from 0 in the menu “Insert” - “Page Number” - “Page Number Format”. the first page will start with number 0 without display, and the second page will start with number 1, the third page with number 2 and so on.
Numbering from the third page
Let's complicate the task a little. We need the numbering to be present, but not displayed on the first and second pages. After all, the first page is usually the title page, the second can be a table of contents, where numbering is also not required.
To number from the third page you will need to do an operation called “Page Break”. First, return all numbering settings to default if you have hidden the numbering display on the cover page. Let's assume that you currently have numbering enabled from the first page and the number 1 is displayed on the title page, the number 2 on the second page, and so on.
For convenience, turn on the display of all characters in Word. To do this, on the “Home” tab, click on the “Display all signs” button.
Now that you have all the characters in your documents displayed, including spaces and empty lines, left-click on the last character on the first page of the document. Then on the “Layout” tab, click “Breaks” - “Next Page”.
Do the same steps with the second page of the document. If you did everything correctly, then the enabled display of all characters function will show you break lines at the end of the first and second pages. In the picture below they are shown with red arrows.
Now the third page is numbered 1. If you want it to be numbered 3, then in the menu “Insert” - “Page Number” - “Page Number Format” set the value to “Start from 3”.
There is only one problem left, on the first two pages we have page numbers displayed. To remove them, select the first page, go to the “Layout” tab - “Page Options”. Next, in the “Paper Source” tab, check the box next to “Distinguish between first page headers and footers.”
Do the same on the next page of your document.
Thus, we were able to make sure that the numbering on the first two pages was not displayed and started from the third, and from the number we wanted.
By the way, this method with a break allows you to start numbering not only from the third page, but from absolutely any one.
To remove numbering, double-click on any page number and press the DEL key. All numbers will be removed from the document.
Page numbering in Word 2003
There are still quite a few people who use the outdated Word 2003. In it, page numbering is done in a slightly different order than for newer versions of the program.
In the open Word 2003 file, click on the top menu “Insert” - “Page Numbers”.

Set the position of the numbers (for example, at the bottom of the page) and alignment (for example, to the right). By unchecking the “Number on the first page” item, you can disable numbering on the title page of the document.

Click on the "Format" button. Specify the numbering format (for example, Roman numerals), and also specify which digit to start page numbering with.

After making changes, click OK and all pages will become numbered.

To number from the third or any other page in Word 2003, first turn on the display of all characters. After that, move the cursor to the last character on the first page and click “Insert” - “Page Break” in the horizontal menu. Do the same on the second one. From now on, numbering will start from the third page.
Page numbering is an important thing in any text document, especially if it is large. The page number is a kind of navigator throughout the text document. In this article you will learn how to create page numbers in Microsoft Word 2010.
Setting numbering in Microsoft Word 2010
So, in order to put page numbers in a Word document, just go to the “ Insert" and in the section " Headers and footers» click on the button « Page number«.
Creating page numbers in Word 2010
After this, a menu will open in which you can select the location of page numbers on the sheets of the document.
By clicking on the desired option, you will see that page numbering has been inserted into the footer of the document.

Numbered pages in Word 2010
If you need to start it not from the 1st sheet, then just go to the tab “ Insert" and in the section " Headers and footers» click on the button « Page number«.

Changing page numbers
In the menu that opens, select “ Page number format«.
At the very bottom, set the switch to “ Begin with" and indicate the number.