Installation from external HDD. Installing Windows on an external USB hard drive Installing Windows 7 on an external USB hdd
Many users of the Windows operating system have wondered: is it possible to install it on removable media, including an external hard drive? There are several reasons for such a step, for example, an installed OS on removable media will allow you to easily restore the OS if it stops starting. For the Linux kernel, this issue has long been resolved, and few people do not know about such things as Live CDs, which allow you to check the hard drive for viruses before starting the installed OS, perform various operations with the hard drive (setting sizes, formatting, etc.) d.). However, Windows and an external USB hard drive have been incompatible concepts until recently. Now this issue can already be resolved, but only by performing certain actions, because there is no special version of Windows for hard drives.
If in Linux the installation problem is thoroughly solved and everything is done using standard tools without any difficulties, certain problems may arise with Windows:
- The OS will inform you that installation on removable media, as well as startup, cannot be carried out;
- Windows does not support virtual hard disks;
- When trying to start Windows from removable media, a BSoD (blue screen of death) error appears.
An unofficial way to install Windows on a hard drive
Some experts independently decided to study and find possible solutions for such installation of Windows on removable media. It must be said right away that with such an installation, the read and write speeds will not be high due to the rather low bandwidth of the USB bus. But if you consider that this installation is necessary for solving certain problems, and not for full-fledged work, this drawback is not so significant.
Before you begin installation, you need to have:
- external hard drive or flash drive, the volume of which must be at least 8 Gb;
- installation file of one of the virtual machines, for example, VMWare Player;
- OS image Windows7 maximum, or corporate. They support virtual machines, but other editions do not have this feature (you can use other OS modifications, but in this case you will have to install on a physical disk without using a virtual machine);
- Native VHD boot utility to properly configure the virtual machine.
Installing Windows on an external hard drive
First of all, you need to copy the install.wim file from the installation disk or OS image, which contains all the necessary installation files (you can use the built-in ImageX utility to work with such images).
Open PWBoot with administrator rights. Select the full installation option, because the second option involves updating an already installed OS.

Further, with each step everything will be extremely clear and it will not be difficult for you to complete the installation. The only thing you need to remember is that this utility does not accept Cyrillic (entering computer and user names must be in English only).
If your image contains several versions of the OS, you need to decide which one to install. Launch ImageX with the following set of parameters: imagex /info x:\file location address\install.wim.
After this, you need to decide on a specific OS to install, each of which is described after the phrase IMAGE INDEX (highlighted in rectangles in the screenshot).

At the next step, the utility will offer you options for installing the OS:
- direct installation on removable media
- creating a single virtual machine file.
These two options are radically different from each other. If in the first case, the operating system will be installed directly on the flash drive, you will only be able to launch from it and will not be able to copy or deploy it on another medium (formatting will be required, after which all data will be deleted), then in the second case you will have the opportunity use of network resources, access to all hard drives, etc. In this case, the reading and writing speed will be almost the same as with a standard Windows installation. Having this image file, you can easily transfer it to other media and run from it, including stationary hard drives. Also, if you performed some operation incorrectly, here you can easily roll back to a stable version.

Having chosen the option with a virtual disk, the next step is to decide on the amount of physical memory to be allocated. The operating system requires about 8 GB, but for full-fledged work you need a little more space. Depending on the size of the removable media, set the threshold that will be optimal for you (all created files will be located in the image, in the free space of the allocated physical memory).


At the next stage, you need to select removable media where the virtual machine image will be placed.

After the process is completed, you need to make personal settings. To ensure that the installed OS runs quickly and smoothly, disable services that you rarely use or don’t use at all. It is also recommended to disable hard drive indexing to speed up the process of reading and writing data.
Try not to perform labor-intensive operations in a virtual machine, because its resources are quite limited.

The last screenshot shows the VHD. And although the view is practically no different from the standard one, here drive C is a special container in which the OS is placed, and other drives are partitions of physically connected hard drives and removable media.

In contact with
It's been a year since I abandoned the DVD drive, and netbook trends indicate that I made the right decision. But I was faced with the question of how to install an operating system without a DVD. The flash drive died out of place, and when I went to the store to buy a new one, I accidentally caught my eye on the Seagate Expansion external drives, the 250Gb version of which cost literally 500 rubles more than the 8Gb flash drive (2323 rubles). And the size and all of which did not bother the jacket pocket much.
Dimensions:141 x 18 x 80 mm
Weight:0.16kg
But as it turned out, installing Windows 7 from a USB HDD does not work on the same principle as with USB FLASH. Having figured it out and checked its functionality, I’m sharing the information with you.
Works for both Desktop PCs, laptops and Netbooks.
- HDD preparation
- Cutting and preparing HDD partitions;
- Copying Windows 7
HDD preparation
You can make a boot disk, install Windows 7, and then erase it and continue to use the HDD for your needs. Or make it much more convenient:If you don’t mind 4 gigabytes of space on the External HDD, then the Disk can be cut into two parts, in our case I did just that, giving one part for the Windows 7 distribution kit, which will always be at hand.
Cutting and preparing HDD partitions
1. Go to:Control Panel - Administration - Computer Management (Disk Management)
Find Disk 1 (if you have several hard drives in your system, find the one that is equal to the size of your External HDD)
2. Select our External HDD drive:
- Right click with the mouse - Delete volume;
- Right click - Create simple volume;
In the window that appears, select the volume size of 4300 Megabytes (Under the Distribution section), and click next,
In the next dialog, if necessary, select the drive letter and click next. In the new dialog, you need to format our new partition (FAT 32), click next and you're done.
After this, you need to make the created section active, for this:
- right click on a section - make the section active.
Now our External HDD looks like this:
Using the same principle, we format the second partition on the disk, preferably in NTFS. but don't make it active.
Copying Windows 7
Copying a Windows distribution to a boot disk has never been easier.If you have DVD:
- Simply open your installation DVD, select all folders and files, and copy to the active partition of your External HDD;
If you have an ISO image:
- Simply open your installation ISO image through Total Commander or Daemon Tools, select all folders and files, and copy to the active partition of your External HDD;
That's it, your External HDD is ready to act as a Bootable media, just reboot, and in the BIOS Set it as Primary Boot Device. a specific External HDD, or just a USB HDD, depending on the BIOS type. Save the changes and proceed to installing your Windows 7.
UPD: For cmd lovers(thanks theproof)
diskpart
List disk
select disk no.
create partition primary
select partition 1
active
format fs=fat32 quick
How to install Windows from a hard drive? Install XP/Vista/7/8/10
Hello everyone, in the next Computer76 blog article I will show you how to install Windows from a hard drive. Yes, the usual Windows installation process for a user requires the presence of an optical drive, installation disk and/or flash drive with the operating system. What if there is none of this?
To all dissatisfied “professionals”. This article is not written for a guru. That’s why I try to describe everything in detail with the appropriate links. And I will immediately divide the article into several parts.
To install Windows from a hard drive, all we need is the Internet and a more or less functional operating system.
Why and when is this needed?
- Firstly, I have already mentioned the main reasons. The Windows disk may be in any of a number of dusty drawers, or just out of reach. The disk drives of some desktop users no longer work or work poorly. And this is generally a problem for laptop owners...
- Further. No need to gut the BIOS settings. What are all these keys F2, F10, DEL, settings? Advanced Settings, changing boot devices... Do you need it? No, of course not. You can install Windows from your hard drive right now.
- You will be protected from the need to urgently transfer the necessary files to various media before the upcoming formatting: this can be done later, slowly, in comfortable conditions.
But, naturally, before installing Windows from a hard drive, we still have to get the installation files themselves somewhere. That is, download Windows from the network. To do this, you can refer to the section or specifically to the article
If much remains unclear, refer to the article
However, you can right now download the image directly from a Microsoft server of ANY VERSION using a simple file:
There are no viruses at any stage of working with the file. I checked it personally and I also packed it. When choosing a Windows version, the antivirus should respond to the user's choice - this is normal. Sequentially select:
- version
- capacity of the future system
All that remains is to indicate the location where you will upload the Windows image. I use this utility in more detail in the article
.
What do you need to install Windows from your hard drive?
I’ll give you a set of programs that will be useful to us.
- Actually, downloaded from the Windows network
- Program Daemon Tools for working with images (how to work with it is described in the article). The 7-zip archiver can also unpack the image, but stock up on an image “reader”
- Program EasyBCD to work with the boot record so that the computer correctly displays input into the new system.
- You can immediately stock up for your device. First download them from the network and put them in a folder, for example, Drivers. In any case, you can't go anywhere without drivers. However, this is not necessary; the operation can be done later (if the Windows installation files see the network card). I'll risk skipping this step for now.
ATTENTION
The described technique is not suitable for computers with Windows operating systems of the NT family (up to and including Windows XP). EasyBCD they will not work as we need. In any version, you don’t have to look!
Everything seems...
I won’t get excited about where to find a Windows image for a long time. You have already read my articles and we take it as an axiom that the Windows image is already on the computer. Don't push it too far. Personally, I throw all temporary files directly onto the Desktop.
Now you need to prepare your hard drive to accept the new system in order to install Windows from the hard drive. We will consider the option when the system will be installed second to the existing one. However, the method is quite applicable if the new copy of Windows overwrites the previous one. Now I do not advise you to do this. But one condition is unshakable - the presence of a free partition on the hard drive from which the installation files of the new Windows will be copied. , described in detail in the blog article of the same name. I did this on the same laptop.
So, the hard drive is broken, the Windows image is on the computer. And now, actually, how to install Windows from a hard drive.
Install programs Daemon Tools And EasyBCD on the computer so as not to be distracted later. You know how to install programs, I think.
Now let's look at the process of installing Windows from a hard drive using a specific example.
A laptop arrived with Windows Vista pre-installed and ready to go. The operation of the system turned out to be unstable, the system itself was badly beaten, and it was decided to install a second Windows 7 system. As you can see in the photo below, I had already divided the hard drive into three logical partitions. One of them is now occupied by Vist (naturally WITH), the second one was reserved by the hostess for files stored on the computer (disk D), and the third (F) reserved by me for Windows 7 - I pinched off a small piece from the storage.
START – Computer – Service(in the toolbar) – Folders settings…– tab View– set Show hidden files, folders, drives
Let's launch Daemon Tools. Let's show her the path to the Windows 7 image.

Then copy all the Windows installation files from the virtual drive and transfer them to the free partition that is reserved for the future Windows 7, that is, to drive F in my case. I put everything on drive F. It took me about 7 minutes to copy.


Let's try installing Windows from a hard drive
Let's launch EasyBCD with administrator rights. We are greeted by the settings window. Everything here is in English, but I'll walk you through it. Make sure you are in the menu Add New Entry:

Lower right in Removable/External media select tab WinPE. In field Name (Name) enter the name of the system. I designated it as "Seven". In field Path (Path) by clicking on the binoculars with the folder to the right of the field to fill, indicate the path to the file boot.wim, which is located in the newly created folder sources on disk F.
That is, the path on my laptop looked like:
F – sources – boot.wim
In general, this is what I ended up with:

Let's finish the settings. We need a button on the right Add Entry (Add).
ATTENTION
Clicking the button View Settings (Current menu) you can see what the bootloader menu will be like. This will be the first window that will allow you to select your operating system. Look at it before you make changes. It can be edited later. But now it should look something like this:

You will see labels numbered Entry#1 and Entry#2 (Entry 1 and Entry 2) in the same order. Will load first Seven, second - Vista. That is, after completing the settings and the inevitable reboot, you will see this window:
 But that comes later.
If you managed to click something, click on the button on the left Edit Boot Menu (Edit Download Menu)

And delete incorrect entries. You can swap the loading order of the buttons Up And Down(Up And Down), delete selected unnecessary records with the button Delete, change the loading wait time from 30 sec. to 0. In general, play to your taste and admire the result after a reboot. If you made changes in this menu, save using the button below Save Settings (Save).
Are you all ready? Go. Don't close anything and just reboot.
The installation took me less than 10 minutes. As you will see for yourself, installing Windows from a hard drive is very fast.
After the installation of Windows 7 is completed, the boot menu will look like this:

Windows 7 is installed.. but the word Seven is in the way
Let's remove it using the same EasyBCD. Return to Vista, launch the program and enter the menu Edit Boot Menu:

P.S.
At some point, one of the systems may become boring... In my example, Vista is almost completely dead. It will be easy to remove. Just log into the new system (mine is Windows 7) and:
- Format the entire logical drive with Vista under Windows 7. All data will be destroyed! It may not be possible to do this using Windows tools; you will have to use the program . You can find out how to work with it in the article.
- however, in some cases, especially for devices with a pre-installed OS, you cannot do without a special disk to remove an unnecessary system. We will look at working with such disks in another article.
- using a program already installed on Windows 7 EasyBCD remove the Vista entry from the bootloader. How to do this is clear from the written article.
P.P.S. EasyBCD will not only allow you to boot operating systems directly from your hard drive. With its help you can:

any disk directly in the boot menu
Good luck to all of us
Read: 7,651
Hello admin! I have a regular computer with Windows 10 installed on an MBR disk, a regular BIOS, that is, not UEFI. There is also a 1TB portable USB hard drive. Tell me, how can I install Windows 7 on this external USB drive, but so that the 7 has a separate bootloader and is located on the portable USB hard drive itself? I want Windows 7 to be a portable operating system that will boot on any computer or laptop that I connect an external USB drive to. On your website, but all of them feature GPT style hard drives.
Hi all! So, the question is clear, let's get straight to the point.
We have a simple computer with Windows 10 installed; we connect a 700 GB portable USB hard drive to this computer.
Computer disk management
Disk 0- this is a hard drive ( MBR), desktop computer with Windows 8.1 installed, drive letter (C:) ( if you have Windows 10 installed, then you need to do everything exactly the same).
Disc 1 is a portable USB hard drive, drive letter (D:), 700 GB, MBR. To install Windows 7 on a portable USB hard drive, be sure to connect the drive to a USB 2.0 port (black).
The portable USB hard drive contains important files and cannot be formatted.
Download and install it, then launch it.
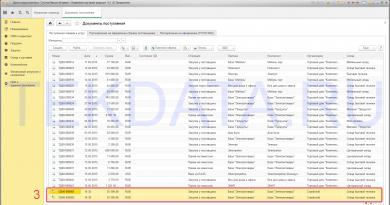
In the main program window, right-click on the external USB drive (D:) and click on the “Resize” button

Move the delimiter to the right to free up free space (100 GB) at the very beginning of the portable USB hard drive and click OK. 100 GB is just enough to install Windows 7 (you can allocate more or less).

Click "Apply" and the program starts working.

"Go"


Operation completed successfully!


Launch the command line as administrator.

diskpart
lis vol (we display all partitions of storage devices connected to the computer in a list).
lis dis (we display a list of disks connected to the computer, we see that Disk 1 is our external USB drive with a capacity of 700 GB)
sel dis 1 (select Disk 1 - external USB drive)
create par primary size=100 (we create a hidden System Reserved partition with a size of 100 MB, on which we will place the Windows 7 download files).
format fs=NTFS (format it to the NTFS file system)
activ (make active)
assign (assign a letter)
create partition primary (we create a partition from the remaining free space, we will install Windows 7 on this partition)
format quick fs=NTFS label Win7(format it to the NTFS file system and assign a Win7 volume label)
assign (assign a drive letter to the partition)
exit (exit diskpart)

Disk management


Double-click on it and attach it to the virtual drive (L:).

WinNTSetup3
Now it's the program's turn.

We launch the program and in the main window, in the first field (Path to Windows installation files) click on the “Select” button,

in the explorer window that opens, find the virtual drive (L:) with Windows 7 files, go to the L:\sources folder and select the install.wim file with the left mouse, click “Open”.

Note: Please note that you can choose to install any edition of Windows 7.

In the middle field (Disk on which the bootloader will be installed), click "Select".

In this window, select the hidden partition System Reserved, size 100 MB, that we created in the command line (the system assigned it the drive letter E:), click on the “Select folder” button.

In the lowest third field (Disk on which Windows will be installed), click “Select”.

In the explorer window that opens, select the 100 GB partition we created (F:) and click the “Select folder” button.

Installation

In the "Use BootSect for bootloader" field, select BIOS.
Check the box next to "Allow native USB boot of Windows 7".

The process of installing Windows 7 begins on the partition (F:) of the portable USB hard drive.

And it ends successfully.

Restart your computer or laptop.
We enter the computer boot menu and select a portable USB hard drive to boot.

We are entering the final phase of installing Windows 7.


Windows 7 installed on a portable USB hard drive.

Disk management.

Installed in this way on an external USB drive, Windows 7 has its own separate bootloader.
On this computer, Windows 7 will boot from an external drive just like a regular operating system.
When you connect a USB hard drive to another computer or laptop, you will need to set the priority to boot the computer device from the external USB drive and Windows 7 will boot on this computer device, all you have to do is install the drivers. But I want to note that it is best to use Windows 8.1 as a portable operating system, since it is compatible with almost any computer hardware.
Articles on this topic:
- USB-HDD
Sometimes you need an additional copy of the OS on removable media. It will not be possible to perform a standard installation due to system limitations, so you will have to perform additional manipulations using various third-party software. Today we will take a step-by-step look at the entire process, starting with preparing an external hard drive and ending with installing Windows.
Conventionally, all actions can be divided into three steps. To work, you will need three different programs that are distributed on the Internet for free, we will talk about them below. Let's get started with the instructions.
Step 1: Prepare the external HDD
Typically, a removable HDD has one partition where users save all the necessary files, but if you need to separate the OS and other files, that is, create an additional logical drive where Windows will be installed, we recommend that you read the following instructions:

If for some reason AOMEI Partition Assistant does not suit you, we recommend that you familiarize yourself with other representatives of similar software in our other article at the link below. In similar software, you will need to perform exactly the same steps.
Now let's use the built-in Windows function for working with logical drives. We will need it to create a new partition from the free space we just selected.
- Open "Start" and go to "Control Panel".
- Click on a section "Administration".
- In the window that opens, select "Computer Management".
- Go to section "Disk Management".
- Find the required volume, right-click on the free space of the main disk and select "Create Simple Volume".
- A wizard will open where you need to click on "Further" to go to the next step.
- In the second window, do not change anything and immediately move on.
- You can assign your own letter if you want, and then click on "Further".
- The last step is to format the partition. Check that its file system is NTFS, do not change any more settings and complete the process by clicking on "Further".


That's all. Now you can proceed to the next algorithm of actions.
Step 2: Prepare Windows for installation
As mentioned above, the usual installation process when starting the computer is not suitable, so you will have to download the WinNT Setup program and perform certain manipulations. Let's look at this in more detail:
- Download a copy of the selected version of Windows in ISO format so that you can mount the image later.
- Use any convenient program to create a disk image. Find out more about the best representatives of such software in our other material below. Just install such software and open the downloaded copy of Windows in ISO using this software.
- In chapter " Devices with removable media" V "My computer" you should have a new disk with the operating system.
- Run WinNT Setup and in the section "Path to Windows installation files" click on "Choose".
- Navigate to the drive with the mounted OS image, open the root folder and select the file install.win or install.esd depending on the version of Windows.
- Now that the drive letter where the bootloader will be installed has automatically appeared in the second partition (it is not recommended to change it), in the section below "Disk on which the OS will be installed" Press "Choose" and specify the hard disk partition that was created in the first step.
- Click on "Installation".
- After this, a new window will open, where next to the item "Use BootSect for bootloader" instead of "ALL" should be set "BIOS", if the computer uses a classic BIOS. UEFI owners will need to select the appropriate item from the drop-down menu, then click "OK".


After the computer restarts, you will be offered a choice of OS to boot, select the desired option and follow the standard procedure for setting up a new platform.
Step 3: Install Windows
The last step is the installation process itself. You do not need to turn off the computer or otherwise configure booting from an external hard drive, since everything happens through the WinNT Setup program. All you have to do is follow the standard instructions. On our website they are described in detail for each version of Windows. Skip all the preparatory steps and go straight to the installation description.
Read more: Step-by-step guide to installing Windows XP, Windows 7, Windows 8
Once the installation is complete, you can connect an external HDD and use the OS installed on it. To avoid problems booting from removable media, you need to change the BIOS settings. The article below describes how to set all the necessary parameters using a flash drive as an example. In the case of a removable disk, this process does not change in any way, just remember its name.