A basic guide to the minimap, or how to use the navigator. Basic guide to the minimap, or how to use the navigator How to replace downloaded markers in Minecraft
Dear users, modifications for obtaining a mini map with the ability to place marks, receive data without reconnaissance, as well as setting an auto point of death are described below. Thanks to these mods, you can easily find a village or easily find a way out of a dungeon.
How to make a map in Minecraft without mods
The standard version of Minecraft has a map, but it is not very convenient to use. When you create it, you appear in the middle of the map, and when you start moving, the map fills up.
Recipe: (compass + 8 sheets of paper)
For the card to be filled, you need to hold it in your hands. There are several card sizes. The smaller its scale, the longer it will take you to fill it, and the more it will be able to display. But keep in mind that the smaller the map, the smaller all the objects displayed on it. To reduce its scale, you need to put the map on a workbench and surround it with sheets of paper.

By the way, there is a small bug here. If the map does not reduce its scale after such manipulation, you need to re-enter the game.
Trying to zoom out on a map that has already been explored is a bad idea. When you zoom out, everything you have scouted will disappear.
It’s convenient that the map can be copied, especially when playing multiplayer. To copy, place your card and an empty card in the crafting slot.

All players who have a copy of your card will appear as a yellow dot on it.

And if you place the map in a frame and hang it at home, the location of the frame with the map will appear on your map as a green dot. This will help mark your home, or other places you need.

Minimap for Minecraft using mods
But it’s much more convenient to use cards from modifications! They do not require crafting. You just need to install the MapWriter or Rei's Minimap mod and enjoy all the amenities!
MapWriter

In the MapWriter mod, pressing the M key opens a full-size map. You can easily change its scale with the mouse wheel and move around it, as well as place name tags in any place by pressing RMB. You can sort the same tags into groups. Switching between groups is done using the space bar.

And in single-player mode with cheats enabled, or when playing on a server with administrator rights, you can select a mark and press the T button to teleport to it. For this mod there is also a function to automatically place a marker at the place of your death. In addition, throughout the game you can see a mini-map displayed as a circle in the top corner of the screen.
Rei's Minimap
Rei's Minimap mod is in no way inferior to MapWriter. The only thing is that there is no way to move around the map with the mouse, and you can only change the scale with the keys.

Labels can be set by pressing the C key. You can give it a name and choose a color to display it. It will appear as a dot in your field of view and on the map when you press X. The map will also show the distance you are from the marker.

This mod also has the function of appearing a mark at the place of your death.
Conclusion
Paper map or modifications? You decide. However, sometimes it is better to have a map and know the way home than to get lost in the dark running away from zombies and creepers.


Many of us have played the wonderful game Minecraft, in which architectural buildings, mechanisms of any complexity and possibilities are limited only by the flight of our imagination. Absolutely everything is possible in it, because the world in the game is huge, and this is a considerable part of the difficulty, because once you lose your house, you may never find it again. Today we will tell you how to place a house point in Minecraft.
A place to put a stop
How to place a house point in Minecraft? First of all, you need to build the very house or cave in which you want to develop and live. The world of Minecraft is large, and therefore there are an endless number of places where you can live. Each world is unique in its own way, because with each creation a unique map is formed, which is different from all others. But let's return to home. Before choosing, look around carefully; it may be that the point you choose is not tactically advantageous. A secret room or attic would be a good choice, and for those who like to watch the sunset, a terrace would be an ideal choice.
If you have decided where you want to return home after each outing, then you need to do the following:
- Stand exactly on the block you want to stand on most.
- Now you need to open the chat to enter the console command there. This is done simply, you just need to press the letter “T” (or another one that you set to open the chat).
- A translucent window will appear in the lower left corner, at the bottom of which you can enter anything, even a message to other players (if, of course, you are playing on a server), but we need to enter the following command in Latin characters: “/sethome”.

Congratulations, you can now go home after death or at will without any extra effort! This is done quite simply, you need to turn on the chat window again and enter the command “/home”, after which you will instantly teleport home. Be careful, the slash should only be like this: “/”, otherwise the game will throw an error.
Installing a home point on the server
How to place a house point on a Minecraft server? Here things are a little more complicated, because not all servers allow the use of several respawn points, but if you want several, you need to donate. However, you can place one house point, and this is done in exactly the same way as in a regular game:
- Choose the location where your home is located.
- Open the chat by pressing the “T” button.
- Write “/sethome” there.

Done, you now have a house point on the Minecraft server. If someone kills you, you will instantly return to the place where you placed the point at home.
Installing a second point at home
How to put the 2nd point of a house in Minecraft? When your house is too large or there are several of them, the same method will come to the rescue as for other cases, namely:
- choose a place to build your second home;
- stand on the required block;
- open the chat by pressing the “T” key;
- enter the console command “/sethome [any name for your second home]”.
The second point for the house has been installed! You can make several points in this way, but they must have different names. If you want to return to a specific house, then write “/home [name of the selected house]”, after which you will immediately teleport there, and the question “how to put the second point of a house in Minecraft” will no longer bother you.
Other ways to get home
There are times when the Internet goes out and there is no way to see on the website how to place a house dot in Minecraft, but you need to immediately return home. Fortunately, Minecraft has a function that allows you to come home, but in this case you will have to walk, and this significantly limits the possibilities of traveling. If you are playing on a server, then you can safely enter the “/help” command, which will help you find the necessary command, and if you are playing a single player game, you will need to do the following:
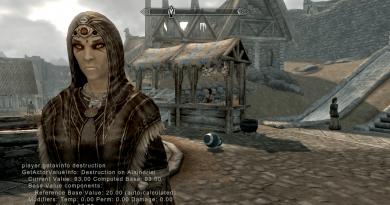
- Go into your home and find the “F3” button on the keyboard, after which symbols will appear on the screen that can be removed with the same button.
- On the left in the middle you will see the letters “XYZ” and numbers opposite them, write them down on a piece of paper.

These numbers are the definition of your location on the Minecraft map, where -z is movement to the south, and +z is movement to the north. Likewise with X, where +x is movement to the east, and -x to the west. Y is a determinant of the height at which you are standing. Having written down the numbers that were at home, you can always return to it without much effort.
We hope that we have answered your question about how to place a house dot in Minecraft.