1c accounting 8.3 client bank system. Making a backup copy of the database
Before setting up the exchange, let's answer the question: “Where is the exchange service with the bank in 1C?”
And, as it turns out, everything is not so simple here.
As a rule, they point us to the Bank Statements magazine, where the developers placed a magic button Download and they stop there. But we will go further and explore all possible ways to access this wonderful service.
Uploading from Client Bank to 1C 8.3 from the journal of bank statements
So, we have already named the first option - downloading bank statements is possible using the button Download from the magazine of the same name in 1C. This is a typical download option that developers offer for use. It will do the following:
But that is not all!
Uploading statements from Client Bank in 1C 8.3 from Exchange with bank processing in the Service group (Bank and cash desk section)
We can upload and download information on banking transactions from the processing itself Exchange with bankom. We can launch it traditionally through the Main Menu - All Functions, or by adding this processing to the active commands of the section Bank and Cashier.
This can be done from the action bar settings by adding the available command Exchange with bank to selected section commands:
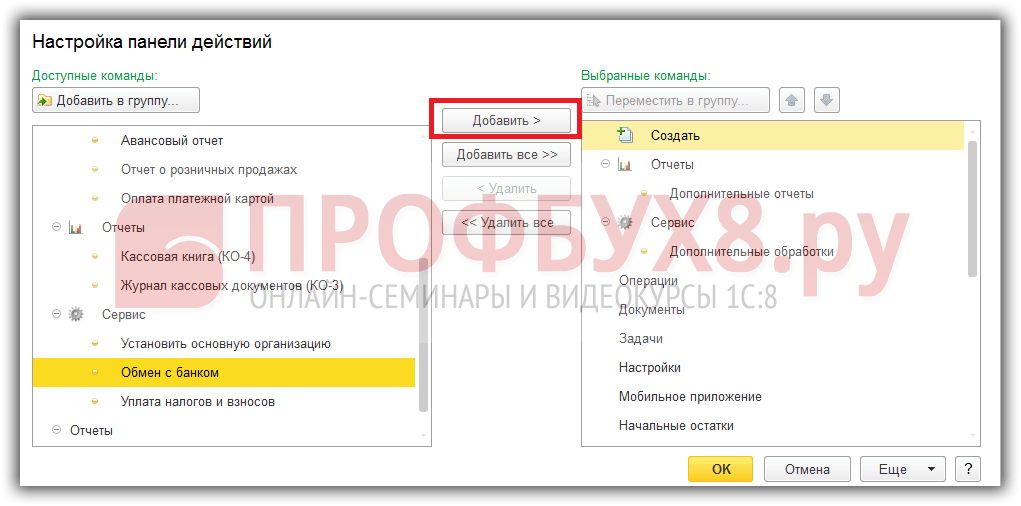
Team Exchange with bank will appear in the Service group (Bank and cash department section):

But that's not all!
Uploading statements from Client Bank in 1C 8.3 from the Exchange with bank form in the bank statement journal
In the Bank Statements journal itself, it is possible to open a form Exchange with bankom by the action menu command MORE – Exchange with the bank.
This very command can be placed on the Bank Statements command panel. Since we, of course, want to be somewhat different from the monotonous coverage of this issue on the Internet, we will now consider this option.
We are sure that this will be useful to you in your future work.
Changing command properties Exchange with bank. From the action menu “More - Change Form” of the Bank Statements journal, we will include the Exchange with Bank service in the journal command panel:

Processing Exchange with bank is available in the list of bank statements:

All options for calling the Exchange service with a bank:
- Directly from the Exchange with bank form (section Bank and cash desk);
- From Bank statements according to the book. Download;
- From Bank statements using the action menu command More – Exchange with bank;
- From the Main menu - All functions - Processing - Exchange with the bank.
Let's move on to the second part of the question - settings for Exchange with the bank.
How to set up downloading from the Client Bank in 1C 8.3 Accounting 3.0
Before you start setting up an exchange with a bank, enter the banking program and find the item in it Uploading to 1C. Copy the file name onto a piece of paper - this will be needed when setting up data exchange loading in 1C.
Now open the processing form Exchange with the Bank in 1C 8.3:

Displayed in form Exchange Bank organization and bank account through which we will perform operations for downloading statements and open the Settings form.
Exchange parameters settings are stored in a special information register Data exchange settings with the Bank Client: Ch. menu – All functions – Information registers:

After specifying the organization and bank account for which we will create the exchange setup, according to the book. Setting up, go to the form for setting up an exchange with the bank.
Settings for program name and download/upload files:

Serviced Banking check– is on by default.
The name of the program– the name of your banking program you are working with. You select the name of the program from the drop-down list provided by the developers.
For example, for SBERBANK this is a program AWS “Client” AS “Client-Sber”Bank" of Sberbank of Russia:

File download fromjar– this is the name and location of the file into which data will be downloaded from the Bank Client. Typically, the text file kl_to_1c.txt is used. But you can use other options.
The only condition: the name of the download file in 1C must match the name of the download file on the bank’s side. This is where the data recorded on a piece of paper from your banking program using the upload file in 1C will help. Please pay serious attention to this. This is the most common exchange setup mistake. If the path is specified incorrectly, the exchange will not work.
Another very important note: enter the file name without spaces, spaces, or unnecessary extensions. After entering, check that the file in the 1C window “Download file from Bank Client” and “Upload file in 1C” of your banking program completely match!
Check with your bank's technical support service about encoding of upload data. This can be either DOS or Windows. 1C supports working with both encodings.
Default substitution details
These settings are optional:

You can set the Cash Flow Item for substitution in the new documents Debiting from the current account and Receipt to the current account. But in fact, it rarely happens that the DDS article is the same for all occasions. Therefore, in order to avoid confusion and make mistakes, these fields are left blank. The data on them is filled in after the exchange is completed.
Groups for new contractors
Also with filling in the Group settings parameter for new counterparties. The accountant has the right to decide how he will control the counterparties in the database created by downloading bank statements in the event that 1C 8.3 did not find the necessary payers and recipients in.
Load/Unload Block
This block already works with the data received from the bank and, before generating new documents in 1C, asks you to decide on the loading and unloading actions:

We are now considering downloading statements from the Bank Client and here the user chooses whether to automatically create new objects in the database and post new documents. But, probably, the checkboxes for posting documents for receipts to the current account and debits from the current account will be convenient.
Uploading from the Client's Bank to 1C 8.3 Accounting 3.0
After saving the settings, you can start uploading documents.
After the cash flow data from the banking program has been uploaded to a file and received by the accountant, you can load it into 1C. During the loading process, the documents Receipts to the current account and Write-offs from the current account are created.
The sequence of actions of the accountant when downloading statements is as follows:
- We indicate the bank account of the organization;
- Choosing an organization;
- Check the path to the download file;
- We control the information in the data loading file;
- Download bank statements;
- We generate a report on downloaded statements:

If no mistakes were made in setting up the exchange with the bank, then the program will handle the download without any problems. Your task is to check the data before downloading:

What you need to pay attention to first:
- When checking data before uploading, pay attention to the icon in the column next to the date:
- An icon with a check mark means that the document is in the database and posted;
- An icon without a checkmark indicates that the document is in the database, but has not been posted;
- The icon with a “sun” signals that a new document will be created.
- When loading data, a “not found” message is displayed:
- By counterparty, if neither the bank account specified in the download file nor the TIN is found;
- For the counterparty's account, if the account number is not found in the download file;
- According to the contract, if the owner of the contract and the required type of contract are not found in the 1C database;
- If there are several identical objects in the database, the first one from the list will be selected and a warning will be issued regarding the situation;
- When re-uploading documents, the program analyzes the Amount and Payment Type data. If they change, the data is overwritten.
After downloading bank statements, you can print a report on the downloaded documents in 1C:


How to automatically monitor invoice payment, how this is affected by the status of invoice payment, that is, quickly report to the manager on paid and unpaid invoices, you can study the features of processing banking transactions in 1C 8.3 on our
Let's look at setting up a bank client in 1C Enterprise 8.2.
Setting up a bank client is very important. It greatly simplifies the life of an accountant from simple and routine work. In this article we will only look at setting up data loading into 1C Enterprise Accounting 8.2 from client-bank files. We will not consider downloading data from a client bank - it is different for each bank. Let's look at how to download statements from the client bank into 1C.
Setting up a client bank with 1C
To set up a bank client in 1C 8.3 you need to:
Go to the menu “Bank” - “Bank statements” - “Download”:

Get 267 video lessons on 1C for free:
The system will inform you that there are no settings in the system, click “yes”:

In point Serviced bank account You must indicate the account to which payment orders will be sent. On the list The name of the program select the program from which you are downloading the file. For Sberbank, this is the Client automated workplace of the Client-Sberbank AS of Sberbank of Russia.
Upload/upload file - setting up the disk space where payment orders will be exchanged between the client-bank and 1C 8.3. By default the files are named kl_to_1c.txt And 1c_to_kl.txt.
That's all. The client bank setup is complete.
Loading payment orders
If your bank client is configured, loading payments into 1C 8 is very simple:
In the process of work, in each organization, there is interaction with other companies (organizations). Payments must be made for outstanding goods, works, services, taxes and other payments. Currently, this process occurs through the Client-Bank system. This program is installed by bank employees on the computer of a company employee to make payments and load payment orders into the program in which accounting is carried out. Let's look at how bank statements are loaded into 1C.
Uploading statements from the Client-Bank program
In order to download an extract from the Client-Bank program, you must:
- Generate a statement for the required period;
- Export it to a text file to transfer data.
Export occurs when you click on the “Export”, “Export” or something similar button; in different Client-Bank programs this button is called differently. The generated file is uploaded for export to the desired folder, along a predetermined path.
In front of the tabular part of the document in the right corner we find the “More” button, click on it, a window appears with a list of functions, select the “Exchange with bank” item in it.

- The organization through which payment orders will be downloaded;
- Organization bank account.

Click “Download” at the bottom of the document and after that, in the tabular part, all bank statements will be loaded into the “1C: Accounting” program. After this, we review the report on the uploaded file and proceed to processing payment orders.
You can set up automatic processing of payment documents upon receipt and debit. To do this you need to configure.
You can select the “Setup with Client-Bank” document:
- By clicking the “Settings” button at the bottom of the “Exchange with the bank” document;

- In the “Bank Statements” journal, select the “Set up exchange with the bank” item from the list when you click on the “More” button.

In the settings, fill in the fields:
- We indicate the bank account from which statements will be downloaded;
- The name of the program is selected from the list provided by the developers - this is the program you are working with. After this, the fields “Upload file from 1C Accounting” and “Download file from 1C Accounting” open. “Upload file from 1C Accounting” only if outgoing payment orders are generated in the 1C database and then uploaded to Client-Bank;
The condition that must be met is the name of the download file in 1C, it must match the name of the download file from the Client-Bank program.
- At the bottom of the settings, two fields open, the left one shows upload data, and the right side shows download data.
In the “After loading automatically post” field, it is advisable to indicate two checkboxes on the positions “Receipt to the current account” and “Write off from the current account”, in this case payment orders will be automatically processed, which in the future only need to be double-checked without going into each of them.

After uploading payment orders, you should carefully check the “Type of transaction” and the created accounting entries, and make corrections if errors are found.
Uploading statements from a banking program into 1C is a very convenient procedure that significantly facilitates the work of the accounting department, significantly saving employees’ time.
Payment orders, or payment slips, are downloaded from 1C 8.3 for further loading into the client bank. To correctly upload payment bills, you need to configure certain 1C 8.3 parameters. Read on to learn how to set up an exchange and how to upload payment cards from 1C 8.3 to the client bank.
Read in the article:
After you have created payment orders in 1s 8.3, you can upload them to the client-bank system for payment. The procedure for exchanging payments in 1C 8.3 consists of two stages:
- uploading a text file from 1C 8.3
- uploading this file to the client bank
To generate an upload file in 1C 8.3, you need to set up an exchange with the client-bank. Setting up the exchange is necessary not only for the correct upload of payment slips from 1C 8.3, but also for loading bank statements from the client bank into 1C 8.3. In this article we will tell you how to set up an exchange and how to upload payments from 1C 8.3 to the client bank in three steps.
How to download payments from BukhSoftStep 1. Set up data exchange with the client bank in 1C 8.3
Go to the “Bank and cash desk” section (1) and click on the “Payment orders” link (2). A window will open with a list of previously created payments.
In the window that opens, in the “Organization” (3) field, select the organization (4) for which you want to set up an exchange. A window will open with a list of created payments for the selected organization. 
Next, click on the “Send to bank” button (5). A window for exchanging data with the bank will open. 
In the “Exchange with Bank” window, click the “Settings” button (6). The exchange settings window will open. 
Step 2. Specify data exchange settings in 1C 8.3
In the “Exchange Settings with Bank Client” window, specify:
- your bank account (1). Select the bank account for which you are setting up the exchange;
- program name (2). Select from the list the bank client program that corresponds to your bank account, for example, “Client-Bank System” of CJSC “Bank “New Symbol””;
- upload file to the bank (3). Here, click “Select” (4) and specify the name of the file and its location on the disk. When uploading payment invoices, this file will be used for exchange;
- correctness of the document number (5). Check the box if you want the client bank to check payment slip numbers for repeatability.
After completing the settings, click the “Save and Close” button (6). 
Step 3. Upload payments from 1C 8.3 to the client bank
Client bank - a program for remote work with your servicing bank. In such systems it is possible to download files with payment slips from 1C 8.3. To download a file from 1C 8.3, go to the “Bank and Cash Desk” section (1) and click on “Payment orders” (2). A list of payment orders that you created in 1C 8.3 will open.
In the window that opens, select your organization (3). 
Now in the window you will see payments only for the selected organization. Next, click the “Send to Bank” button (4). The “Exchange with Bank” window will open. 
In the window you see payment orders prepared for payment. They are in the Prepared state (5). Payments that will be downloaded are marked with ticks (6). You can uncheck payment orders if you do not want to pay for them. In the “Upload file to bank” window (7) you will see the path to the file that you specified in setting up the exchange with the client-bank. You can specify another file to upload. To do this, press the “…” button (8). To save the file with payments, click the “Upload” button (9). After this, the payment status will change to “Sent”. Your payments have been sent to the bank. 
The file with payments is visible in the “Upload file to bank” field (7). Log in to your bank client and download this file to make a payment. You specified the location where this file is located in setting up the exchange with the bank (see step 2).
In order not to manually enter bank statements into your enterprise software, you should ask how to load a bank into 1C 8.3. Simply put, this process can be automated for a long time; you just need to approach this task correctly. Entrust the setup of the 1C program to programmers and you will never return to this issue.
How to load jars in 1C 8.3?
If you follow the entire download process step by step, you will end up with everything you planned. You must have a good understanding of the system interface. The main action processes are divided into three groups:
uploading from the client bank to a file;
creating a backup copy;
loading from a file into the 1C database.
These are fundamental tasks on the way to loading the bank in 1C 8.3. The first process looks like this: menu “Settings” - “General”. In the new window, select “Export”.
Be sure to check the box next to 1C “File for exchange” and enter the correct path to the document there. Its extension should only be txt. Next, to load the client bank into 1C 8.3, we confirm our action by clicking on “Save”. In the next window, click on the “Out” button and select “Export to 1C...”. We can consider that we have successfully completed the first of three important processes.
Next, we are working on creating a backup copy for loading the bank into 1C 8.3. This step is your guarantee of safety. It is better to prevent yourself from possible troubles than to eliminate them later. After you have completed this stage, we move on to the very last and most important task - loading from a file into the 1C database.
To ultimately load the bank into 1C 8.3 successfully, follow the following chain of actions: section “Bank and cash desk”, item “Bank statements”. In the journal, click on “More”, go to “Exchange with the bank”. A tab called “Load from bank” will appear in a new window, go into it and at the very bottom click on “Download”.
Automation details in 1C
The entire process of loading a bank statement into 1C 8.3 can be considered complete if you followed a clearly defined algorithm of actions. If you encounter difficulties at any stage, please contact technical support. Specialists will help you understand any current situation, especially if it concerns loading banks in 1C 8.3.
Every software user needs to have a good understanding of all system settings. 1C is a storehouse of functionality that you need to learn to use, and then the software will work for you. After the correct setup associated with loading the bank classifier into 1C 8.3, the system will become your indispensable assistant.
Using the classifier contained in some of the programs, you will always receive up-to-date data regarding the details of banking institutions. In order to load the bank classifier in 1C 8.3, you should go to the “All functions” menu, go to the “Directory” and select “Banks”. In the new window, click on the “Select” button, then on “Load classifier”. We put a tick next to the entry “from the agency’s website...”, and upon completion of work, we confirm all our actions by clicking on “Next”. That’s it, we can assume that you have completed loading bank classifiers into 1C 8.3.
Joint setup with the company "Setbi"
If you are looking for a worthy specialist in the field of implementation and automation of 1C software, then contact us. Many accountants try to independently configure the download of bank statements in 1C 8.3. For unprepared people, this takes a lot of time, and the result is not always satisfactory.
It’s better not to save money and trust the professionals. After all, after you have established the exchange of documentation between banks and loading bank statements into 1C 8.3 is successful, the work will proceed faster and more efficiently. And this is one of the main goals of any entrepreneur.
The Setby company will provide you with a full consultation over the phone, after which you will find out what needs to be done to ensure that the download from the bank to 1C 8.3 is successful. Our technical support is available 24 hours a day. Leave your contact numbers and we will contact you as soon as possible.