Create an email for an organization on Yandex. Domain delegation to Yandex. Transferring corporate mail to domain mail from Yandex
Hi all! Today we will examine a topic such as “ Mail for a domain: Yandex and Google mail with your own domain" "What is this?" - you ask. The point is this: I finally made my own mail for the domain, that is, now my main mailbox will look like petr@site.
Why do I need this?
If for some reason you also want to create your own mail with your own domain, then read the lesson further and you will learn how to create the same mail.
I showed mail for a domain using the example of two services: Yandex (at the beginning) and Google (in the middle of the lesson). Choose which email service is more convenient for you and start using it.
Mail for a domain: Yandex will do everything for you!
I first created mail for my domain through Yandex. I don’t know why, but I don’t really like Gmail and Facebook, but prefer Yandex and VKontakte. The first ones seem terribly inconvenient to me. But the fact that gmail is the best email service in the world, and even the fact that many applications are integrated specifically for gmail, “forced” me to choose mail from Google. I have long wanted to switch to this mail, but now I will have to get used to a new mail service for me.
So, first, let's look at the example with Yandex (let me remind you, I created it for myself on Google, the method of which is described below).
- We log in to Yandex (that is, we log in with our username and password).
- First, go to the page https://pdd.yandex.ru/domains_add/.
- There you “drive in” the address of your domain:

- Click on the “Connect domain” button (located next to it).
- And you wait. Please note that “Checking domain connectivity may take a long time.” For some reason, this process in my Google Chrome takes a very long time, I solved the problem using Mozilla Firefox (the domain “connects” instantly, no need to wait 3 hours).
- Next, create a new document and insert there the text that Yandex gives us (I chose the first item to confirm domain ownership):

- Click on the “Save” button and save the file under the name Yandex tells us:

- Next, upload the saved file to the root of the site (where the wp-admin, wp-config, etc. folders are located):

- Next, click on the “Check Now” button:

- Wait a few minutes (Yandex rechecks the presence of the file approximately every 10 minutes). Although you don’t even have to sit and wait, you can safely follow “Step 2. Set up MX records.”
- If you are like me, then follow the steps below (even if you did not buy there, the steps will be similar, just go to the control panel of your domain registrar). Go to the control panel -> Domains -> My domains:

- There, left-click on the domain for which you are creating mail:

- In the next window, select “Manage DNS zone”:

- On the page where you confirmed your rights to manage the domain, fill out the following information:

- And fill them in “DNS Zone Management”:

- Click “Add”. Now Yandex has probably checked the rights to access the domain, but now you will need to wait while it checks the MX records (again you will need to wait about 10 minutes). It says “Next check will be at XX:XX:XX”. Just refresh the page when the “cherished moment” comes.
- Now come up with a login for your mailbox, that is, what will appear in front of @your_domain.ru. For example: “admin”, “my”, “your_name”, etc., then click on the “Add” button:

- Mail has been created! Next, go to the Yandex main page and enter a new email address and password:

- Next, fill in the required information and click on the “Complete registration” button:

- Next, you need to specify a different e-mail that you used before in order to automatically redirect letters from another mailbox to a new one. To do this, click on the “Add your mailbox” button:

- There you click on the “Connect mailbox” button:

- There, enter the login and password for the old mailbox, check the box to save originals in that mailbox or not, and click “Connect”:

- That's it! Now you are the owner of a very beautiful email box. Still, mail for domain– cool thing! Is it true?
If you prefer Google, then mail for domain This service will come in handy. Connecting Google mail is also not difficult (unfortunately, Google’s innovation: this service has become paid):
- Let's go to .
- Enter your domain name:

- Click on the “Get Started” button.
- Next, fill in the required information and click on the “Next” button:

- Enter the word from the picture and click on the “I Accept” button. Continue setting up.”
- Next, if you were already logged in to Gmail, in the next window click on “Log in to another account”:

- Next, click on the “Install quickly” button:

- Next, go to the “Domain Ownership Confirmation” tab:

- Click on the “Next” button:

- Click on the link “this HTML confirmation file” to download the required file:

- Then place this downloaded file via FTP in the root of the blog (where wp-config, wp-admin, etc. are located):

- Next, click on the link that confirms the successful completion of the download:

- And then click on the “Confirm” button.
- Now you should see a notification that everything was completed successfully, in that window you need to click on “Continue”:

- In the next window, since I will be working alone with the mail of this domain, to the question “Will other domain users work with Google Apps services together with you?” I answer “No, just me.” (Skip information for multiple users.).” Then I click on the “Next” button:

- Then in the next window I will leave a checkmark next to Gmail only and click on the “Next” button:

- In the next window, click “Next”:

- Then click on the “Next” button again:

- Further in “Gmail settings for a domain” to the question “Where do you want to redirect your mail?” answer “Google Servers”, and then click on the “Next” button:

- In the next “Select a service provider” window, select “Other”:

- Next, follow steps No. 11-13 to create a domain mail on Yandex (see above). And we take the data that Google gives us for domain mail:

- We enter this data into “DNS Zone Management”:

- Now in the window for creating Google mail for the domain, click on the “Next” button:

- You will be redirected to a new window where you need to log in with a new login:

- Congratulations! That's it! Now your mailbox has a very cool address. You don’t have to go through the rest of the steps; you can click on the “Do it later” buttons. In order for letters from the old mailbox to automatically go to our new one, you need to go to “Mail Settings” (upper right corner) -> Accounts -> Collecting mail from other accounts -> Add your mail account. And just enter your old email address (in my case wpnew@mail.ru) and enter a password. And letters will be automatically sent from the old mailbox :).
Next, enter your username and password. The username can be “admin”, your name (for example, “petr”), that is, this will be the word that will be in your email address before the “@” sign: 
How to make access to mail in the form mail.domain.ru
Now I will tell you how to make access to mail in the form (in my case). We go again to the “DNS Zone Management” of the domain registrar (see No. 11-13 about the Yandex mailbox) and add another entry there. Namely:
- Subdomain name – mail
- Record type – CNAME
- Data (IP, CNAME...) - ghs.google.com.

Now go to https://mail.google.com and in the lower right corner you will find the “Manage Domain” link:

Go there, go to the “Settings” tab:

There, click on the “Change URL” button:

And already there, put a “dot” on the second line and enter the word “mail” into the field:

In the next window, click on the “I completed these steps” button:

That's it! Now when I go to the address I get to my mailbox. Very convenient!
Conclusion:
Ugh…. The lesson turned out to be difficult, I really hope that you got the hang of it. After halfway through writing the article, I began to regret that I had not recorded a video tutorial; I didn’t know that I would need so many graphics (illustrations, etc.). If everything worked out for you, please unsubscribe, I’m afraid maybe I missed some step... If it didn’t work out, also write in the comments, we’ll figure it out together.
Now I’m thinking about how I can transfer RSS, Google Analytics and other services to this account so as not to re-authorize 50 times. If you have any tips, please leave them in the comments.
See you soon friends!
It is advisable for the site owner to connect mail to it for a Yandex domain, then the mailing address will look stylish and respectable. For example: info@site. This is especially important for organizations, online stores and sites where there is no contact form for communicating with the administration of the site or organization, i.e. The appeal takes place through the contact postal address.
What are the advantages of mail for a domain on Yandex.ru:
- By creating mail for a domain, you can add up to 1000 mailboxes for free for friends and acquaintances, assigning any logins;
- Create a corporate email and distribute a separate mailbox to each employee, formalize and control the process (if you are a manager);
- Place the organization's logo and links in the mail web interface;
- Install a mail account authorization form on the website and a widget with the number of new letters;
- Reliable protection against viruses and spam;
- Ability to access mail through the Yandex home page, via a direct link, through a form on the website or via mobile;
- Various additional features.
Connecting mail for a domain on Yandex in practice is not as simple as it seems at first glance. To do this, you need to have not only a domain, but also access to a hosting provider.
How to connect a domain to Yandex Mail:
Step 4. Now it is necessary verify domain ownership. Yandex offers 3 confirmation methods:
- Upload a file with the specified name and content to the root directory of the site,
- configure a CNAME record,
- or specify a new contact email address using your hosting provider.
Choose your method, but it’s more convenient to create a file, add the specified entry to it and upload it to the root of the site:

Step 5. After you have confirmed rights to the domain, the next and final step is to install and configure the MX record. Here I had to work a little, following the not very detailed instructions from Yandex. I’ll show you step by step what I did so that Yandex found the domain in the DNS. The process may be slightly different for different hosting providers, but the principle is the same.
— We start a new MX record, in DNS Editor:


— The MX record appears in the list of other records in the DNS Editor:

— Next, go to the hosting provider account and delegate the domain to Yandex — make changes to the domain NS server: add dns1.yandex.ru And dns2.yandex.ru.
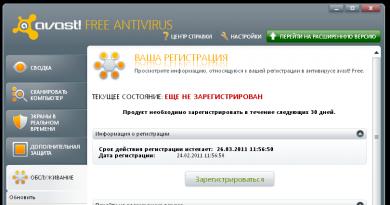
Here you can see Yandex's instructions on delegation -. But my hosting refused to add two new DNS records with a dot at the end, as Yandex recommends. Having added DNS records without a dot, as a result of checking by Yandex (within an hour), the MX record was found, the domain was delegated. But sometimes the verification process takes much longer - up to 48 hours. See screenshot below.
This has a positive effect on the image of the online store and also increases the level of customer confidence.
Using corporate email for an online store allows you to:
- create mailboxes for an online store with a unique domain after the “@” sign (for example: sales@myshop.ru, director @myshop.ru, etc.);
- centrally manage the mailboxes of the online store and all employees;
- control correspondence between employees and clients;
- corporate mail is a convenient tool for communicating with customers of an online store.
Buyers perceive positively when letters about orders and letters from online store managers come from the company’s corporate mail, and not from regular addresses.
The mail.ru service offers the opportunity to use your domain to create mail.
1. Go to https://biz.mail.ru/mail/ and register, or log in if you have an account.
2. Enter your domain and click “Connect”. In this instruction we will use the test domain myshop.ml:
3. The service will ask you to confirm domain ownership. This is done in 4 ways: by uploading an HTML file, adding a meta tag to the code, using DNS check and DNS transfer:
We don’t need the last method, so we choose any of the first three (preferably the first, it’s simpler). Let's look at each of them in more detail.
3.1. When you select the “HTML file” option, download the system-generated file:

And add it in the back office in the “Content => Files” section. Then click “Confirm”:

3.2. The method of adding a meta tag is possible if you have any tariff in InSales except “Start” (since the code editor is closed for this tariff). In addition, minimal knowledge of HTML is required. Select the tag and copy it:


You need to find a section
(usually it is available in the head snippet of the same name or the layouts.layout.liquid template) and add the copied content there. If you have chosen confirmation using a meta tag, but find it difficult to add the tag itself to the code, we recommend contacting technical support.3.3. When choosing the method with DNS checking, copy this content:

In the back office, go to the “Settings => Domains” section and click on the gear next to the domain:

Create a record of type TXT:

Enter the @ symbol as a subdomain, and paste the text copied earlier into the “Content” field:

Click “Create”, after which we return to mail.ru and select “Confirm”.
4. Regardless of the chosen domain verification method, if everything is in order, we will see the text “Domain myshop.ml has been successfully verified” and a proposal to configure MX records:

5. As in step 3.3, in the “Settings => Domains” section, click on the gear, but this time we create an MX record rather than a TXT:

6. The contents of the fields should be as in the screenshot:

7. After clicking “Create”, wait a couple of minutes, return to mail.ru and click “Check Now”:

8. The text “MX records are configured correctly” should appear:

In order for mail to work correctly, mail.ru requires additional entries for the domain. Therefore, we will have to go back to the back office again and make 2 more TXT entries. The first entry should be as follows:
subdomain: @
contents: v=spf1 a mx include:mail..mail.ru ~all

We copy the data for the second entry directly from mail.ru:

Example of adding:

9. Again, wait a couple of minutes and click “Check all records”:

After about 10-15 seconds, a pop-up notification will appear indicating that the entries have been verified. Reload the page, now it should look like this:

This completes the setup for InSales.


If necessary, go to the “Settings” section of the back office and enter the address we created in the “Store E-mail” and/or “E-mail for notifications” field.
I will describe it briefly and to the point, which is what you came here for. To create mail on Yandex with your domain we will need:
- personal domain – purchased from a hosting or domain registrar, it will need to be delegated to Yandex.Domains
- a valid account on Yandex.Mail - it will be the administrator of all mail accounts
Such mail will have separate access to all Yandex services except Yandex.Money
Setting up mail for a domain
Apply now
- We pass authorization in Yandex services (open in a separate window)
- Go to the mail section for the domain (open in window)
- In the "Connect domain" section, indicate your domain and click "Connect domain"
Connect a domain to Yandex.Mail
The advantage of storing mail separately from hosting is:
- when changing hosting, all your mail will not be lost
- when the site (your hosting) is down, mail will work
- removes restrictions on the volume of accounts and does not take up space on the hosting
- usually a spam filter works better, there will be less spam
Therefore, if you are going to link a domain to Yandex mail, you will remove many restrictions and problems in the future.
There are two ways to connect your domain to mail:
- Delegate a domain to the Yandex DNS server
- this is the easiest way
- get a convenient DNS editor
- all changes usually take effect faster
- possible disadvantage - when the hosting changes the IP address, the site may be unavailable; you must manually specify the new IP in the DNS editor
- this method is often difficult
- often crooked and incomprehensible DNS editor
- if the hosting changes the IP address of your server (often due to: DOS attack, infection of the site with a virus, high load of the site on the server, change of tariff plan) on which the site is located, then the site and mail will work
We delegate using the example of RU-CENTER hosting (nic.ru)
- We go through the RU-CENTER authorization (open the login page in a separate window)
- Go to the menu "Services" - "My domains"

- In the table, click on the "DNS servers" column and click "edit"

- We delete everything and indicate only

- Click “Save changes” and you will have to wait several hours, usually no more than 24 hours
Confirm domain ownership in Yandex
- We return to the “mail for domain” site from Yandex (open separately)
- The domain has not yet been confirmed, follow the instructions described on the site “Step 1. Confirm domain ownership”, for me the easiest first option is to create an html file with the specified name and text inside, then upload it to the root directory of the site
- Then click “Check domain ownership”

- If the previous step 1 is done correctly and after clicking on the “Check domain ownership” button and step 1 disappears (see screenshot below), then in our case there is no need to do anything, since we chose “delegate the domain to Yandex”

- We wait several hours for the domain DNS servers to be delegated to Yandex, and it will automatically install MX records
Add a mailbox
- Refresh the window again or click on the button (see screenshot), indicate a new mailbox and click “add”

- Log in to your mailbox, just like in regular Yandex mail (open your mail in another window), select “Add user”

- Specify the full login and password for the new mailbox

- Provide data and confirm the license agreement
- Open Yandex.Mail, make sure the desired login is selected and, if desired, import all mail from the old mailbox using the "Add your mailbox" button.
Mail management
Attention: if you have several accounts in Yandex, then you now need to switch between logins, so in the case of “mail for a domain” you need to switch to the old login in order to continue managing the domain.
Access to mail at mail.site.ru
If you have delegated your domain to Yandex, then you can already open the mail login page on your domain at https://mail.site.ru
If the domain is delegated to hosting, then the hosting must specify the following entry
- host – mail
- type – CNAME
- the entry value is domain.mail.yandex.net. (the period at the end is required)

Importing mailboxes from another server
- Open domain management with a list of mailboxes and click "Go to import page"

- Specify import settings and wait for completion
Mailbox for automatic mailing to all users
- Open domain management with a list of mailboxes and click "Create mailing list"

- Enter an email address that does not yet exist in the list of mailboxes and click "create"
- Set up a list of subscribers and send a letter to this address, it will send this letter to all subscribers
Login to mail on your domain
Access to mail via web interface
There are two ways, universal and additional
- Open Yandex.Mail (open the link in a separate window) and indicate the full login of your mail login@site.ru and password
- Open the address mail.site.ru and also indicate your full login and password
Note: you can transfer all letters from your old mail to the new one by clicking on the "Add your mailbox" button.
Yandex uses avatars from Gravatar.com.
Here you can register an FBL mailbox - a mailbox that will receive information about all letters marked as spam on Yandex. Yandex also supports the header in the letter List-Unsubscribe.
Setting up a gmail.com avatar
To specify the sender's avatar for a mailbox on the google mail service, you need to upload your avatar in your google account profile.
Feedback Loop or information about spam complaints
FBL is a standard for reporting spam complaints from an email service provider to the sender of the email. After the user clicks the “Spam” button in the mail system, the mail system generates a notification that the user has marked the letter as spam. This system is used by such mail services as Hotmail, Yahoo, AOL, mail.ru.
Gmail does not provide FBL, but uses a special List-Unsubscribe header to unsubscribe the user from the mailing list.
If there is a List-Unsubscribe header in the letter, Yandex will add an “Unsubscribe” button next to the “Spam” button.
Please note that emails without a DKIM signature will not be able to send a SPAM click notification.
Checking micro markup in emails
Google provides the ability to test markup in emails with markup-tester.
- Read