How to check if your hard drive is alive. How to check the performance of your hard drive in a few minutes? Testing via HDD Regenerator
Hard disk (HDD) is the most important element of a computer on which all the necessary information, programs and user files are stored. Like any other component, over time the hard drive wears out, its normal operation is disrupted, and failures begin to occur. Along with physical wear and tear, which leads to the appearance of so-called bad sectors (bad blocks), logical errors associated with the file system, indexes and the main file table often occur.
For the time being, you may not observe any problems with your hard drive, but this does not guarantee that one day the hard drive will not die. Therefore, it is important to periodically (once or twice a year) check your hard drive for errors and bad sectors that require repair. Regular monitoring will allow you to track the condition of the media and respond in a timely manner to changes in its condition. Of course, you should not neglect such a proven method of protecting information as backup. The most valuable data must be duplicated on a backup storage device.
Symptoms of a failing hard drive
In most cases, HDDs operate smoothly for several years without requiring special attention. However, in case of improper operation (physical impact, lack of proper cooling), the resource of the storage medium is significantly reduced. In rare situations, there may be a manufacturing defect or sudden failure.
Failures in the hard drive may be indicated by loading the operating system for too long, the unreasonable disappearance of files and folders, and slow startup of applications. Obvious symptoms of a hard drive losing its functionality are slowdowns in programs and long periods of copying files. If the computer constantly hangs, and nothing but restarting helps, then in the process of identifying the causes, checking the hard drive should be the first point.
Using standard Windows 7/10 tools
You can test the media using standard Windows tools. The easiest way is to select the desired hard drive in Explorer, right-click on it and go to the “Service” tab.
Next, click the “Run scan” button and set the scan parameters in the window that opens. If both checkboxes are checked, Windows will automatically correct all system errors and restore damaged sectors during diagnostics.

The results of the audit can be found in the report.

Command line
You can also audit your hard drive using the utility chkdsk called from the command line. In fact, such a check will not differ much from the above option.
So, launch the command line by selecting the required Start menu item. Then enter the command in the window: chkdsk G: /f /r
- G – name of the hard drive being tested (select the drive you will check);
- f – error checking and correction;
- r – detection and recovery of bad sectors.
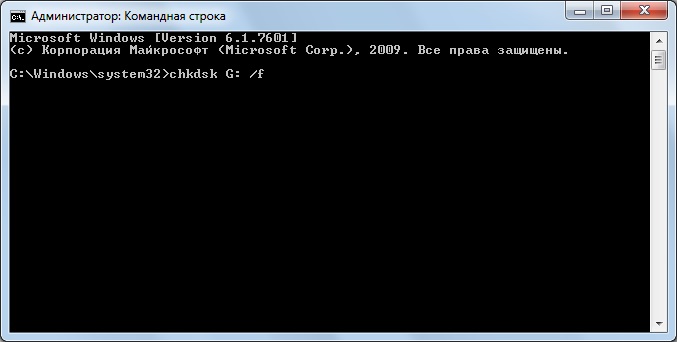
All information about errors and bad sectors found will be displayed as the diagnostics are carried out.

Third-party programs for checking your hard drive
There are many programs and utilities for finding bad sectors and fixing HDD errors. We will list only the most famous ones.
Victoria
Perhaps the most popular hard drive checking tool. The program can be launched both in Windows and in DOS mode from a bootable USB flash drive.
The interface provides five tabs: Standard, SMART, Tests, Advanced and Setup. First of all, go to the section Standard, where in the list of devices we select the hard drive we are interested in. The Drive passport area will display basic information about the HDD.

Next, select the tab SMART and press the “Get SMART” button. SMART (Self-Monitoring, Analisys and Reporting Technology) is a hard drive self-monitoring technology. Those. The hard drive monitors its operation during operation, recording information on a set of parameters that allows one to assess the condition of the media. It is this service information that we are trying to obtain.
After clicking “Get SMART”, either the inscription GOOD on a green background or the inscription BAD! will appear to the right of the button. on red. The second option will indicate that the media is in unsatisfactory condition and will most likely have to be replaced. For a more detailed study of SMART statistics, let's pay attention to the list of parameters on the left. Here we are primarily interested in the attribute 5 Reallocated sector count, indicating the number of sectors remapped. If there are too many of them, it means the disk has begun to “crumble,” that is, its surface is rapidly degrading and it is urgent to make a copy of all data. In this case, there is no point in restoring the hard drive.

Chapter Tests makes it possible to check the hard drive for bad sectors, as well as try to “cure” or reassign unreadable blocks. For simple testing of the hard drive, set the switch to Ignore and start the test with the Start button. Sector health is assessed by measuring response time. The smaller it is, the better. Each response time range has its own color code. The slowest blocks are marked in green, orange and red. Sectors that could not be read at all are marked in blue. If there are a large number of “slow” and unreadable blocks, the hard drive should be replaced.

The Victoria program allows you to restore bad sectors, but we will not consider all the nuances of the procedure. Moreover, “treatment” often contributes only to a slight extension of the service life of the storage medium. To reassign bad blocks, perform a check with the mode enabled Remap. If the restoration was successful, do not rush to rejoice. Re-diagnostics of the disk after a certain period of operation. The appearance of new bad blocks will indicate that the degradation of the hard drive is irreversible, and it’s time to find a replacement.
HDDScan
This is another handy program for identifying hard drive problems. After launching the application, select the drive that needs to be checked in the Select Drive list.

Below we click on the “S.M.A.R.T.” button and get acquainted with the provided report.

Now let's diagnose the disk surface. Click on the round button to the right of the drop-down list of media and select Surface Tests in the menu that opens.
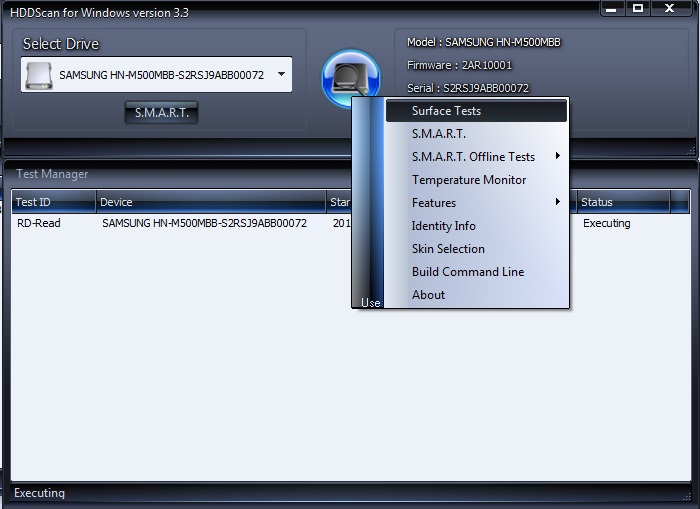

Click on the Add Test button, thereby adding a test to the list and starting its execution.

You can receive information about the testing progress in Graph, Map, and Report modes. All blocks are also distributed into groups with appropriate color marking depending on access time.


At the end, a final report is generated.

Perhaps this is all we wanted to tell you about the methods of checking a computer’s hard drive for functionality. We hope the information provided will be useful to you and help you save important data.
A hard drive is a storage device on which all computer information is stored. It is for this reason that it is important to monitor the condition of the HDD and regularly carry out diagnostics in order to troubleshoot problems in a timely manner. This is ideal, but until problems with the drive occur, users often don’t even think about how the hard drive is diagnosed and why it is needed at all. If your computer and the information on it are of any importance to you, take the time to read this guide, which will help you learn how to test your hard drive using software without spending a lot of time.
We check the functionality using built-in Windows tools
If you do not have the time or skills to use the special software needed to diagnose the HDD, you can use what is built into Windows natively. The steps are simple:
Through Explorer or the “My Computer” shortcut, go to the HDD.
Right-click on the drive icon, then select “Properties” in the menu that opens.

On the page that appears, go to the “Service” tab located at the top. Click "Check".

Wait until the built-in program finishes checking the health of your drive.
Unfortunately, this method is not as effective as diagnostics using special software - it can only indicate some errors and prompt the user to scan sectors more seriously. To thoroughly scan and eliminate faults and damage, a more serious approach is needed.
Scan HDD in third-party software
There are a lot of programs with which you can find out about the presence of hard drive errors, as well as remove them, and parsing the instructions for using each of them is a very long and complex matter. For this reason, below you can familiarize yourself with a method that involves using the popular Victoria program. When choosing other software, remember that the principle of operation of disk diagnostic applications is practically the same from program to program. Here are the instructions for Victoria:
Run the application as an administrator by calling up the menu using RMB on the program shortcut.

In the application window that opens, find the Standard tab at the top and click on it.
On the new page you will see a list of media detected by your system - they are listed in the upper right side of the application. Select your HDD, then click the Passport button. If you did everything correctly and the media is available for use, Victoria will immediately notify you about this.

Go to the SMART tab, located, as a rule, next to the tab you previously opened. Here you need to select Get SMART and wait for approval from the application.

Go to the TEST section, then press the START button to start diagnosing your HDD.

During the verification process, Victoria will display the HDD status with a grid of squares. Gray squares indicate that everything is fine - for normal operation of the equipment, either all or the vast majority of all sectors must be this way. Red squares are damaged sectors that hang like dead weight and interfere with the operation of the drive.

If you have blue squares - unreadable sectors, you need to rescan them in Victoria with the Remap mode enabled.
Now you know how to check the media status.
Remember that over time, there are more and more unreadable sectors on the disk - they appear as a result of mechanical deformations, intensive memory use, and also for numerous other reasons. This is a normal phenomenon that can be compared to the aging of the host.
Share the article with your friends so that they also learn about this and also learn how to diagnose HDD errors on their own. Don't forget to subscribe to updates so you don't miss new interesting materials!
Frequent errors in the system or even reboots with a “screen of death” force a thorough analysis of all computer components. In this article we will talk about the easiest way to check bad sectors on a hard drive, as well as assess its condition without calling expensive specialists.
All further actions will be carried out using special software. You don’t have to use each software one by one, because it will be enough to choose only one option. First, we suggest that you familiarize yourself with all the presented methods in order to ultimately choose the ideal solution for yourself.
Method 1: HDD Health
The simplest and fastest program that can quickly check a hard drive for serviceability is HDD Health. The local interface is very friendly, and the built-in monitoring system will not let you miss serious problems with the memory device, even on a laptop. Both HDD and SSD drives are supported. The process of use itself is as follows:

Unfortunately, the program, other than for informational purposes, does not in any way assist the user in correcting errors. It is suitable for one-time assessment and monitoring, but to correct detected problems, you will need to contact Method 2 or other programs.
Method 2: Victoria
Victoria is rightfully considered one of the best programs for testing and restoring hard drives that have bad sectors. It does not require installation, because the developers immediately created a portable version that runs from the archive. The process of checking the drive here is as follows:
- Download the archive from the official Victoria website, open it and run the executable file.
- Move to the tab "Standard".
- Click the button here "Passport" to view the hard drive information, and then select the device you want to check.
- Drive information is also displayed in the status bar at the bottom.
- In the tab "SMART" you can get basic information about disk health. To do this, click on the button "Get SMART".
- The output of information will not take much time. However, after that you will receive a table with values and status marks. Check it out to be a little aware of the health of your device.
- Then go to the main tab "Tests".
- Leave all settings at default for now, just run the scan.
- Blocks of different colors will begin to be created in the window. The range up to green is considered normal, then blocks are considered unstable, and blue marks mean the presence of errors (most often these are bad sectors). Latency information is displayed in the section on the right.
- Upon completion of scanning, you should separately familiarize yourself with the number of red and blue blocks. If it is large enough, then the disk is considered unstable.
- Recovery occurs due to the reassignment of bad sectors; during the scan they are simply hidden. This is done through testing with the attribute set "Remap". You will learn more detailed information about restoration a little later.


Additionally, we would like to point out that some users may experience problems running tests in Victoria due to the AHCI mode being installed. To avoid difficulties, it is recommended to select IDE (Compatibility) mode in the BIOS. Find all the necessary information on this topic in the materials listed below.
If during the analysis you found a large number of bad sectors and want to restore the drive using the same software, we recommend that you read the instructions provided in our other article at the following link. There, the author described this process in as much detail as possible, explaining each action that is necessary to complete.
Method 3: HDDScan
Another program similar to Victoria, but with a more modern interface is called HDDScan. We recommend using it in the case when some difficulties arise with Victoria or you are not satisfied with it for certain reasons. The testing process is not much different here.
- To get started, you can get basic information about the health of your drive by selecting it and clicking on "SMART".
- The information here is displayed at approximately the same level as was shown in Victoria.
- Next, return to the main menu and run one of the types of tests. You will learn more about them below.
- Leave the analysis settings unchanged.
- To display detailed information, double-click the left mouse button on the task line.
- As you can see, the scan map is almost the same as in the version discussed earlier, only the color marks are slightly different in delay.
- Upon completion of the analysis, you can view a detailed report, which shows the status of the drive in the form of a graph and additional information.


Now let's take a closer look at each testing option, because it is important to choose the right methodology to get accurate information:
- Verify— scanning sectors without reading data on them;
- Read— checking sectors with reading data (accordingly, it will take much longer);
- Butterfly- reading blocks in pairs, one from the beginning and one from the end;
- Erase— recording blocks filled with sector numbers (delete all user data).
The program, like the first one, only diagnoses problems. Above, we have already provided links to articles through which identified failures can be eliminated.
Conclusion
Nowadays, various developers have created a fairly large number of programs that allow you to check your hard drive for errors. They work on approximately the same principle, so there is little point in disassembling them. Instead, we recommend that you read the separate material on our website, which contains reviews of the most popular detailed solutions.
If you suddenly discover that the drive you are using is not working at all, repairs are a must. However, only specialists can not always help with this. Certain actions are quite doable manually. Read more about this further.
If the hard drive is not visible in the system at all, refer to the following material:
Today you were introduced to software methods for checking your hard drive for functionality. As you can see, there is nothing complicated about this; you just need to select one of the proposed software to start testing.
Reading time: 6 minutes. Views 321 Published 12/01/2016
In a modern computer, the hard drive is the most unreliable device. Since the number of failures of this component is very large, and the whole danger is that you cannot predict the time when it will break, but you can periodically check the hard drive for serviceability. Due to untimely diagnosis and prevention, many users lose important information. Therefore, I recommend that you always pay attention to how your computer works.
If so, then you need to check the hard drive for serviceability. I will tell you how to do this in this article.
Let's first look at how a hard drive works and what it consists of.
HDD consists of glass and aluminum plates, which are coated with a special layer of ferromagnetic material. In simple terms, a hard drive is a magnetic recording device.
For clarity, I am attaching an image of the insides of the HDD.
When producing hard drives, the final stage is low-level formatting, which forms a “disk map”, dividing it into tracks and sectors. Special marks are also applied to ensure that the head falls into the desired sector. A sector is a unit of measurement on a hard drive that is equal to 512 bytes.
To check the hard drive for serviceability, we will use special programs.
Checking HDD temperature
It is important to monitor the temperature of the hard drive, as overheating can lead to its failure. To check the temperature of the hard drive, you can use utilities such as AIDA or HDD Life.
You can download these programs on the official websites, to do this, enter the names of the programs.
After installing the HDDLife program, run it and you will clearly see the status of your hard drive, as well as its temperature.
You can also perform a disk test if you wish.

In the AIDA program you can also view the disk temperature parameters.
To do this, launch the program, open the item “Computer” - “Sensors”

All information is at your fingertips. If you see that the temperature of the hard drives is high enough, you need to install active cooling. Special cooling systems for hard drives are sold in stores.
We check the status of the hard drive using CrystalDiskInfo.
You can download the CrystalDiskInfo program from the official website, it is distributed free of charge, but has quite rich functionality and can provide all the necessary information to the user about the condition of the disk. If the program, after diagnostics, determines that the disk is fully functional, it will assess the condition as “Good”. If there are any problems, the program will give an “Alarm” or “Bad” rating if the disk is in a dying state.

You can also view S.M.A.R.T information in CrystalDiskInfo - this is the initial data by which the program evaluates the condition of the disk.
We check the status of the hard drive with the Victoria program.
In order to prevent problems with your hard drive in advance, I recommend using the Victoria program for Windows. With its help, you can get a large amount of important information about the disk, as well as check the disk for bad sectors and prevent it. The program has a free and paid version; to determine the state of the disk, it will be enough for us to use the free version. The program is suitable even for beginners, as it has an intuitive interface, and when scanning the HDD, the user clearly sees the state of the sectors.
Since we are only interested in the condition of the disk, we will not delve into the process of deep checking and restoring problem sectors, if any, but for a complete understanding, I will describe the main functions. First, download the program, it is quite lightweight and weighs less than 1 MB, so after downloading, launch the application - the icon with a green cross. In the main program window you will see a horizontal menu with switching tabs. Let's look at the most important ones.

During the test, the program will scan the disk for readability of sectors; as you can see, the quality of sectors is highlighted in different colors. Let's figure out what each of the colors means.
- Gray sectors are the fastest sectors, we have no questions about them.
- Green sectors are sectors that work more slowly, but they are also in good condition.
- Orange - slow sectors, if the disk has a lot of such sectors, then you need to think about its health, because because of them, the disk starts to work slower, and as a rule, such sectors will fail in the future.
- Red – sectors are damaged and cannot be read. If the program detects them, you need to think about a new disk.
- Blue sectors with a cross are those that caused a failure when reading. Information from them cannot be restored, but you can replace this sector with a working one, and perhaps the disk will work a little longer, but it is better not to delay the replacement.
If you pay attention, there are four buttons on the test tab panel: Ignore, Erase, Remap, Restore, they will also be useful to us, let’s look at their purpose.
- Ignore is a function in which only a surface test is carried out and no actions are applied to bad sectors.
- Erase – when this function is enabled, bad sectors will be erased.
- Remap – if this function is enabled, the program will try to replace bad sectors with working ones. That is, when scanning, the program finds a bad sector, marks it as not working and replaces it with a good, working sector.
- Restore – this function is available only in the paid version of the program. When enabled, the program will try to restore the non-working sector.
I have described the main functions of the program; all you have to do is select the one you need and run the test. It may take quite a long time, depending on the capacity of the hard drive, as well as its condition. Therefore, please be patient. If many problem sectors are found on your disk, then do not delay in purchasing a new one, and make sure to transfer all the important information to another as soon as possible, and not regret losing it in the future.
That's all for me, now you know how to check the health of your hard drive, and you can take steps to replace it in advance.
Good mood to you all! Friends, in this publication we will look at one very simple and primitive way of how check hard drive for performance and errors using Windows 7, 8 and 10.
This method is very suitable for beginners, as well as for identifying bad sectors of the hard drive at the stage of their early occurrence. Moreover, in this situation you only need to press a couple of buttons.

And in the window that opens, right-click on the hard drive. Then select the “Properties” section in the context menu:

And after that, follow the path “Service-Check”:

Sometimes the operating system may display a message stating that no verification is required. We don’t pay any attention to this and confidently click on the “Check disk” item:

If you are using Windows 10, the disk scanning process will automatically start, upon completion of which a verdict will be displayed: there are errors or there are none:

If you click on the "Show details" item, the system event log will open, where you can familiarize yourself with all the details of this process:

If you use Windows 7 or 8 in your work, the “Check” service section will differ slightly from that shown in the article. But this doesn’t change the essence, you just need to check the two existing boxes and that’s it.
Also, in these versions of the operating system, when checking with the letter C, you will need to reboot the system, since a message will be displayed that the disk is currently busy and the diagnostics will not start.
That's all, friends, now you know exactly how to check your hard drive for functionality and errors using Windows 7, 8 and 10. And in this article we will look at a more advanced method. And in conclusion, as always, you can watch a scary video.