Preparing a file for laser engraving in the ArtCam program. Creating a control program for engraving in the ArtCAM program Control programs for CNC laser
The CNC Master program, starting with version 2.7.5.0, supports working with DXF files, which can significantly reduce the complexity of writing many programs to control a CNC machine.
Writing a program for artistic engraving, both 3D and 2D, is a labor-intensive task, the solution of which seems extremely difficult without automation tools. For the case of 2D engraving, the image can consist of hundreds of thousands of primitives. Manually writing programs for such images would require considerable time. In the case of preparing a control program (hereinafter referred to as CP) using modern information processing tools, this operation can take only a few minutes, taking into account the time for preparing the image file.
The algorithm for generating NC for 2D engraving using the CNC Master program is quite simple:
|
1. Launch the CNC Master program (version 0.2.7.5 and older) |
|
2. Select the “Engraving” tab |
 |
 |
| 4. Click the “Load DXF” button, after which the file selection window will open |
 |
|
5. Select a pre-prepared file and click the “Open” button |
 |
| 6. Set the engraving parameters (depth and speed) and click on the “Generate” button |
 |
|
7. After generation, the “Control program” tab will open with the result of the generation |
 |
| 8. Select “File” in the top menu, then “Save”, save |
 |
|
9. The program is ready. We load it into the machine control program and process it |

Engraver Master is a program that is designed to prepare burning patterns on a laser cutter. Using this free software, you can complete all stages of preparing an image for further application to wood or other material. EM is quite easy to use and offers a good set of functions, but if you are looking for an even more intuitive solution, we recommend paying attention to the program.
Usage
So, at the beginning of work on the project, the user will be asked to select the size of the workpiece. Next, you will need to upload a drawing (all popular graphic formats are supported), select its style and make minor external changes, then position the workpiece and send it for “burning”. In this case, the standard laser cutter parameters will be used. In order to change them, you can refer to the special section.
Engraver Master makes it possible to control the speed and depth of cutting, supports the burning mode for black dots, and also allows you to specify the step size of the laser power in individual areas. As for compatibility, Engraver Master works with almost any engraver model. You just have to download the drivers to connect them to your computer yourself from the manufacturer’s official website.
Additional functions
Among the interesting features of the program, it is worth highlighting the pause and continuation of “burning”, as well as convenient tools for setting up the workspace. If necessary, it allows you to work with several devices connected via a COM port at once.
By default, Engraver Master does not provide localization. But if necessary, it can be translated into Russian using an amateur Russifier, which, by the way, is made of very high quality.
Key Features
- preparing images and diagrams for burning on a laser cutter;
- control of the basic parameters of “burning”;
- convenient positioning and adjustment of the work area;
- support for burning mode on black areas;
- nice interface in Russian.
To correctly download software for an Arduino-based CNC machine, right-click on the corresponding link and select the item from the drop-down menu Save object as.
If an error appears when launching the application, run Install.bat to install the missing components;
- You may need to configure an antivirus or firewall for the system to check for updates to work correctly;
- If errors occur again, write to me by email: andrey@mdls.ru ;
Latest version 2.1.6
Changes
Changed the main menu;
- Added a form for working with the impact head
Latest version 2.1.5
Changes
The form of laser cutting according to the drawing has been improved;
- Optimized traversal of shapes when laser cutting according to a drawing
Latest version 2.1.4
Changes
The forms of engraving paintings with a laser and engraving paintings with a burner have been changed. Now there is no need to pre-prepare images for specific sizes. Please note that for painting/photo engraving to work correctly, you must correctly specify the diameter of the laser spot/tip.
- A button has been added to the form for laser engraving of paintings Invert. The button allows you to invert the image tones regardless of pseudo-toning.
- When burning with a hot thread, the ability to line-by-line drawing of the tip trajectory has been added. Necessary to speed up work on “weak” computers.
Latest version 2.1.1
Changes
Minor bugs fixed;
- The GDI+ library is connected, providing the ability to open images in any raster formats.
Latest version 2.0.8
Changes
Improved opening of images on all forms of working with a CNC machine. Now color depth does not matter. That is, the program can open a raster image of any depth. Guaranteed extensions supported: BMP, JPG. The ability to open other formats depends on the OS.
Most of the articles on the site describe working in the ArtCAM v8/v9 program. If you are using later versions of the program (v11/v12 or later), for the convenience of working with the program and articles, you must configure the layout after starting ArtCAM, as shown in the figure:
The file preparation is designed for a blue laser with a power of 1..10 W with a beam diameter of 0.25 mm.
A black and white dotted drawing in .bmp format prepared in a graphic program convenient for you is opened in the ArtCam program
File - Open

If necessary, scale (resize) the model.

In the ArtCam program, you need to change the model resolution - increase it approximately twice. Model ->Change resolution.

Use the slider in the left area to set the new resolution (1). The new resolution parameters should be approximately twice as large as the current resolution parameters. Next, click the Apply button (2).

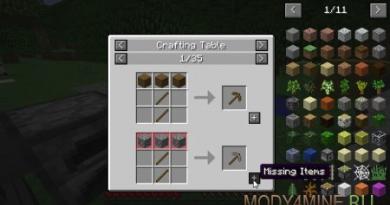
Call the Form Editor. Model -> Form Editor or simply double-click the left mouse button on the black square at the bottom of the image (1). In the window that appears, select the FLAT button (2). Next, enter a value of 1 mm for the Initial height (3). Next - Subtract (4), Apply (5), Close (6).

A relief will appear in the 3D view area.

We create a LASER tool based on an end mill. For this
Go to the UE tab (1),
Select TOOL DATABASE (2),
Add a new tool (3),
Enter the name of the tool, select the type of tool - END, units of measurement mm/sec (4),
We set the diameter to 0.001, the processing depth is minimal (5),
Step - 0.001, speed, spindle - any (6),
Save the changes (7), save the creation of a new tool (8).

Staying in the NC tab (1), select RELIEF PROCESSING (2).

We adjust the trajectory of movement - SNAKE IN X, angle - 0, allowance - 0, accuracy - 0.001 (1).
Safety height in Z - 1, return point in X and Y - 0, in Z - 1 (2).
Tool Select (3) laser 0.001 (4),Select (5).

We indicate a step of 0.25 mm (laser focus) (1), depth per pass of 1 mm (2)

Determine the material (1), height of the workpiece 1.0 (2), pay attention to the offset (3), OK (4), give a name to the workpiece (5), calculate now (6), close (7).


Move the UE to the saved section (1),
Select G-Code (mm) (2),
Save (3),
Select the storage folder (4) and set the file name (5),
Save the changes (6) and close the window (7).

Next, you need to open the program program in Notepad and replace (Edit - Replace) all values of Z 1.000 with Z 0.010. If necessary, change the speed value to the required F1000. This is done so that the Z axis does not waste time, and the head moves at a constant speed without stopping or delaying turning the laser on/off.

Photo of a picture obtained by burning on a tabletop milling machine with a laser installed.

ATTENTION! When working with a laser, follow safety precautions. ALWAYS use glasses!
Burning from a photograph on an engraving and milling machine Modelist3040

Video of burning on a desktop milling machine Modelist3040
Video of laser paper cutting on the Modelit3040 machine
When purchasing a laser engraver, a satisfied buyer usually quickly masters the technology for making simple images on various surfaces: wood, plastic, glass, metal. Having dealt with applying simple drawings, I want to move on to printing full-fledged photographs. At this moment, the owner of a laser engraver is faced with the problem of creating halftones. Printed photographs are black and white, without a soft color transition.
Programs for image processing when engraving halftones
Endurance Laser Labs have tried to solve this problem using various laser engraving software. Today we'll take a step away from popular programs like Benbox or RIBS and take a closer look at the little-known Acan laser engraving software.
This program is free, runs without installation and has all the necessary options for working with a laser engraver. The main buttons are standard, perform standard functions and do not need explanation, as they are intuitive to the user.
In addition to the full version, there is a lightweight Acan-mini program with truncated options for customizing texts and images. (Please note that in the mini version it was not possible to add a caption to the picture).
What Acan has that Acan-mini does not:
- Has more settings when entering text.
- Ability to set the degree of image tilt.
- Overlaying several pictures and/or text on top of each other and combining them into one.
- Before burning, the Acan version allows you to outline with a beam the perimeter in which the image will be applied.
- It has two operating modes - engraving and cutting. Switching is done using the button at the top of the program.
- Allows you to load G-code.
- In the program folder there is an archive with the free vector graphics editor Inkscape, which allows you to create g-codes for laser cutting.
Both programs perform their functions, but have a number of shortcomings that appear during regular use. For example, it is difficult to specify the exact size of images. However, both versions can render halftones of gray. We invite you to watch a video where employees of the Endurance laser laboratory demonstrate the operation of the Acan-mini version and print an image with different halftones:
Both versions of the Acan program are available for download on the Endurance laser laboratory website at the following link:
http://endurancerobots.com/download-center-lasers/
Image processing to produce high-quality halftones
To obtain high-quality engraving with well-defined gray halftones, before starting the laser engraver, you need to save the image in Bitmap mode. We used the graphic editor Adobe Photoshop CC for this.
To save an image in Bitmap mode in the English version of Adobe Photoshop, follow these steps:
1. Open your drawing in Adobe Photoshop.
2. Set the drawing to grayscale (halftone) mode. To do this, go to the Image/Mode/Grayscale menu. The picture will turn gray.