How to set up an adsl internet connection. Setting up an ADSL modem How to connect an adsl modem to a laptop
Greetings! Today’s article is addressed to those who have home Internet via a telephone line using an ADSL modem connection. Many providers still work with this option, usually providing not only Internet services, but also telephony or digital TV. The connection diagram is built a little differently, which means that setting up wifi via an ADSL modem router happens differently.
How to connect an ADSL modem to a wifi router?
Let's consider two possible schemes for setting up an ADSL modem and router using the Internet via ADSL technology. When the provider employee who connected the Internet leaves you, the diagram looks like this:
- The telephone cable is connected to a splitter (a tee that splits the plug for the telephone cable).
- From it, one telephone wire goes to the landline telephone itself, and the other to the ADSL modem.
- And from the modem the network cable is connected to a connector on the computer.
The first way to distribute such Internet via wifi is to make one additional link in the form of a regular wifi router. We simply connect it to an ADSL modem and a computer with a network cable (from the modem to the WAN port, from the PC to the LAN), and we get the following diagram:

To create this structure we can use two methods:
- So that the modem operates in bridge mode, and the router operates as a router (Router, RT) or access point (Access Point, AP). In this configuration, all Internet connection settings are made not in the ADSL modem, but on the computer or, in our case, in the router.
- The other is when, on the contrary, the modem is configured to connect to the provider, and the router simply extends this signal.
The second option is quite simple. You do not touch anything in the settings that your provider’s employee has already made when connecting, but simply configure the router to receive a dynamic IP address and activate the function of dynamic distribution of addresses over the DHCP network.
The first one is a little more complicated, so let's figure out how to implement it using the example of the most common budget ADSL modem model, D-Link. First of all, insert the telephone cable (with a small connector) into the corresponding ADSL connector of the modem, and into the LAN connector - the patch cord that we use to connect it to the PC.

The adsl setup itself is located on the computer. Go to Windows 7 “Start > Control Panel > Network and Internet > Network and Sharing Center > Change adapter settings.” Here we find “Local Area Connection”, right-click and select “Properties > TCP/IPv4 Protocol” and set the receipt of all settings to automatic.

After that, go to the browser at http://192.168.0.1 - this is the network address in the admin panel of the D-Link modem. Enter the login-password pair admin-admin.
In the menu, go to the “Quick Setup” section, uncheck the “DSL Auto Connect” box and enter the values for VPI and VCI - they should be specified in your service connection agreement or ask your provider. In the “PORT” item we leave “0”.
After that, click the “Next” button and check the “Bridging” value, that is, we switch the modem to bridge mode.

Next, check the “Enable Bridge Service” checkbox and set a name for our bridge. Then on the next page we write down the IP address and mask of our modem, that is, 192.168.0.1 and the standard mask 255.255.255.0.

Click “Next” again, look at all the final settings and click the “Save/Reboot” button to apply all the changes. The modem will reboot. We also reboot the computer so that it receives a new network IP.
Let's move on to the router. First of all, we take out the patch cord from the PC, connect it to the router, and the router, in turn, connects it with the same patch cord (RJ-45 cable) - to the modem via the WAN connector, and to the computer via LAN. If you work with Asus routers, then it will look like the screenshots below. Go to the “WAN” menu section and select PPPoE as the connection from the drop-down list. Next, enter all the data provided by the provider (login, password, possibly something else). And we apply all these settings.

That's it, after this your router, through the mediation of an ADSL modem, should start broadcasting the Internet.
Setting up an Asus ADSL router
The second method is that we remove the ADSL modem link from the diagram and replace it and the router with a single device - a WiFi router with support for ADSL connections.

It looks the same as a regular router, only with a socket for inserting a telephone cable. Zyxel, TP-Link, D-Link, Acorp - any brand of network equipment has such a device in its model range. As an example, I suggest you first familiarize yourself with the Asus DSL N-12U model.

All connection settings will be made in the admin panel of the router itself. First you need to connect the telephone cable to the ADSL modem router, and the Ethernet patch cord to the computer. We go to the address - you already know which one 100 times - enter the well-known login and password if you still haven’t changed them (by the way, if you forgot them, you can look at the bottom of the router).
We go to the settings page, select manual settings, select a provider from the list, the settings for which are already built into the device. If it is not there, then select “Not in list”. Also here you will need to fill in all the parameters for VPI, VCI, Protocol and Encapsulation Mode,

and also in the next step your login and password for access. All this can be found out from the provider or from the contract.

These were the modem part settings. Now let’s go to the router room, set the network identifier and encryption keys.

How to configure a TP-Link ADSL modem?
Now we’ll look at the more sophisticated ADSL modem-router TP-Link Archer VR400 with a USB input, to which you can later connect a printer or 3G modem.
Here we will also use the quick setup, which is located at http://192.168.0.1. We are greeted by a new, nice, minimalistic interface.

I hope I answered the question “How to connect an ADSL modem through a router”
For a snack - step-by-step video instructions for different models:
One of the most popular and accessible ways to connect to the World Wide Web today is an ADSL connection. The abbreviation ADSL stands for “Asymmetric Digital Subscriber Line” - an asymmetric digital subscriber line. Despite its simplicity and almost one hundred percent availability, a mobile connection is significantly inferior in its capabilities to an ADSL connection: the data transfer speed is lower, the range of services is smaller, and the cost of connection is much higher. Connection using ETTH technology (“Ethernet to every home”), GPON and FTTH (using fiber optic cable) today are still available only to residents of the multi-apartment sector in large settlements, since they are economically justified for mass connections. Therefore, today an ADSL connection is relevant for most users, especially in small towns.
ADSL connection problems
Despite its mass availability and fairly decent technical characteristics:
- Practical access speed: up to 24 Mbit/s;
- Length of subscriber line for satisfactory operation: up to 7.5 km;
- Possibility of receiving the service triple play- simultaneous transmission of voice, video and data.
This technology uses a telephone subscriber line with all the ensuing problems.
Let's consider a typical subscriber connection scheme using ADSL technology:
The practice of operating this technology shows that the most common problems that lead to the user having slow speed on adsl connection, or no Internet access at all, are:
- Telephone line failure;
- Malfunction of the access equipment port (DSLAM) on the provider side;
- Incorrect connection on the user side.
Telephone line problem
This is the most common type of damage that occurs in the Subscriber-Provider chain. Unfortunately, the telephone line is far from perfect. While it “gets” from the Internet provider to the user, it can pass through quite a lot of different sections: backbone, cable, distribution cables, cables between cabinets, and even the so-called overhead wires - wires going from the cabinet to the subscriber by air. Each of these sections, in addition to attenuation of the useful signal, can also introduce various interferences, leading to both a general decrease in speed and the fact that the subscriber experiences frequent disconnections during an adsl connection.
Of course, in order to measure the physical parameters of a telephone line to obtain its quality characteristics, you must have special instruments and the ability to use them. But an ordinary user can also easily assess its condition in order to understand why certain access problems arise. To do this, you need to connect to the ADSL modem and look at the ADSL connection statistics.

It’s not just problems with the communication line or the provider’s equipment that lead to problems with the Internet. When asking the question “How to increase the speed of an adsl connection?”, the user sometimes forgets that malfunctioning equipment or an incorrect connection on its side can also cause failures and low speed. Therefore, before calling technical support, you need to check whether the telephone line, modem and telephone are connected correctly.
First of all, you should start with splitter– a special device that is designed to prevent high-frequency noise from the modem from interfering with telephone conversations. In essence, it is a special filter for separating the operating frequency bands of the modem and the telephone.

Let's consider the correct connection diagram for user devices:

Please remember that you cannot connect telephones or any other telephone devices to the splitter! All phones must be strictly connected to the PHONE jack! Otherwise, the connection will be unstable, and, as a rule, with low speed. In this case, disconnections during adsl connections will be almost constant.
Connecting an adsl modem without a splitter will lead to noise during a telephone conversation and, as in the first case, to poor connection quality. However, if you do not use a telephone, the modem can be connected to the telephone line without this device.
Excessively long telephone extension cords should be avoided. If you really can’t do without it, you need to choose ones that use not four, but two conductors. This will reduce interference and improve connection quality.
Unfortunately, the adsl modem is also not immune to damage. Moreover, there are obvious damages, that is, when it simply does not work or does not work correctly, and there are hidden ones associated with damage to its linear part. Especially often, such malfunctions often occur after a thunderstorm. At the same time, the modem itself is working and can even establish a connection with the provider’s equipment, but it is unstable, or the connection occurs at low speed. The first impression that arises is that the telephone line is faulty, since the “symptoms” are very similar. In this case, you should take readings of the main characteristics of the connection from its menu in the “Statistics” section, and check it at the provider’s stand, asking to take the same data. If the readings are similar, most likely the linear part of the modem is “burnt” and requires repair.
- If the speed of Internet access periodically decreases, start checking by examining the stability of the established connection - the “link”. (The English version of the word is Link). Follow the indicator with the same name. On some models it is called ADSL. During operation, if the adsl connection is stable and established, it should just light up. If it flashes periodically, the connection with the provider is unstable and the communication line needs to be checked.
- Monitor the upstream speed on the line. Practice shows that the lower it is, the lower the quality of the connection. Ideally, it should be equal to or close to 1 Mbit/s (unless specifically limited by the tariff).
- If the connection is constantly interrupted, you can try to turn off the splitter and the phone by temporarily connecting the modem directly to the line. This eliminates the possible influence of other devices on the connection. If in this case everything works stably, then you can turn on the devices one by one to find out which of them has an effect.
- Always check the quality of contact in the connectors. A modern RJ11 telephone connector is not a very high-quality product; its contacts often oxidize. Remove and reinsert it two or three times.
Tweet
The D-Link 2500U modem is very common among ADSL Internet users. Cheap, unpretentious and works even with poor telephone lines, it is quite suitable for providing a computer with Internet access. Although there are modern, low-cost Wi-Fi modems on the market, the outdated 2500U without wireless technology still struggles in some homes.
On the Internet you can find dozens, if not hundreds, of instructions for setting up this modem. However, there are practically no clear instructions for quickly setting up and connecting to the World Wide Web. I will try to correct this situation.
Connecting a modem to a telephone line
Any ADSL modem is connected to a telephone line using a wire with connectors (plugs) of type RJ-25, RJ-14 or RJ-11, that is, the most common telephone wire. What they look like and which ones fit is well explained.
This wire is not connected directly to the telephone socket, as its predecessor did - a buzzing and squeaking, terribly slow Dial-Up modem, but through a special filter - a splitter.
To avoid noise when picking up the phone, so that the Internet works stably and quickly, you need to connect a splitter.
This is a box that filters the signal separately for the modem and separately for the telephone. Click on the picture below, where I have drawn two options for connecting the splitter: As can be seen from the text in the picture, you need to connect the splitter Necessarily.
And not just connect, but connect correctly - both the modem and the phone are connected through it to the appropriate connectors.
A common reason for a slow, unstable Internet is the incorrect connection of this small box.
Connecting a modem to a computer
Everything should be simple here. We take the blue cord from the box with the modem, insert one end into the yellow connector of the modem (the color may be different, it doesn’t matter), the other into the same port on the back of the computer. Don't you find it? Very rarely, but it happens. Then you need to go to the store and buy any network card, any cheap one for 10/100 megabits is enough. Then it needs to be installed in the PCI slot of the motherboard. How to do this is written
If you have Windows Vista or Windows 7, at some stage a window will appear asking you to select your network type. Select "Public Network". In this case, you do not need to touch the network card settings, everything will be configured automatically. After proper connection, the light on the modem with the inscription “LAN” will light up (or blink). If you encounter problems, read the fourth part of the article; there are solutions to common problems.
There are two types of ADSL modem connections - bridge and router settings. The difference is that when connecting with a “bridge,” the computer itself connects to the Internet, using a modem only for the actual data transfer. When connecting with a “router,” the modem connects itself, without the help of a computer, and then “gives” the Internet to the computer.
The advantage of connecting with a bridge is that there will be no heavy load on the modem when transmitting data. This is useful for high speeds (6 megabits and above) and frequent use of torrents. Minus - the Internet will only turn on when the computer is running.
The advantage of connecting a modem to a “router” is that you don’t have to have your computer turned on to connect to the Internet. This is convenient, because to connect to the Internet you just need to turn on the modem.
Of course, I greatly simplified the explanation and told only the essence. Because I prefer connection "router", further we will talk about him.
To connect the D-Link 2500U to a router, do the following:
1) Turn on the modem, wait 20-30 seconds. The “Power” light should light up
2) There is a small round hole on the back of the modem between the connectors. This is the reset button. Press it with something thin (a match, for example) and hold it pressed for 10-12 seconds. The modem must be turned on during this procedure.
3) Wait 30-60 seconds.
4) Open any browser (Internet Explorer, Chrome, Firefox, Opera - it doesn’t matter), enter the address 192.168.1.1
A login and password window will appear. Enter admin in both fields. A page like this should open:
The page may be blue, it doesn't matter. There are quite a few versions of the D-Link 2500U modem, but the settings are always the same. However, like other modems.
If the page does not open, try entering the addresses 192.168.0.1, 192.168.2.1. If a message appears indicating that your password is incorrect, try entering Admin as your login instead of admin.
5) Click on the left Quick Setup (Wizard button in some versions of the modem). You will see the following:
6) Uncheck “DSL Auto-connect”. Then the window will look like this:
Here you only need to enter the VPI and VCI values. Each provider has their own. You can find out these values by calling your provider’s technical support or searching for them on the Internet. Naturally, you will have to look for a computer with the Internet or log in via phone. Here the decision is up to you.
The provider “Rostelecom South: Kabardino-Balkarian Branch”, which I use, will have VPI and VCI values 0 and 67, respectively, I enter them and click Next.
7) In the next window, you need to select the router mode – PPP over Ethernet (PPPoE) and click Next.
You also need to check the boxes that I noted in the picture. The “Enable KeepAlive” setting may simply be called “KeepAlive”, and “Retry PPP password” may be completely absent.
Advice to those who use the provider “Rostelecom South: Kabardino-Balkarian Branch” (formerly “UTK Kabardino-Balkaria”) - if the Internet does not work after setup, reset the modem parameters and configure again, adding the letters “@” at the end of the login without a space and quotes pppoe." Perhaps this advice is also useful for other branches of Rostelecom.
Click Next.
9) On the next page there will be settings that you should leave as they are:
The only note: I have come across versions of the modem where some of the settings from the previous page were transferred to this one. So the values “Retry PPP Password on authentication error” and “Enable keepAlive” will probably be here.
Click Next.
10) You will see settings that are strictly not recommended to be touched unless you know what they are for:
Click the Save/Reboot button and wait. You can close the page; it is no longer needed. After about a couple of minutes, the light on the modem with the words “i” or “Internet” will blink - this indicates that the modem is configured correctly and the Internet is working.
Congratulations, you have set up the Internet!
If something doesn't work - problems and solutions
Yes, this happens, unfortunately. I will list the most common problems, and also answer questions that I have been asked more than once, asking for help:
Problem: The LAN light does not light up.
Solution: check that you have inserted the cable tightly into the connectors of the modem and computer.
Problem: address 192.168.1.1 cannot be opened.
Solution: Check if the modem's LAN light is on. Turn off your antivirus and firewall - they may be blocking your work. Also look at the network card settings:
A) In Windows XP - Start - Control Panel - (Network and Internet connection - if there is such an icon) - Network connections - right-click on the "Local Area Connection" icon - Properties, select the line "Internet Protocol TCP / IP" (the checkbox must be checked), then click the Properties button - check the boxes for Obtain an IP address automatically, obtain a DNS server address automatically, OK, OK. The network status should be “Connected”, as in the picture below:
B) In Windows Vista, go to Start - Control Panel - Classic View - Network and Sharing Center - Manage Network Connections - right-click on the "Local Area Connection" icon - Properties, select the line "Internet Protocol Version 4 (TCP/IPv4) ) – Properties - check the boxes for Obtain an IP address automatically, Obtain a DNS server address automatically, OK, OK. The network status should be “Network” or “Connected”, as in the picture below:
Go back to the Network and Sharing Center and make sure that next to “Local Area Connection” is “Public Network”:
If it is “Private Network”, click on “Settings” and change the network type to “Public”.
C) In Windows 7, go to Start - Control Panel - view: Small icons - Network and Sharing Center - Change adapter settings - right-click on the "Local Area Connection" icon - Properties, select the line "Internet Protocol version 4 (TCP /IPv4) – Properties - check the boxes for Obtain an IP address automatically, obtain the DNS server address automatically, OK, OK. The network status should be “Network” or “Connected”, as in the picture below:
Go back to the Network and Sharing Center and make sure that next to “Local Area Connection” is “Public Network”:
If it says “Home Network” or anything else, click on this and change the network type.
Note: If, after setting the settings to “automatic”, you still get some error, look for a solution in Google or Yandex.
Question: how to reset the modem?
Answer:
A) Complete reset of the modem - press the button in the hole on the back panel of the switched on modem for 10-12 seconds. Then wait a couple of minutes - the modem will turn on with factory settings.
B) Removing only Internet settings: open the modem page at 192.168.1.1, password and login are admin, go to the Advanced Setup - WAN section (or just WAN in some models) - check the box next to the settings line and then click Remove, Save in turn /Reboot:
Question: I configured everything according to your instructions, entered VPI and VCI correctly - my provider, but there is still no Internet, what should I do?
Answer:
A) Check if the modem is connected correctly. In 90% of cases the reason is inattention.
B) If the Internet light on the modem is on, but there is no Internet on the computer, there is something wrong with the computer. There can be so many reasons and they are all varied, I can only recommend point 2 of the fourth part of this article - set the settings to automatic mode.
IN) Look at the DSL light on the modem. If it is not lit, it means that the telephone line is not connected. Check the modem connection to the telephone line. The splitter must be connected correctly!
G) Set up the modem, then go back to the modem settings - 192.168.1.1 and look at the page that opens. If you have blank lines “Line Rate - Upstream” and “Line Rate - Downstream”, you have problems with the telephone line or it is not connected at all. Call your provider's technical support.
D) Reset the modem settings and configure it again, only after logging in in the settings add “@pppoe” without quotes and spaces. This is exactly what helps with my provider Rostelecom South.
E) Perhaps your provider uses some specific settings. Look for instructions on the Internet, on the provider’s website.
Question: When someone is talking on the phone, the Internet turns off.
Answer: The splitter is not connected correctly. Or not connected at all. Don't kill your modem, connect it correctly! This is discussed at the very beginning of the article.
Problem: the Internet takes a long time to turn on - more than 5 minutes after turning on the modem.
Solution: call your provider, the problem is on their side.
Problem: the Internet often turns off by itself (the Internet light goes out)
Solution: The problem is either on the provider's side, or your telephone wiring is of poor quality. This issue is being resolved with the provider and telephone company. Call your provider's technical support.
Problem: the modem often turns off, freezes, the Internet “disappears” (the Internet light is on at this time) or the Internet speed periodically drops significantly, you cannot access the address 192.168.1.1
Solutions:
A) The D-Link 2500U modem, like many other D-Link modems, often overheats. If you touch the top cover of the case, it will be hot. The situation can be solved by installing a radiator on the chip and/or installing a cooler. Examples one, examples two. You can also remove the top part of the case and put the modem on the floor - this may help, although not as effectively.
B) If you use uTorrent or a similar program, in its settings, reduce the number of simultaneous connections to 50-70 (I posted a screenshot of the settings). This will reduce the load on the modem.
IN) The power supply may be damaged. If you don’t have the necessary tools (a multimeter or a voltmeter with an ammeter) to determine the malfunction, look for one with similar characteristics - 15 +3/-2 V, a current of at least 0.7 A (I took the advice from here), connect it and check the operation of the router.
G) The problem may be viruses. Check your computer with Dr.Web CureIt.
D) There may also be problems with antiviruses, as well as with firewalls (they block access to the modem address). Disable them and check the Internet.
E) A red “Power” indicator indicates power problems or some other hardware problem. There is only one way - to the service center for diagnostics and repairs.
Conclusion
The settings I have given will help you connect the D-Link 2500U modem and similar models (D-Link 2600U, 2650U, etc.) to the Internet relatively quickly and without much hassle. Configuring the modem as a “router” will allow you to connect it to any computer that has an Ethernet connector (and this is almost all modern computers) without any settings from the computer - the modem will configure everything itself thanks to the DHCP protocol. But there are a lot of subtleties when connecting ADSL modems; it’s simply impossible to cover them in one article, so don’t blame me if something doesn’t work out.
I also want to note that my article is primarily suitable for connecting one computer. If you have several computers at home and you intend to connect them all to the Internet at the same time, then the D-Link 2500U modem is not suitable for you. Of course, you can buy a second network card and connect two computers via a network, allowing the second one connected to the modem to distribute the Internet, but in this case you need to keep the first PC turned on, which is often annoying or annoying. Ideally, you need either an additional router in addition to the modem (a complicated option, I don’t recommend it), or another modem with several Ethernet ports to organize a local network between computers (a much simpler option). For example, D-Link DSL-2650U. In this case, after setting up the modem with the router, you will be able to connect computers through the same Ethernet ports (connectors) to the modem, everything should be configured and working on its own. I will not talk about connecting to such modems using Wi-Fi wireless technology now, because this does not fit into the scope of the article (2500U does not have Wi-Fi).
I noticed that in the comments to various articles on the site, questions are asked about connecting Wi-Fi routers to regular ADSL modems. Many people have problems setting up such a connection. But, there is nothing difficult there. In this article we will look at the connection diagram and configuration of the ADSL modem + router combination. We will connect using a regular network cable. Which you can buy, or take the one that comes with the router/modem.
Why connect two similar devices at all? If you have ADSL Internet, then it’s clear that you need a modem. There are many modems that do not have the ability to distribute Wi-Fi, but we need Wi-Fi, it’s difficult without it now :)
So, there are two options:
- Buy a new ADSL modem that has the ability to distribute the Internet via wireless technology. There are a lot of such devices on the market now. If you don’t want to worry about making a choice, then call (or go) to your Internet provider, and he will advise you on a specific model and manufacturer. Or offer your device. Many providers have network equipment that they seem to recommend using.
- And the second option (which this article will be about). You can buy a regular Wi-Fi router, any one, and connect it via a network cable to the modem. The modem definitely has network outputs (LAN). The router will simply take the Internet from the modem and distribute it over the air.
As you can see, everything is very simple. We need the modem itself (which should already be configured and distributing the Internet), network cable (which is included with the router), and the Wi-Fi router itself. Now we will connect and configure all this.
By the way, we already have a similar article on. You can view.
Connecting the router to the ADSL modem
Before connection, Necessarily do it on a Wi-Fi router. Even if it is new, from the store.
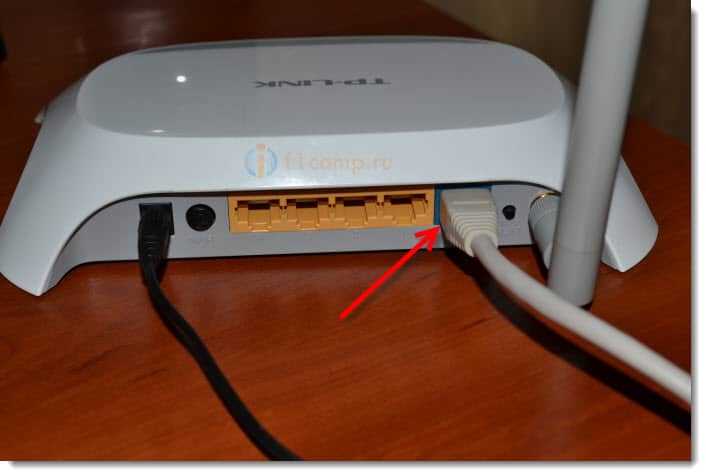
Next, take the network cable. We connect one end to the modem in LAN connector (it is usually signed and highlighted in yellow). Your modem may have several LAN connectors. You can connect to any.
 We connect the second end to the router in blue WAN connector. Look carefully.
 Here is the entire connection diagram. If you reset the settings on the router and your modem distributes IP automatically, then the router should already distribute the Internet via Wi-Fi. And via cable, to the router, you can connect the devices that you had connected to the modem. Here are the instructions, just in case.
Router settings
If it doesn't work automatically, then let's check the settings. We will only configure the router, we will not touch the modem. But your modem must be configured, and the Internet must work through it.
You need to check whether the router settings are set to automatically obtain an IP address. Provided that the modem distributes IP automatically.
Go to your router settings. If you don't know how, then...
Go to the tab WAN. Depending on the company and model, this tab may be called differently. Internet, network, etc.
And see what's in the field WAN Connection Type (WAN connection type) it was found Dynamic IP (Dynamic IP address). Set and save settings. This is the example of TP-Link.

Reboot your modem and router.
Everything should work. If it doesn’t work, then describe the problem in the comments to this article, and we’ll figure it out together.
Best wishes!
Also on the site:
How to connect an ADSL modem to a Wi-Fi router using a network cable? Connection diagram and setup updated: August 19, 2014 by: admin
There are different ways to connect to the Internet, but all these methods can be divided into wired and wireless. The disadvantage of wired ones is the wire (cable) itself - you cannot move further than the cable allows you from the connection point. Wireless connections are preferable for a laptop because you can move freely within the range of a wireless network (either a cellular network or a wireless Wi-Fi network).
Let's start with a wired Internet connection. Almost every laptop has a built-in modem that allows you to establish a regular modem connection. The advantage of a modem connection is that you can connect to the Internet in almost any apartment - everyone has a telephone. There are services for connecting to the Internet without concluding a contract - you either need to buy a prepaid access card or call a special phone number - then the Internet bill will be included in your phone bill. But that's where the advantages end. The disadvantages begin: low data transfer speed (in our realities - a maximum of 33.6 Kbps), constant connection interruptions, high cost of access itself. Don't believe that a modem connection is expensive? Let's count together. My local provider costs 15 cents for an hour of access. Then 8 hours of access (eight-hour working day) and 22 days a month will cost you $26.4. But an unlimited DSL connection with a speed of 5 Mbit/s in both directions (to and from the Network) costs only $15! Moreover, this connection can be used around the clock. If you use a modem connection in this mode, it will cost you $108 per month, but the speed and quality of communication cannot be compared with a DSL connection, so we discard the modem connection right away. Just because your laptop has a modem doesn't mean you need to use it. When there are no other ways to connect to the Internet, then you can use a modem connection.
Physical connection of the DSL modem
To connect a DSL modem to the telephone network, you need a special DSL splitter, which is usually included with the DSL modem. The splitter needs to be connected to a telephone line, and then a DSL modem and a regular telephone must be connected to it.
After this, you need to connect the modem to the laptop using an Ethernet cable. If you plan to use a wireless access point with a built-in DSL modem, then it must also be connected to the splitter. If the DSL modem and the wireless access point are different devices, then the modem needs to be connected as mentioned above, and then using an Ethernet cable to connect it not to the laptop, but to the access point. We will talk in detail about building your own network in the chapter Creating your own wireless network.
Setting up a DSL connection in Windows 7
Basic DSL connection setup
In most cases, setting up a DSL connection does not pose any problems. Let's start with a basic DSL connection setup and hope everything goes well. Make sure your DSL modem is turned on and connected to your laptop. Click the connection icon in the notification area and select Network and Sharing Center. If you don’t have a connection icon, then through the control panel, run the Network and Sharing Center command.
Disconnecting and connecting the Internet connection
To disconnect the connection, right-click on the connection icon and select Disconnect, Beeline Internet.

Changing connection parameters. IP address, DNS server
Typically, all network parameters (IP address, DNS server IP addresses) are set automatically upon connection, but sometimes the provider does not use a DHCP server for automatic configuration, and users must enter connection parameters manually. This is rare, but it does happen, and you should know how to configure the network interface manually.
Open the Network and Sharing Center window and select Change adapter settings, right-click on the connection you need and select Properties. Please note that, in addition to the Properties command, you will also need the Disable and Status commands. The first allows you to terminate the connection, and the second allows you to view the connection status (including the number of bytes received/sent).
Internet connection diagnostics
To diagnose connection problems, we will use a number of Windows utility utilities. Let's start with the ipconfig utility, which displays information about your network settings. In particular, some providers are tied to the MAC address of clients. The MAC address is the scale hardware address of the network adapter. When a client connects, the administrator enters its MAC address into the database. When a client connects to the network, the server checks whether the user's login matches his MAC address. It turns out that even if someone steals your Internet password, they still won't be able to connect because their MAC address is different from yours. In other words, such control provides additional protection against “Internet theft” - you can access the Internet using your login only from your computer. But sometimes the MAC address needs to be changed, for example when you change your computer or network adapter. Then you need to inform the administrator of the new MAC address. To find your MAC address, click the Start button, type cmd in the Search programs and files line, and press the key. A Windows command prompt will open, enter the command:
Network adapter speed limit
When working with a DSL/PPPoE connection, I encountered the following problem: the DSL connection disappears on its own for no apparent reason, several times a day. Reconnecting in this case occurs without problems. It would seem that there is nothing wrong - you just need to reconnect, but when the connection breaks almost every 30-40 minutes, it is very annoying.
Limiting the speed of the network adapter helped me and other users. The network adapter is configured at 100 Mbps by default. By limiting the speed to 10 Mbit/s, I got rid of the problem with the connection being dropped. It’s not a fact that my advice will help you, but it’s still worth a try. And don’t worry too much about the decrease in speed - a DSL connection rarely exceeds 10 Mbit/s anyway, so you won’t feel a decrease in the speed of opening web pages or downloading files.
Open Network and Sharing Center and select Change adapter settings. Then right-click on the LAN adapter and select Properties. In the window that appears, click the Configure button.
Windows 7 Troubleshooting Wizard
Network Sharing Center has a very "helpful" troubleshooting wizard (called by the Troubleshoot command). The wizard will help you fix problems with connecting to the Internet, to shared folders, problems with the home group, with the network adapter, with incoming connections, with connecting to a workplace via DirectAccess, as well as problems with printing.