How to disassemble and clean any laptop yourself. Step by step guide. Disassembling and cleaning the hp pavilion dv6 laptop from dust How to open the hp pavilion g6
HP G62-b51SR– this is a rather old laptop model, which today has already been discontinued and is not sold in various electronics stores. But despite this, this laptop sold successfully at one time, and I am sure that a lot of users still use it.
But, as you know, no matter what kind of laptop it is, it still collects dust over time, which must be removed from it periodically. It’s just that if you don’t do this, then in the future problems may arise related to overheating, slowing down of the laptop, or uncharacteristic noise from the cooler.
So, this article is intended specifically for you, dear owners of the HP G62-b51SR and other models from this series. In general, below you will find step-by-step instructions on how to completely disassemble the HP G62-b51SR laptop yourself and clean it of dust.
You must understand that you perform all further actions solely at your own peril and risk, but if you strictly follow the recommendations that will be described below, then you should succeed.
Step 1: Disassembling the bottom of the laptop
As usual, when disassembling a laptop, the first thing you should do is disconnect it from the power supply and switch the latch to the " Open» remove the battery.
Next, unscrew all accessible screws on the bottom cover of the laptop. For greater information, in the example below, large bolts will be indicated in green, those of medium size in red and small ones in yellow.

I would like to emphasize that you should remember their location otherwise, if you screw one of the large bolts in the wrong direction, you can damage the laptop case. The damage may not be critical, but it will still be very unpleasant.
So, after removing all the screws, remove the covers of the hard drive and RAM.
Under the cover you will see:
- HDD;
- RAM;
- Wi-Fi adapter;
- CMOS battery;

If you need to replace any of these elements, you can do this right now by replacing the old ones with new components and putting the computer back together. If you decide to completely clean the laptop from dust, then we should completely turn off all these elements.
In order to disconnect the hard drive, when disassembling the HP G62-b51SR laptop, you must first remove it from the slot using the tongue, pulling it up. And only then, when you have it in your hands, disconnect the SATA connector.


After you disconnect the connector from the hard drive, I recommend disconnecting it on the motherboard, again, using the tab to lightly pull it up. Otherwise, in the future, when disassembling and cleaning the laptop, it will only interfere with us.

You can turn off the RAM only after you free it from the side mounts by moving them to the sides. Then, without any problems, remove the bar from the socket.

When disconnecting the Wi-Fi adapter, you should first remove the two connectors, which then, when reassembling, it is recommended not to confuse them and connect them correctly. Usually there are designations on the connectors themselves and the Wi-Fi module; this can be a number or some kind of symbol.


There is a CMOS battery left, the first thing you should do is remove it from the socket, for example, for me it was glued, so you may have to make a little effort, but then disconnect it from the motherboard, again so that in the future it will not be used for us. interfered.


Now, you need to unscrew the three internal screws and one small one that holds the DVD drive. Then we hook the drive and pull it out of the housing, as shown below.


Well, we complete this stage of disassembling the HP G62 by disconnecting the power cable from the board, carefully prying it on both sides of the connector.

Step 2: Removing the Keyboard and Top Cover
At the second stage of disassembling the HP G62 laptop, we turn it over and open it. Now we need to disconnect the keyboard; to do this, take a pick (as in the photo), any plastic card or flat-head screwdriver and release the keyboard from the latches with which it is attached to the case, going all the way around its entire perimeter.

If, after freeing it from the latches, you still cannot disconnect the keyboard, then first of all turn the laptop over and check whether all the screws have been unscrewed. Also, sometimes the manufacturer, in addition to latches, attaches the keyboard to the case using double-sided tape or glue. In this case, you can lightly lift the keyboard and use, for example, a long screwdriver to carefully tear it off the cover.
I would like to note that when wiping off the glue you need to be extremely careful so as not to accidentally damage the cable. In the photo below I will show those areas where surfaces most often stick together.

After you free the keyboard, carefully turn it over and disconnect it from the motherboard by lifting the lock up and pulling the cable toward you.

The keyboard has been removed, now we disconnect the remaining touchpad cables and the remaining available contacts. Then unscrew three more screws on the cover itself.

Next, remove the cover; to do this, again, take a pick or a plastic card and, lifting the cover, disconnect all the latches around the perimeter of the case, as shown below. In this case, I do not recommend using a screwdriver in such a way that you can damage the laptop case.


Having removed the top cover, you will see the motherboard in front of you, on which you should disconnect the remaining cables and connectors, and also unscrew a few more screws that hold the motherboard in the case. You can see where it is in the photo below.

This concludes the second stage.
Step 3: Cleaning the Motherboard
So, having released the mat. the board from any fastenings, we try to carefully disconnect it, while making sure that the audio and VGA ports also come out of the case.
In principle, we can say that the disassembly of the HP G62-b51SR laptop case is complete, all that remains is to clean the case and cooling system from dust. If everything is clear with the case, then to clean the cooling it will have to be removed from the board.
But, I want to note that after you remove the radiator you will have to replace the thermal paste on the processor, so if you don’t have one, I recommend purchasing it first and only then cleaning the cooling system.
The radiator is held on by several screws, which also need to be unscrewed, but this should be done evenly on each side so as not to damage anything. Usually there are markings on the cooling parts showing in what order they should be unscrewed.

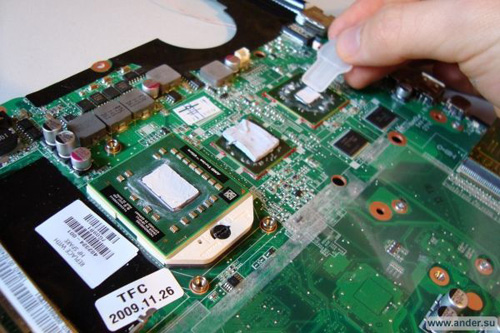
So, having disconnected the radiator, using a cotton swab or a piece of cloth, we remove the remnants of the old, probably already dried thermal paste from the processor. As a result, you should get a completely clean and smooth surface.
Then we repeat the same operation with cooling.
Having finished cleaning the thermal paste, you can begin to disassemble the cooler itself, which, in principle, collects the most dust when working with the HP G62 laptop. So, to disassemble it you need to open four small screws and disconnect the cooler from the radiator.

Well, then you will see everything for yourself, I think you know perfectly well what dust is and how to deal with it. The main thing is not to push it under water; as a rule, it is recommended to clean the cooling system using various brushes and sharp, thin objects that can easily be used to clean the radiator grille.
In general, after cleaning, we begin to assemble our HP G62, but we do everything in reverse order. I recommend that you pay attention to the fact that all the cables are connected back and when tightening the case, do not confuse the long and short screws, otherwise I am sure that you can handle everything else.
Step-by-step instructions for disassembling and cleaning the HP G62-b51SR laptop
Hello friends! Today we will learn how to disassemble the HP Pavilion dv6 laptop, namely the dv6-6051er model.
First of all, remove the battery and the compartment covering the hard drive and RAM.
Next, unscrew all the bolts, as shown in the photo below (in red), and also disconnect the hard drive and the small wi-fi board (in orange).

Now disconnect the DVD drive. There are 3 more bolts underneath.

There is a “sneaky” bolt under the hard drive that is often missed. Be careful and unscrew it too.


Do not forget that you cannot pull the keyboard up too much when removing it, as you risk damaging the cable. Carefully tilt it towards you and disconnect the cable.

The next step is to unscrew the bolts that are located under the keyboard and disconnect the cables.

Now we use something thin and hard to pry up the top of the laptop and remove the panel.


Half the way has been completed and now there is little left for a complete instruction" how to disassemble HP pavilion dv6 laptop".
Here is the HP dv6-6051er laptop board. Let's look further. Unscrew 1 bolt and disconnect the remaining cables.

Lift the soundbar slightly so you can lift up the motherboard.

The last thing holding the board is the power cable. To remove it, you need to lift and flip the motherboard over.
IMPORTANT! Do not pull on the wires, otherwise you risk that the connector will remain in the connector and the wires will be in your hands.
Use some tool (screwdriver for example) for auxiliary purposes.

Now the question is " how to disassemble hp pavilion dv6 laptop" can be considered closed. The payment is in front of us.
However, if you need to clean the cooling system, then we will disassemble it further.

Now we clean the cooler from dust, the surface of the chips from the old thermal paste and apply new one.
- The presence in the body of the copied (processed) material of an active link to the website www.site
- The link must be open for indexing by search engines
Appearance of HP Pavilion dv5

Attention! Experience has shown that self-disassembly can lead to serious damage, so if you have doubts while reading the instructions, contact a specialist.
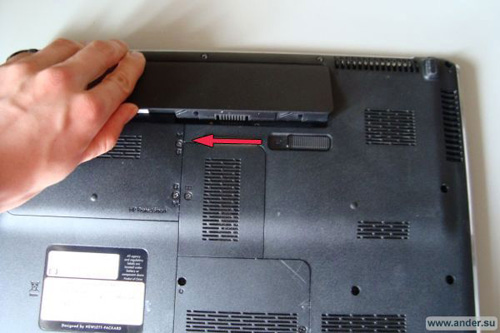
First of all, we remove the battery in order to de-energize the laptop and avoid the risk of possible short circuits during disassembly. The battery can be easily removed; you need to move the latch as shown in the figure and at the same time remove the battery.

Shown below:
- 1) Hard drive
2) RAM

Replacing, removing the hard drive
Removing or replacing a hard drive is quite simple, just remove it from the recess, take the hard drive with one hand, the connecting contact with the other and disconnect it.

Replacing, removing RAM
The RAM is also easy to remove; first you need to disconnect the fasteners on the sides and at the same time lift the RAM a little to remove it. If you only needed to replace the RAM, you can skip the steps below.

Replacement, removal of DVD drive
Replacing or removing a DVD drive on most laptops is done as follows: Unscrew one or more screws that secure the DVD, then carefully pull out the drive.

In order to clean the laptop from dust inside or further disassemble the HP Pavilion dv5 laptop, you need to unscrew the indicated screws. In this case, you will come across screws of different sizes and diameters, so when unscrewing it is best to write down where the bolts come from and put them in a previously signed box, otherwise an incorrectly screwed bolt can damage the laptop. After we disconnect the wi-fi sensor, to do this we disconnect the wires from the wi-fi, sign where the wire came from, and disconnect the wi-fi sensor.

We turn the laptop over, hook the socket near the monitor with something flat and carefully unhook the plastic latches. This procedure requires some experience so as not to damage the plastic latches that secure the socket. The most important thing is not to make sudden movements, etc. The socket itself is still connected to the laptop with wires.

Lifting the panel, unscrew the 4 screws securing the keyboard. Under the keyboard there are contacts from the socket, so we don’t remove it yet.
In order to disconnect the keyboard, turn the mount by prying it with a flat screwdriver (approximately as shown in the image). You can do this with your fingers.

We disconnect the socket in two places - in the middle part and similarly on the left. In some cases, before removing the contact, it is necessary to extend the 2 tips along the edges (shown by arrows) if they are present.


Having removed the socket, we proceed to disconnecting the remaining contacts and unscrewing the screws shown in the figure. When everything is done, remove the panel on which the speakers are located. The holes for the speakers usually allow dust and debris to get onto the speakers, so cleaning the speakers from dust will not hurt, but it is better to use a dry cloth.

The next step is to disconnect the display. Before removing the screen, you need to disconnect the 2 contacts on the left and remove the wires that fit on the right from the groove. Now we unscrew 2 screws on the right and left, mark where the screws were from and we can remove the screen. Even if you only need to clean the laptop from dust inside and replace the thermal paste on the HP Pavilion dv5 processor, this will not work without removing the screen.

After removing the screen, we disassemble further - we go around the perimeter and, having disconnected all the latches, remove the cover under the keyboard, for these purposes it is convenient to use a small knife; it is not advisable to perform this procedure with a screwdriver because there is a risk of scratching the case.

We disconnect 2 contacts on the board (shown in the picture), and unscrew several screws (not shown in the picture) that secure the board to the bottom.

Cleaning the HP Pavilion dv5 laptop from dust inside
After removing the motherboard, turn it over and disconnect the power cable for the laptop cooler as shown in the image. You can use small pliers.

To replace the thermal paste and clean the laptop from dust inside, unscrew the 6 bolts securing the plate and cooler. Sometimes you may need to additionally unscrew a few more bolts near the cooler. Disconnect the HP Pavilion dv5 cooling system from the board. It happens that a little effort is required, because... The thermal paste seems to glue the cooling plates to the processor.

We remove the old layer of thermal paste on the processor and other chip completely, even along the edges, using a cotton swab moistened with solvent or alcohol (can be replaced with vodka). It is advisable to replace the thermal pad if a crack appears on it; if it is in good condition, you can leave it in place and not do anything with it. Afterwards, you can clean the laptop board from dust with a dry cloth or dampened with alcohol; do not forget to clean the inside of the HP Pavilion dv5 case.

We perform a similar procedure before replacing thermal paste and on the cooling system. Sometimes the thermal paste dries out a lot, in this case you can use a flathead screwdriver to remove the residue - all this only applies to the cooling system. When removing paste on a processor or chip, do not use an iron tip screwdriver or the like.

In order to be able to clean the dust inside the cooler, unscrew the screws. On some laptop models, the cooler may not be disassembled; in this case, you can limit yourself to cleaning the places where possible with cotton swabs.

It is convenient to clean the cooler with a cotton swab moistened with alcohol, because... alcohol dries quickly and the cooler can be collected immediately after cleaning, rather than waiting until it dries. The hardware itself (cooling system) can be blown out, but it is better to rinse it under water. If you decide to rinse with water, then you need to be prepared for the fact that you will need to wait a sufficient time until the water is completely dry or use a regular hairdryer.

Replacing thermal paste
The final touch is replacing the thermal paste in the HP Pavilion dv5 laptop with new one on the processor and chip. For these purposes, apply the paste and smooth it with something flat - a SIM card from a phone, a plastic card or the like will do. The layer of thermal paste on the processor is about 0.5 mm; it is better to apply a larger layer on the chip, because There will most likely be a larger gap there.
After application, you must make sure that the layer thickness is sufficient. To test the layer, perform the following steps:
- 1) Applying thermal paste (described above)
2) Assembling the cooling system (tighten all the screws that secure the iron plate to the board)
3) Remove the cooling system
4) Let's see if there is a print of the paste on the cooling system. If the fingerprint remains, then remove the thermal paste from the iron plate and repeat steps 1 and 2. If there is no fingerprint, or it is not completely imprinted, then you need to increase the layer. As a rule, a minimum layer is sufficient on a processor, but a larger layer is required on a video card or chip.
This article described how to disassemble an HP Pavilion dv5 laptop and replace the thermal paste on the processor. If you have any difficulties, you can always use the service cleaning laptops from dust inside .
Your questions and comments
05.07.2017 Sergey
- Question:
- HP dv6 2150er. From time to time the cooler would malfunction, it would stop, then it would start spinning again; when tilted, you could hear the blades touching at low speeds. Today, when I turn it on, the error is cooling fan 902, although I can hear that the cooler is spinning slightly but stops, and after 10 seconds it spins again and stops. Question: could you tell me what markings are on the cooler and what other laptops are suitable for replacement or analogues or maybe the article number to buy and exchange. Saasibo
- Hello, search by the exact model name, for example "cooler for dv6 2150er". Be sure to indicate the exact model, because... The dv6 line has many different modifications with different fans.
The HP pavilion G6 laptop got very hot even during simple Skype communication, and the fan accelerated to maximum, but the air coming out of the fan was not felt. The D-SUB output got so hot that you could even get burned on it (on its metal part)
Photo of the HP pavilion G6 laptop itself:
Before disassembling, be sure to unplug the laptop and remove the battery by sliding the holder to the left:

Unscrew the two screws from the back cover:

We remove the back cover using a little force, since in addition to the bolts it is also held in place by latches. After removing the cover, immediately unscrew the four screws:

Moreover, one of the screws holds the keyboard, in the photo above it is located at the very top left.
Use the tab to disconnect the hard drive wire from the motherboard:

We take out the hard drive (nothing else holds it):

We disconnect the antenna wiring from the Wi-Fi module, unscrew one screw holding this module and remove it from the motherboard slot:

We unscrew all the screws (12 pieces) from the laptop case:

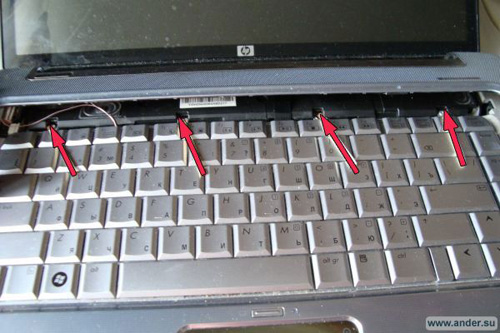
Turn over and open the lid of the HP pavilion G6 laptop to remove the keyboard. In addition to the screw (which was unscrewed earlier), the keyboard is held in place by latches on the case, which are pressed into the case with a small flat screwdriver in these places:

There are also holders on the sides, they are located in these places:

Once the keyboard is released, you need to carefully turn it over in order to disconnect the keyboard cable from the motherboard:

It is very easy to disconnect; you just need to turn the cable lock, which presses the cable to the connector on the motherboard, 90 degrees:

We move the keyboard aside and unscrew the two bolts that were under it:

Now we need to disconnect these two cables (they go to the touchpad):

Everything here is also very simple, the clamps also rotate 90 degrees and the cables easily come out of the motherboard connectors:

In the upper left area, near the fan, you also need to disconnect another cable:

It is disconnected in the same way as the previous ones, that is, the latch must be rotated 90 degrees:

After all this is done, you can remove the decorative/protective cover of the laptop, which hides all the insides of the laptop. In addition to the bolts, it is also held in place by latches; it is better to start removing it from the upper right edge:

After removing the decorative/protective cover we observe the following:

Here we will still need to disconnect several cables and wires, starting from the lower left corner:

After we have disconnected the cable and wire highlighted above, we remove the transparent yellow film, under which another wire with a connector is “hidden”:

Simply disconnect it from the motherboard connector:

Go to the upper left corner:

Pull the tab and disconnect the monitor wire from the connector:

Upper right corner, disconnect the USB cable with a rotary lock:

And below this cable there is another bundle of wires (power), which must also be disconnected from the motherboard:

Be careful here, because it doesn’t give in right away, but eventually you should be able to disconnect it:

We return to the lower left corner and unscrew the screw that holds the motherboard:

Now nothing is holding the motherboard and you can remove it by pulling it slightly to the right and lifting it up. Laptop case without motherboard:

We move the laptop case to the side, and place the motherboard in front of us:

We unscrew the screws (7 pieces) holding the cooling system to the processor and video card processor, and also immediately disconnect the fan wires from the motherboard:

Screws are unscrewed:

Carefully remove the cooler (radiator with heat pipe, pads and fan):

Having turned the motherboard over, we notice that one of the fasteners has fallen off; it will need to be corrected during assembly, otherwise it will not be possible to press the radiator part to the video card processor with screws:

Let's move on to the fan, we need to remove it and first unscrew two screws:

We disassemble the HP Pavilion dv5 laptop (model Pavilion dv5t-1000).
In our case, we need to replace a noisy fan, which is installed deep inside the case under the motherboard. To replace the fan, you will have to disassemble the entire laptop.
Warning
This article is not a guide to action! All responsibility for collecting and disassembling your device lies with you.
Many manufacturers do not bear warranty obligations if the device has been disassembled by the user. If you do not want to lose the warranty for your device, check the terms of the warranty in the documentation or with the device manufacturer.
Tools used
So let's get started. Before you start disassembling, be sure to turn off your laptop.
Remove the battery.
Remove the 4 screws securing the hard drive bay covers, memory modules, and CMOS battery/system clock. Remove all three covers.

Lift the hard drive module on the left side and carefully slide it to the left.

Remove the hard drive module and disconnect the hard drive cable from the connector on the motherboard.
Remove both memory modules.
If necessary, remove the CMOS battery (you can leave it on the motherboard, as in our case).

If you need to replace the hard drive, remove the cable from the hard drive and attach it to the new hard drive.
You also need to unscrew 4 screws (two on each side), remove the hard drive holders and attach them to the new drive.
The HP Pavilion dv5 laptop has a regular 2.5-inch SATA hard drive.

Below the hard drive is a wireless network card.
Disconnect both antenna cables and remove the screw that secures the wireless network card.

Remove the wireless network card in the same way as the memory modules.

Unscrew the screw securing the CD/DVD drive and remove the drive from the laptop.

Remove the 5 screws securing the panel above the keyboard (indicated by yellow circles in the picture below).
Remove two more screws securing the keyboard (indicated by red circles).

Insert a piece of soft plastic (such as a guitar pick) into the gap between the panel above the keyboard and the laptop body and carefully pry the panel open.

Continue removing the panel above the keyboard with your fingers.
Be careful, there are two cables running from the panel above the keyboard to the motherboard. They are shown in the following pictures.

Place the panel over the keyboard so that you can reach the 4 keyboard mounting screws.

Fold up the keyboard.

Now you can get to the cable connector under the keyboard.
Before removing the keyboard, you need to bend the cable lock and pull the keyboard cable out of the connector.

The following picture shows the cable connector in the closed position.

To open the connector, lift the brown latch at a 90-degree angle. The following picture shows the keyboard cable connector in the open position.
Now you can pull the keyboard cable and pull it out of the connector.

Remove the keyboard.

Disconnect the power button and LED cables from the motherboard.

Remove the panel above the keyboard.

Disconnect the video cable from the motherboard. Disconnect the webcam cable.
Route both wireless antenna cables through the hole in the top panel.

Remove the 4 screws (two on each side) securing the monitor hinges.

Remove the monitor module.
If you want to know how to disassemble the display panel and remove the LCD screen, check this out.

Disconnect the speaker module cable and remove the speaker module.

Remove all screws from the bottom of the laptop.

Remove the 4 screws securing the top panel.
Disconnect the touchpad cable.

Start removing the top panel.

So you've removed the top panel.

Disconnect the power connector, USB board, and headphone jack board cables from the motherboard.
Remove the screw securing the motherboard. It is located under the headphone jack board cable.

Lift the motherboard from the right side.

Remove the motherboard from the laptop base.

If you need to replace the power connector, it is located in the upper right corner of the base of the laptop.
In the HP Pavilion dv5 laptop, the connector is not soldered to the motherboard. It is attached to the power cable.

Remove the three screws securing the cooling fan module.
Disconnect the fan cable from the motherboard.

After removing the fan module, you need to clean the CPU and video card chips from any remaining thermal paste.

After this, you can install a new fan module.
New modules can be sold complete with thermal paste and thermal pads.
When installing a new module, you need to apply thermal paste to the processor and attach thermal pads from the old module.

Different HP Pavilion dv5 laptops have different cooling modules. This depends on the installed processor (AMD or Intel) and the type of video card (discrete or integrated graphics in systems with a unified memory architecture).
How to find a suitable cooling module:
2. Find your motherboard serial number. It is usually indicated on a sticker under the memory modules.
3. Compare the number found with all the numbers listed on page 20 of the official manual. This will help determine the type of motherboard installed in your laptop.
4. Find the corresponding cooling module number on page 21 of the official manual. Search for the required module for sale by number via Google.