How to perform a RAM test? How to run a RAM test How to run a Windows 7 RAM test
RAM is one of the key components for computer performance. If, with a weak or faulty video card on the computer, only problems with productive games and applications arise, then if there are problems with RAM, the entire system will work slowly.
Most often, a computer has several RAM modules installed, each of which has a certain capacity. Moreover, even if there is a lot of memory, problems with system performance may arise because:
- RAM is not selected correctly;
- One or more memory sticks are installed incorrectly.
We also must not forget that for one reason or another, RAM can fail, either entirely or partially. If there is a suspicion of a malfunction, it is necessary to check the RAM for errors, and this can be done in two ways.
How to check RAM using Windows
 When developing the Windows operating system, Microsoft included diagnostic utilities that will allow computer administrators to check the condition of components. The Memory Diagnostic Tool is available on Windows 7 and older versions of the system, including Windows 10. From time to time, when the computer is restarted, the operating system automatically launches the Memory Diagnostic utility, but does not notify the user of the results unless there are critical problems. You can also run the diagnostic tool in manual mode.
To check RAM using Windows, you must:
- Launch the Windows Memory Checker application. This can be done in different ways:


Important: If an error is found, you must first determine which memory stick is faulty (if there are several of them). To do this, you need to run the diagnostic tool again and select the option to launch the utility when you restart the computer. Next, you need to turn off the PC completely and leave one stick in the RAM slots. After this, the computer turns on, and the diagnostics again take place at boot. Similarly, by rearranging the memory dies, you can determine which one is faulty.
How to check RAM using Memtest86

There are several dozen applications that are designed for “deep” testing of RAM. Among them, the most popular is the free utility Memtest86, the diagnostics of which takes place in 10 steps to identify the slightest deviation in memory performance. The application tests RAM using the following algorithm:
- Step 1: Surface mode addressing problems are identified;
- Step 2. A deep memory analysis is carried out to look for addressing errors;
- Step 3: Look for hardware problems;
- Step 4. Repeat the search for hardware problems, but using a different algorithm: running an 8-bit zeros and ones test. Diagnostics are performed using 20 different schemes;
- Step 5. Passes 60 tests to find problems with data sensitive;
- Step 6. Faults in memory circuits are caught;
- Step 7. Long-term error detection test data sensitive;
- Step 8. Diagnostics of the stability of recording information into memory;
- Step 9. Run tests based on cache and buffering information to look for hidden errors;
- Step 10. An optional test that is run manually. It is aimed at checking the safety of information in RAM. The point is that the program writes various addresses into RAM, after which the device under test is put into sleep mode for an hour and a half. After waking up, the security of the information is checked.
As you can see, Memtest86 is a powerful diagnostic tool and takes about 8-10 hours to go through all the steps of a memory test.
Preparing to diagnose RAM using Memtest86
The RAM check is performed before the operating system boots, so you must first download and write the program installation file to an external drive, and also configure the BIOS for the specific task of launching the diagnostic utility. You can burn Memtest86 to a CD/DVD disk or USB flash drive. Both options on how to do this are discussed below.
To burn Memtest86 to a CD/DVD you will need:

After completing the steps described above, you will receive a diagnostic disk, which can then be used repeatedly to check the RAM.
To write Memtest86 to a USB flash drive you need to:

Important: During the process of recording the program, all content will be deleted from the flash drive.
Having created external media with the Memtest86 program, you can proceed to the final preparatory procedure - setting up the BIOS to run the file from a CD/DVD disk or USB flash drive. It is worth noting that different motherboard models may have different BIOS versions installed. In general, the process of setting up the startup sequence of drives and reading information from them is approximately the same.
Let's look at setting up Memtest86 to run from a CD/DVD using one of the BIOS as an example:

Please note: The process of launching the Memtest86 program from a USB drive is no different, except for the need to select in step 4 of the instructions the name of the flash drive on which the utility is recorded.
If you cannot figure out where in the BIOS the sequence of reading information from drives is configured, you can try launching the Boot menu. To do this, after restarting the computer, instead of Del, you need to press F8, which will launch the menu for setting the reading sequence from drives. 
Important: Not all motherboards can launch the Boot menu in this way.
Checking RAM with Memtest86
When the necessary preparatory work for launching Memtest86 has been completed, all that remains is to insert the drive into the computer: install the flash drive into the USB port or the disk into the drive. After this, you need to perform a scheduled system boot and the Memtest86 test will start automatically.
You can monitor the progress of the test in the upper right corner, where the completion of the general diagnostics and each step separately is displayed as a percentage.

When the tests are completed, a message will appear at the bottom of the screen asking you to press ESC to restart your computer.

If Memtest86 detects errors during testing, they will be displayed in red on the screen. Also, information about their number will be duplicated upon completion of the test.

As noted above, it is recommended that each die be tested separately to determine exactly which one is faulty. If the Memtest86 utility detects errors in the operation of the RAM, it will need to be replaced with a new one. In rare situations, clearing the RAM contacts or installing it in another slot on the motherboard can help get rid of the error.
The need to check random access memory (RAM) is dictated by the frequent occurrence of the following situations in Windows 7:
- The appearance of a “blue screen of death” (BSOD).
- Computer freezes.
- Unstable or incorrect operation of the computer.
- Critical errors when running applications.
In all such cases, the most likely culprit is the RAM, and it needs to be checked. There are several ways to test RAM in Windows 7.
Built-in Windows 7 test
Unlike previous versions of the OS, which required the use of third-party applications to analyze the performance of this computer node, the seven provides a built-in tool for this. It can be launched in two ways:
- From the command line.
- From the control panel.
To run this tool from the command line, click Start, type mdsched in the search bar, and press Enter. The following window will appear:
This window provides two options for performing the built-in RAM test:
Which option to choose depends on the user's intentions. Needless to say, when choosing the first option, you need to save your work and quit running applications, as the message displayed in the window reminds you of.
To launch this tool from the Control Panel, you need to select “Administrative Tools” in it, and in the list that appears on the right side of the window, select “Windows Memory Checker”:

Further actions of the user and computer are the same as when running the test from the command line.
Built-in memory checker settings
It is recommended that you run this tool with the default settings first. If no problems with RAM were found, then a more detailed analysis can be carried out. To do this, you need to run the built-in test again and press the F1 key while running it, after which the settings menu appears, which you can navigate with the arrow keys and Tab. This tool provides three analysis modes, differing in the set of tests, completeness and completion time:
- Basic – lasts a few minutes.
- Standard – takes about an hour.
- Extended – up to several hours.
With default settings, all tests are performed in two passes. This value can be changed from 0 to 99. If set to 0, the test will run indefinitely until the user stops it, which can be done by pressing the Esc key.
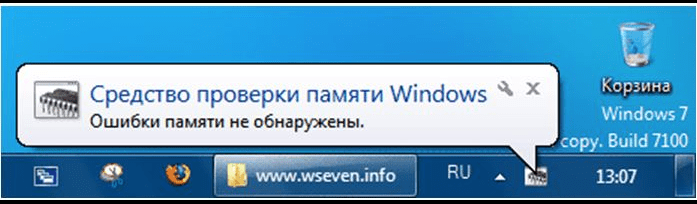
The successful completion of the RAM test is indicated by the appearance of a window like this:
Checking memory at boot
This is another option for running the built-in test, which is used when, due to problems with RAM, you cannot even boot Windows. To start it, after turning on the computer, use the F8 key to make a menu with additional boot options appear, then successively press the Esc, Tab and Enter keys:


The built-in diagnostic tool will launch:

Upon completion of the check, Windows 7 will automatically reboot and its normal operating mode will begin.
Checking RAM using the Memtest86 utility
Many third-party utilities have been developed for RAM tests, but Memtest86 is deservedly considered the “king” among them. It differs from many similar programs in that it has its own bootloader and is launched from bootable media (for example, a flash drive or CD). This allows her to more thoroughly diagnose the performance of RAM. Unfortunately, this utility has two drawbacks:
- The need to obtain bootable media from the distribution iso file. This should hardly be considered a disadvantage - that is why the program does not require any OS and does not depend on it.
- Quite a long test execution time (more than 1 hour).
In what cases should it be used:
- Of course, the first and most common case is that the OS does not load, or a BSOD appears.
- If your PC is unstable.
- Diagnostics of purchased and non-functioning RAM modules.
- For fine-tuning timings when overclocking system components.
What to do if tests find problems
If errors were identified during testing in any way, or the tests could not even complete, then this is a clear sign that one or more RAM sticks are faulty. What to do in such cases:
- Don't rush to purchase new planks. First, remove all the strips from the slots and reinsert them. Just remember to turn off the computer before doing this and remove static electricity from yourself by touching the computer case.
- If it takes a lot of effort to remove and install the slats, it means that you either forgot about the latches of the slats, or you are inserting them incorrectly.
- Gently wipe the contacts of the strips with an eraser to remove plaque formed as a result of their contact with air and subsequent oxidation.
- Install the brackets into the motherboard slots, turn on the computer and repeat the test. It is possible that the test will end successfully.
The cause of many critical errors (BSOD) and subsequent reboots, freezes, and malfunctions is faulty RAM.
The easiest way to identify a faulty module is to use the standard utility included in Windows 7 - "" (Windows Memory Diagnostic Tool). This checker appeared in Windows Vista, but many never used it, and in earlier operating systems it was not included in Windows at all, although it was possible download separately. When using the "Windows Memory Checker" you will not have to create additional bootable disks to record the utility; you will only need to restart your computer or boot from an existing Windows 7 installation disk.
Quite a bit of time has passed since Windows Memory Diagnostic lived a life separate from Windows, and the utility has undergone some changes, the range of tests used has expanded, constant monitoring has appeared, and the interface has been simplified as much as possible for use by the end user.
Typically the system can automatically detect obvious problems with the computer's memory and offer to run a diagnostic tool, but this is only if the OS is installed and booting.
It is necessary to promptly identify and replace faulty memory before blue screens and other symptoms become constant companions of your work.
If changes were made to the BIOS (overclocking, voltage changes, etc., etc.), you need to return everything to its original state and check operation in this mode.
Running from a running OS
Follow: Start ---> Control Panel ---> Administration ---> Windows Memory Checker.
Or: Start---> in the search bar type " mdsched"without quotes and click" Enter".
Or: Start---> in the search bar type " remember" without quotes and select this item:
The following window will appear:

Launch when computer boots
When booting, press the key F8 on the keyboard, the “Additional boot options” selection menu will appear:
Click " Esc" to go to the Windows Boot Manager menu, then " Tab", then " Enter".
Running from a Windows 7 installation disc or system repair disc
You must press any key while this prompt is on the screen.

If you use installation disk, in the first window click " Further":
Select " System Restore":
The next 3 steps are identical.
Select the first option and click again " Further":
Click " Windows Memory Diagnostics":
We choose the first option:
Working with the utility
After launch, the test will begin immediately (with standard parameters):
To change parameters, click " F1":
You can select different "Test Suites":
The "Basic Set" includes only 3 tests, use it for a quick check:
The "Regular Suite" is used to perform standard tests:
To select the next parameter, press the " Tab".
Enabling/disabling the cache for various tests serves to identify different types of errors.
When the cache is disabled, the utility accesses the RAM directly, this ensures the most accurate testing of the modules themselves.

We set the number of passes; the more passes, the greater the likelihood of detecting defects.
We start testing with the specified parameters using the " F10".
When the test is completed, the computer will automatically restart.
Information about testing and problems found/not found is always on the screen, in addition, in If errors are detected, information about them will be displayed after Windows boots (if the test was launched from the OS).
Scheduled launch
It is very convenient to schedule the utility to run on a schedule, for example, once a week. To do this, set the parameters similar to the screenshots below:
Launch the task scheduler ( Start ---> All programs ---> Standard ---> Service ---> Task Scheduler), press " Create a task":
Go to the "Triggers" tab, click " Create":
Go to the "Actions" tab, click " Create", in the "Program or script" field write:
In the "Add arguments" field we type:
/bootsequence (memdiag) /addlas t

Go to the "Parameters" tab:
Now once a week, the utility will be automatically added to the Windows boot loader and launched the next time you reboot after adding it. A reboot, however, can also be scheduled.
Troubleshooting possible problems related to the operation of the utility
If you encounter the fact that the utility starts every time you start Windows 7, it’s very easy to fix the situation. You must manually remove the utility startup entry from the Windows boot loader.
Conclusion
In this article I told you how to check RAM standard utility included in Windows 7 - " Windows Memory Checker".
If a faulty memory module is detected, you must replace it with a new one; do not forget to check the new module immediately, because Low-quality memory sticks often end up on sale.
I talked about what can cause various errors in the system and screens of death. So, we have seen that to identify these errors you can use the Memtest86, Memtest86+ programs and the Microsoft program - Windows Memory Diagnostic. Today I will describe...
So, one of the vulnerabilities in a PC is . But, as practice shows, sometimes memory sticks fail or are damaged, which can cause errors. To make sure that it is the RAM that is at fault, we will use a special utility.
What is Memory Diagnostic Tool and how to use it?
The Memory Diagnostic Tool utility is a program that performs RAM tests under high load. It is a component of Windows versions and is capable of identifying various memory chip errors.
Now let's get down to business. This utility is located on the system disk, so we can launch it from the dialog box "Run". To do this, click Win+R and enter the phrase .
If you are using Windows 8.1, then you can enter in the search "w m d" and then you will see the utility in the search results.

Did you click? A window should appear in front of you "Windows Memory Checker", where you can see two verification options. The first one allows you to immediately restart your computer and begin diagnostics. The second option will work the next time you turn on the computer.
As soon as you have chosen the first option, you will see on the screen how the memory diagnostic process is progressing.

During the test, press the key F1, thus, a selection of diagnostic types will open: Basic, Standard, Extended (Simple, standard, extended). Any of these items will affect how long you will have to wait for the review to be completed. The Extended method, of course, will be more effective, but you will have to wait a lot.
Once the memory diagnostic is completed, the computer will restart. You can see the results in "Event Viewer". To get there, you can enter this phrase in the search bar. Let's go to "Windows Logs", Then "System", on the right side of the window we look for "Memory diagnostics" or "Memory Diagnostic".

This analysis should show the presence of errors in the RAM, but if they are not found, then it is worth looking for the cause of the system malfunction elsewhere; it is possible that some other computer component is to blame.
I am glad to welcome you to the website! In this article I will tell you everything about diagnosing the RAM of a computer/laptop.
Let's talk about symptoms that indicate that there may be some errors in the RAM, as well as how to check its functionality and integrity.
So, let's begin!
Random access memory, or RAM (random access memory), is the “temporary” memory of a computer. This is the so-called “buffer” between the hard drive, on which your programs and data are permanently stored, and the processor, which processes this data. This memory is volatile, i.e. Every time you restart or turn off the computer's power, it is reset to zero.
RAM is a small strip that is inserted into the motherboard connector. Like any computer component, this bar can fail.
In general, all these symptoms do not necessarily indicate a malfunction of the RAM sticks. Freezes and errors when installing Windows often occur due to the hard drive, BSODs - due to OS errors and viruses. You can tell for sure whether there are broken blocks or errors in the RAM only by conducting memory tests using the methods that I will describe to you below.
If you perceive information better in video format, you can watch the video on my YouTube channel:
How to check RAM [Video]
How to check your computer's RAM
The easiest way to test RAM is the elimination method. Most often, the computer has 2-4 RAM modules installed. Therefore, you can take them out one by one and check if the problem has gone away. If without one of the memory modules the freezes stop and the errors disappear, it means it is faulty.
But it is quite possible that you have only one memory module.
To find and remove RAM from your system unit, look carefully at the picture below. I think everything will become clear to you right away. You need to bend the latches on the sides of the memory - and it will “pop out” on its own. 
And here’s what it looks like and how RAM is removed from laptops:

Checking RAM for errors using Windows
If your system boots normally, but displays various failures and errors during operation, then you can use standard Windows tool for checking RAM.
That's what it's called - " Diagnosing computer RAM problems.»
This tool is built into the Windows 7 and Vista operating systems, and all we have to do is find and use it:
- Press the button Start, and in the field " Find programs and files» enter part of the name of the program that we need to find. I entered "operator". Among the list of programs we find “ Diagnosis of computer RAM problems":

- In the window that appears, you can select when the scan will be performed - right now or the next time you turn on the computer:

We close all open programs, save documents, and run the first item to restart the PC and start checking the RAM right now. - After reboot will automatically launch and begin checking the memory. We wait while the check is performed; there is no need to touch anything.

On my configuration (i5-4460, 16 Gb DDR3), testing in normal mode took about 15-20 minutes.
By pressing the F1 key, you can select other test options (Basic and Wide), as well as the number of passes. If you wish, you can check with Wide a set of tests, but it will take several times longer, so first do Ordinary test.
- After the test is completed, Windows will continue to boot.
- To see the result of the Windows RAM test you need to go to Event Viewer -> Windows Logs -> System -> MemoryDiagnostics-Results:

Program for testing RAM - memtest86+
It is best to use a special program to test your memory - memtest86+.
Its advantage is that it can be used even if the Windows OS does not boot, or the PC does not have a hard drive at all.
Download the program to check RAM you can from the official website memtest.org, or right here on my blog (files have been checked for viruses): the memory test will begin. It looks like this:

The test runs automatically, you don’t need to change anything, just watch. It will go on forever. If after 1-2 passes (Pass) no red bars with errors appear in the field below, and the “Errors” counter is zero, then your memory is almost certainly clean!
Many people are probably wondering what the test for “broken” RAM looks like? To see this, watch the video below.
RAM test memtest86+ - 1.5 million errors [Video]:
By the way, subscribe to my youtube channel . There I show the entire process of diagnosing and repairing computers and laptops in real time in video format.