The old horse doesn't spoil the furrow. An old horse, it doesn’t spoil the furrow Modem d link 320
The DIR-320 router, like many of its “300” brethren, is being actively replaced by more modern DIR-6xx. It has a limited Wi-Fi coverage range and greatly reduced speed characteristics. But for small cottages, apartments and offices, DIR-300 is an adequate solution.
Description and parameters of the D-Link DIR-320 router
The DIR-320 router is not much different from its counterparts, for example, the DIR-300: the same ports and connectors on the back, display panel on the front.
Very informative display panel DIR-320
One Wi-Fi antenna indicates a limited coverage area: the router can cover two three-room apartments in a reinforced concrete building or two adjacent floors on both sides.
The “range” of the DIR-320 can be increased only by using a special narrow-directional antenna instead of the standard (detachable) antenna (for example, to cover a corridor or assembly hall).
At the back there is a USB port for external drives and printers. There are 5 LAN ports, one of them is for the provider cable.
One Wi-Fi antenna and modest multi-megabit speeds
There is also a power connector and a reset button for the router that is protected from accidental pressing. The antenna is fixed on the Wi-Fi radio connector next to the USB port.
Table: characteristics of the DIR-320 router
| Parameter | Value or its tolerance |
| CPU | Broadcom BCM5354 (240 MHz) |
| RAM | 32 MB |
| Flash drive | 4 MB |
| Wi-Fi standard, range and speed | 802.11bgu Mixed (2.4 GHz), up to 54 Mbps |
| Ethernet Standard and Capacity | 802.1x, LAN/WAN speed up to 100 Mbit/s |
| Wi-Fi radio protection | any encryption (up to WPA-2) |
| USB port and its functions | connecting network drives and printers, connecting a 3G/4G modem (third-party firmware) |
| Hardware control of the router | reset button, detachable power, WPS button |
| Network protocols and functions | static/dynamic IP/DNS, PPPoE/PPTP (with DualAccess support), L2TP, DHCP server, MAC filter, NAT, SPI, firewall |
| Other | Guest Wi-Fi network (supports up to 2 simultaneous SSIDs) |
In general, the DIR-320, despite its rather outdated speeds, is still capable of solving the vast majority of problems that arise for the user, such as: high-speed wireless Internet based on PON/3G/4G via Wi-Fi at speeds up to 50 Mbit/s, comfortable work with disks and PCs connected via DIR-320 to a single network.
First switching on and checking connection with DIR-320
First, make sure that the IP settings on the PC from which you are setting up the connection to the router are correct. As an example, check using Windows 10.

If there are any, even incomplete, changes to at least one of the IP addresses, you should restart Windows.
The router also tries to connect to the Network using the default settings - as a rule, this is access with dynamic IPs. An open Wi-Fi network with a name in the format “DIR-320_” is also turned on<концовка_MAC-адреса>" If you don’t have an Internet connection, and you don’t plan to make your traffic available to everyone around you, it’s time to get serious about setting up the DIR-320.
Advanced setup of DIR-320
As an example, there are various options for the DIR-320 web interface (up to four). It is not a problem to reflash the router with any router you like, if it is compatible with DIR-320.
Changing the admin password on DIR-320
First of all, protect yourself by changing the “admin” password on the DIR-320 router to your own.

DIR-320 will restart. To further configure the router, log in again using the password you just set.
Setting up LAN and DHCP on DIR-320
Do not rush to connect the provider's cable to the WAN socket - before going online, configure the local network, such as: LAN functionality, DHCP, Wi-Fi functions, etc. This will allow you not to repeat the same steps twice.

The DIR-320 router will restart with new IP settings. Your PC or laptop from which the settings are made will automatically reconnect to the router.
Setting up Wi-Fi on DIR-320
Wi-Fi makes it possible to connect to the router not only on PCs and laptops, but also on smartphones and tablets.
More and more people are abandoning home PCs, preferring to use tablets and smartphones even for solving business issues. Your humble servant writes articles from a Windows tablet, which relies on a shared keyboard and mouse working via Bluetooth; 4G access was launched through one of the D-Link DIR routers.
Do the following.

The router will restart with the new Wi-Fi settings. Connect on all PCs and gadgets by entering the newly set WPA-2 password from your network.
Setting up a PPPoE connection on the DIR-320 router
PPPoE is a high-speed Internet connection protocol that uses login and password authorization. PPPoE communication is used both in cable and fiber optic, and in cellular networks.
- Give the command “Settings - Internet setup - Manual connection setup”.
Select manual Internet connection setup
- Select the PPPoE protocol and enter the login and password (twice), the service name (the provider's main server) and an MTU value (IP packet lifetime) less than 1450.
Enter and assign optimal PPPoE communication parameters
- Select the option to obtain DNS addresses from your ISP and enable the “Connect by request” option. Click the "Save Settings" button.
The router will automatically go online (after a possible restart).
Setting up L2TP communication on the DIR-320 router
The setting from the DIR-620 model is suitable here - it is identical to the 320.

The router will reconnect to the Network via L2TP with the specified settings.
Setting up PPTP connection with a provider on DIR-320
PPTP, like L2TP, is a type of VPN encryption. Makes it easier to bypass Internet censorship in a particular country - for example, if access to the P2P protocol is blocked (BitTorrent, eDonkey, DirectConnect(++) and similar peer-to-peer network services). Roughly speaking, if the provider has closed torrents, but the desire to download something large from a torrent tracker remains.

DIR-320 will go online using a PPTP connection.
Setting up static IP on the DIR-320 router
If you have activated the “Static IP” service, you will need to configure it appropriately on the DIR-320 router. This service allows you to access your local network from the Internet (from anywhere), for example, organize video surveillance of your office or business from home.
As an example, the updated D-Link interface.
- Give the command “Network - Connections” and select a WAN profile, click the “Add” (profile) button.
Create a new profile in the DIR-320 settings
- In the main settings, select the IPoE protocol and the 5th (physical) port, check the MAC address (if specified in the contract, it must match) and enter an MTU value less than 1450.
Specifying port and MAC for Static IP
- In additional settings, specify the main IP received from your provider, as well as DNS addresses.
Assigning an IP gateway and DNS addresses
- In the secondary settings, enable NAT, IMGP and firewall functions, click the “Save” button.
Enabling additional Static IP functions, including for IPTV
- Click the “Save” button again - this time in the connection profile selection menu.
Checking and saving Static IP profile in DIR-320
The DIR-320 router will access the Network using static IPs issued by the provider.
Video: setting up the Internet on DIR-320
Setting up IP television on the DIR-320 router
The IPTV service is supported by all providers that support ultra-high-speed Internet connections via fiber optic cable. (G)PON technology allows you to get a speed of 35–300 Mbit/s (tariffs for ultra-high-speed unlimited Internet in 2017–2018).
- It is advisable to enable a composite protocol on the router, for example, PPTP with dual access (in the already familiar connection settings).
Not all DIR-320 web interfaces are limited to the choice of LAN port for IPTV
- Check the already familiar LAN and DHCP settings.
- Give the command “Advanced - Advanced settings” and enable (or check the presence of) “uPnP” (the function makes it easier to configure devices on a peer-to-peer local network), “WAN ping polling”.
Enabling advanced IPTV features
- Check whether the WAN port speed mode is automatically switched in the router, and also enable the “Multi-streaming” and “Enhanced wireless network mode” functions. The latter is necessary if the IPTV set-top box has a USB port for connecting an external Wi-Fi module or a built-in Wi-Fi adapter. Click the "Save Settings" button.
- Check that you have the RTSP protocol enabled by giving the command “Advanced settings - Firewall and DMZ”.
Completing IPTV setup on DIR-320
- Click the “Save Settings” button in this window.
The router is ready to work with the IPTV service.
The RTSP protocol is one of the multimedia broadcasting protocols on the Internet. It runs many players - from Windows Media Player in Windows to the RealPlayer program, which was used on Nokia smartphones running Symbian. It is similar to the main HTTP protocol - it is now used, along with the IGMP protocol, by the IP television service (previously RTSP was used in Mobile Television from MegaFon, which also operated in 2G/EDGE networks).
Connect the IPTV set-top box to any of the LAN ports of the router, turn on the monitor. The screen should display a list of available TV channels, select any of them.
Port forwarding through the DIR-320 router
Router port forwarding is needed, for example, when you distribute torrents or install a game server on a local network.
The latter was previously widely used in Internet cafes, where one of the services was online games. Software port forwarding was carried out through the “administrator’s” PC or LAN router.
As an example, the updated D-Link web interface. Do the following.
- Switch to advanced settings and give the command “Firewall - Virtual Servers”.
Use all these buttons to control the DIR-320 settings according to the situation
To reset the settings, use the “Factory settings” button. To save the current settings, use the corresponding button. As well as to restart the router, there is a “Reboot” button.
To save the entire current configuration to a separate file, click the “Backup” button and select a location to save the file. To preload a previously saved configuration, use the browse button with a panel indicating the file path from which this copy of the settings will be loaded into the DIR-320.
DIR-320 firmware update
Unlike today's routers, in which the update wizard itself downloads and installs the latest firmware, the DIR-3xx series devices use the old method - downloading a pre-downloaded firmware file over the wire.

The firmware will be downloaded to the router's memory. When restarted, the DIR-320 will update its firmware. Perhaps the functionality of the router will expand - functions that were not available before will be available, for example, improved and more understandable configuration of the DIR-320 in repeater mode.
Video: updating DIR-320 firmware to third-party LedeProject
Before we start setting up the router, let's check the local network connection settings. For this:
Windows 7
1. Click on " Start", "Control Panel".
2. Click on " View network status and tasks".

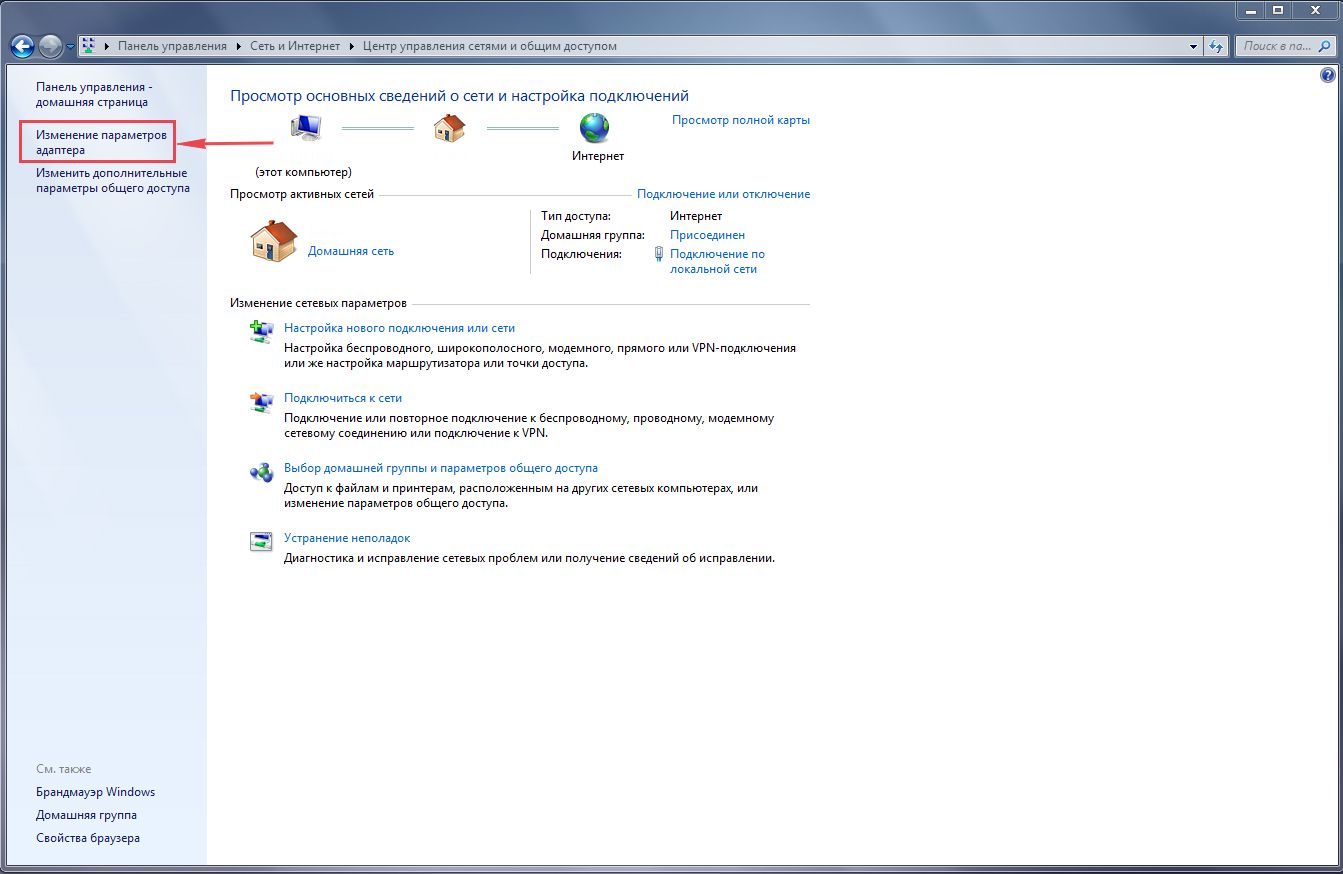
3. Click on " Change adapter settings".
4. LAN connectionProperty".

5. From the list select " Internet Protocol Version 4 (TCP/IPv4)" and press " Property".

6. " and "", then press the " button Ok".

Windows 10
1. Click on " Start", "Options".

2. Click on " Network and Internet".

3. Select " Ethernet" and click on " Configuring adapter settings".

4. In the window that opens we see " Ethernet". Right-click on it and select " Property".

5. From the list select " IP version 4 (TCP/IPv4)" and press " Property".

6. In the window that opens, you need to check the box " Obtain an IP address automatically" And " Obtain DNS server address automatically", then press the button " Ok".

Connecting a router D-Link DIR-320 to the computer
The next step is to connect the router D-Link DIR-320 to your Laptop or Personal Computer. To do this, you need to connect the cable that your provider provided to you to the router port where it is signed "INTERNET", in older models this port is signed as "WAN". Connect the cable that came with the router at one end to your laptop or computer, and connect the other end to one of the four ports, which are marked in black on the router (the colors of the ports may differ depending on the version of the router). And yes, don't forget to connect the power cable.

Authorization of the D-Link DIR-320 router
So, we have connected the router, now you need to access its web interface through any browser (be it Google Chrome, Mozilla Firefox, Internet Explorer, etc.). To do this, open the browser and enter the router address in the address bar: 192.168.0.1
- Username - admin
- Password - admin
So, enter the data and press " Enter"

Setting up the router D-Link DIR-320.
And finally we got to the router’s Web interface and now you need to configure the equipment. First of all, let's secure the wireless network by setting a password for wi-fi. Then you will need to find out what type of connection is used to access the Internet, is it PPTP, L2TP or PPPOE. You can find out by calling your provider (this is the organization with which you entered into an agreement to provide Internet services). So, let's start setting up the router. First, let's change the language of the Web interface to Russian. To do this, go to the tab " Language"and choose" Russian"

Setting up a Wi-Fi password on a router D-Link DIR-320.
I bring to your attention Video instructions for setting a password for wi-fi on a router D-Link DIR-320
Let's also take a written and illustrative look at setting up a Wi-Fi password on a router D-Link DIR-320.
1.
Select on the Web interface " Advanced settings"
2.
On the menu " WiFi"select item" basic settings".

3.
Let's check" Enable wireless connection", there should be a check mark.
4.
Below in the line " SSID:“Create and specify a name for your wireless network; this name will then appear when you connect to the network.
5.
"A country" - "Russian Federation", "Channel" - "auto", "Wireless mode" - "802.11 B/G/N mixed".
6.
Click " Apply" and return to the previous menu by clicking on the symbol that looks like a triangle on the left.

7. On the menu " WiFi"choose" Security Settings".

8.
In line " Network authentication:"choose" WPA2-PSK".
9.
In line " PSK encryption key:“You need to come up with and enter a password for the wireless network that we created above.
10.
Click " Apply", then in the upper right part of the web interface go to the " tab System" and press " Save and Reboot".

Setting up PPTP on the router D-Link DIR-320.
PPTP on the router D-Link DIR-320 using the example of the D-Link DIR-620 router.
Let's also write and illustrate PPTP on the router D-Link DIR-320.
1.
On the menu " Net"choose" WAN".

2. Add".

3.
In point " Connection type:"choose" PPTP+Dynamic IP".
4.
Place a check mark next to " Connect automatically".
5.
Username:"), password (in line " Password:Password confirmation:VPN server address:").
6.
Apply".

Setting up PPTP with a static IP address on the router D-Link DIR-320.
Let's look at the connection setup PPTP with static IP address on the router D-Link DIR-320
1.
On the menu " Net"choose" WAN".
2. In the window that opens, click " Add".
3.
In point " Connection type:"choose" PPTP+Static IP".
4.
Below in the section " IPIP address:", subnet mask in line " Network mask:", default gateway in line " Gateway IP address:" and DNS in the line " Primary DNS server:".
5.
Place a check mark next to " Connect automatically".
6.
Below we enter the Username (in the line " Username:"), password (in line " Password:"), confirm the password (in the line " Password confirmation:") and indicate the server address (in the line " VPN server address:").
All of the above data is provided to you by the provider (the organization that provided you with the Internet).
All this data is usually specified in the contract with the provider. If for some reason you could not find them, you need to call your provider's hotline and find out how you can get them.
7.
After all manipulations with the settings, press the button " Apply".

Setting up L2TP on the router D-Link DIR-320.
1. On the menu " Net"choose" WAN".
2. In the window that opens, click " Add".
3.
In point " Connection type:"choose" L2TP+Dynamic IP".
4.
Place a check mark next to " Connect automatically".
5.
Below we enter the Username (in the line " Username:"), password (in line " Password:"), confirm the password (in the line " Password confirmation:") and indicate the server address (in the line " VPN server address:").
All of the above data is provided to you by the provider (the organization that provided you with the Internet).
All this data is usually specified in the contract with the provider. If for some reason you could not find them, you need to call your provider's hotline and find out how you can get them.
6.
After all manipulations with the settings, press the button " Apply".

Setting up L2TP with a static IP address on the router D-Link DIR-320.
Let's look at the connection setup L2TP with static IP address on the router D-Link DIR-320. Typically, a static IP address is provided to legal entities, or as an additional service to the basic tariff to individuals.
1.
On the menu " Net"choose" WAN".
2. In the window that opens, click " Add".
3.
In point " Connection type:"choose" L2TP+Static IP".
4.
Below in the section " IP"specify the IP address in the line" IP address:", subnet mask in line " Network mask:", default gateway in line " Gateway IP address:" and DNS in the line " Primary DNS server:".
5.
Place a check mark next to " Connect automatically".
6.
Below we enter the Username (in the line " Username:"), password (in line " Password:"), confirm the password (in the line " Password confirmation:") and indicate the server address (in the line " VPN server address:").
All of the above data is provided to you by the provider (the organization that provided you with the Internet).
All this data is usually specified in the contract with the provider. If for some reason you could not find them, you need to call your provider's hotline and find out how you can get them.
7.
After all manipulations with the settings, press the button " Apply".

Setting up PPPOE on the router D-Link DIR-320.
I bring to your attention Video instructions for setting up the connection type PPTP on the router D-Link DIR-320 using the example of the D-Link DIR-620 router.
PPPOE on the router D-Link DIR-320.
1.
On the menu " Net"choose" WAN".
2. In the window that opens, click " Add".
3.
In point " Connection type:"choose" PPPOE+Dynamic IP".
4.
Below we enter the Username (in the line " Username:"), password (in line " Password:Password confirmation:").
All of the above data is provided to you by the provider (the organization that provided you with the Internet).
All this data is usually specified in the contract with the provider. If for some reason you could not find them, you need to call your provider's hotline and find out how you can get them.
5.
After all manipulations with the settings, press the button " Apply".

Setting up PPPOE with a static IP address on the router D-Link DIR-320.
Let's look at the connection setup PPPOE with static IP address on the router D-Link DIR-320. Typically, a static IP address is provided to legal entities, or as an additional service to the basic tariff to individuals.
1.
On the menu " Net"choose" WAN".
2. In the window that opens, click " Add".
3.
In point " Connection type:"choose" PPPOE+Static IP".
4.
Below in the section " IP"specify the IP address in the line" IP address:", subnet mask in line " Network mask:", default gateway in line " Gateway IP address:" and DNS in the line " Primary DNS server:".
5.
Below we enter the Username (in the line " Username:"), password (in line " Password:") and confirm the password (in the line " Password confirmation:").
All of the above data is provided to you by the provider (the organization that provided you with the Internet).
All this data is usually specified in the contract with the provider. If for some reason you could not find them, you need to call your provider's hotline and find out how you can get them.
6.
After all manipulations with the settings, press the button " Apply".

Firmware update
I bring to your attention Video instructions for updating the firmware on the router D-Link DIR-320 using the example of the D-Link DIR-620 router.
Connecting a computer to wi-fi
After connecting and setting up the router, you need to connect the computer to a wireless network (wi-fi), let's consider connecting to wi-fi in two operating systems, these are Windows 7 and Windows 10:
Windows 7
Video instruction
1.

2. Sultan

3.
Connect automatically" and press
"Connection".

4. You must specify " Security keyOK".

5.

Windows 10
Video instruction
1. In the lower right corner of the desktop, find the wireless network (wi-fi) icon and click on it with the left mouse button.

2. A window pops up with a list of available wireless networks. Select a wireless network, in my case it is the network " Sultanova"(You select the network whose name was given at ).

3. After selecting the network, check the box next to " Connect automatically" and press " Connect".

4. You must specify " Security key"This is the wireless network password that you specified when . After you have specified the key, click " Further".

5. We wait perhaps a couple of seconds and you are connected to your wireless network.

In this instruction for setting up the DIR-320/NRU, we will look in detail at how to configure this router in DHCP mode, changing the MAC address, as well as in PPTP (VPN) client mode. Our manual for setting up the D-Link Dir-320 NRU router can be used for other models from the Dlink line that have a similar web interface and functionality:
- D-Link DIR-300 (ver. B5+)
- D-Link DIR-615 (ver. E4+)
- D-Link DIR-655 (ver. B1+)
- and other “Long” models that we might not have mentioned.
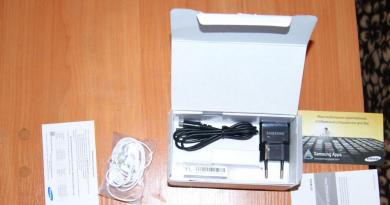
Well... Let's assume that you have in your hands one of the D-Links with a new web interface; you took it out of the cardboard box along with the power adapter and network cable. On the front side of the router you will find LED indicators that, during operation, indicate the “behavior” of the router at a given time (the operation of its interfaces). On the rear panel, to the right of the antenna, you will find 5 network connectors: 4 of them labeled LAN are needed to connect internal cables from home PCs, and into the lonely connector with the inscription INTERNET connect the network cable from Aido (this interface in routers is usually called WAN). To the right of WAN interface is located USB a connector for connecting a 3G modem from a wireless Internet provider, and then there is a connector for power and a button recessed into the body RESET to reset the router settings if necessary.
By 4th LAN To the DIR-320 ports you can connect up to 4 PCs or laptops via a network cable. By the way, one of these blue cables (a regular patch cord) is already included with the router, so you can use it to perform the setup.
We have reviewed the basic information regarding the capabilities of your router, now you can move on to setting it up, but first you need to connect the router to your computer or laptop, after which we will gain access to the web interface of our router.
Connecting a router in Windows 7 and XP
Before setting up your D-Link DIR-320, you need to perform a number of preparatory steps - connect any LAN interface of the router with a blue network cable to the network card on the PC or laptop from which you will perform the setup and connect the power adapter to your router. As for the cable from Aido, it must be connected to the INTERNET (WAN) interface.
Now you should switch the TCP/IP settings on your PC to DHCP client mode (automatically obtaining IP addresses). Below we will look at how to do this using Windows XP and Windows 7 as an example.
Connecting the D-Link DIR-320/NRU router in Windows XP:
Start - Control Panel - Network Connections - Local Area Connection - Properties - Internet Protocol (TCP/IP) – further see the figure:
Connecting the D-Link DIR-320/NRU router in Windows 7:
Start - type View network - select at the top in the search results - View network connections - Local network connection - Properties - Internet Protocol version 4 - then see the figure:

By default, all D-Links issue IP addresses from the range 192.168.0.1/24 to the internal network. Therefore, after 10-20 seconds, your PC or laptop should itself receive an IP address from the router. It will look something like 192.168.0.101 or 192.168.0.102. The inscription that the network card is assigned DHCP means that the router successfully issued an internal IP address to the computer via the LAN interface. If this does not happen or an IP address appears like 169.***.***.***, then problems with the operation of the DHCP client on your computer are possible. Most often this can be caused by the operation of firewalls (firewalls), but there are other reasons... In this case, we can advise you to enter the necessary IP addresses in the network card settings manually. To do this, it will be enough to specify the following IP parameters on your PC or laptop:
IP - 192.168.0.101
Subnet mask - 255.255.255.0
Default gateway - 192.168.0.1
DNS - 192.168.0.1
Setting up the router
We will configure the D-Link DIR-320 via the web interface. To do this, you need to use any computer browser (Opera, Internet Explorer, Mozilla, Chrome) in the address bar to go to: http://192.168.0.1 (usually all D-Links have this address by default). You will see the router welcome message on your computer screen. To log into the D-Link web interface, you will need to enter your username and password, and then click on Entrance. Default Username- admin, Password- admin:

After entering your credentials, you will see a pop-up message from the router (see figure). This message forces the DIR-320 to change the default password, which will be used to log into the router in the future. All you have to do is click on OK:

N you must enter a new one Password and him Confirmation, then press the button Save:

You will be taken to the main menu of the D-Link DIR-320 router, where you will see Device Information:

Important: to save the configuration after any change in settings (!), you must click on the Save button in the upper right corner each time.
Connecting to the Internet and setting up in DHCP mode, specifying the MAC address
Now it's time to set up the connection between the router and Aido. In D-Link DIR-320 NRU this can be done in step. Connections - WAN, click on the line WAN interface:

In DHCP mode (automatically obtaining IP parameters from Aido), no special difficulties should arise with setting up the D-Link DIR-320/NRU. To do this in the field Connection type you need to leave the option in position IPoE.
In field MAC You can make a MAC address identical to the MAC address of your computer on which you were working before installing the router, this will allow you to avoid calls to Aido. If you want to use a router with a “native” MAC address, then fill out this option, indicate the MAC address that can be found on the bottom of the router (six pairs of numbers). To register the MAC address of the router, you need to call Aido technical support and provide this MAC address.
We will not change any more options here; everything will work in DHCP mode. All you have to do is press the button Save:


Now you need to check the functionality of the settings. This can be done in p. Status - Network statistics. Here in the field WAN You can see information that the router's DHCP client has successfully received the necessary IP parameters from Aido. In fact, you can already work on the Internet from a computer that is connected to the LAN interface of the DIR-320/NRU router.

Configuring a router in PPTP VPN “Real IP” mode
To connect via PPTP, you need to create a new interface. (Note: first, we still need to configure the router to work via the WAN interface with the connection type ipoe). Open p. Connections, press the button Add:

To configure the router to work over a VPN connection, you need to set the option Connection type into position PPTP. Next, let's look at the remaining necessary options for configuring the DIR-320/NRU in PPTP mode [top-to-bottom]:
wanPPTPSNameType– allows you to specify how to specify the VPN server address: as a domain name or as an IP address. Choose an option URL;
Server address- here the VPN server address mentioned above is indicated, enter ip.site;
PPP Username- in this option, enter the login for authorization with the VPN server. It can be found in your contract with Aido;
Password- this is the password for connecting to the Aido VPN server (see your contract);
Password confirmation- here you will need to re-enter the password for authentication on the VPN server to avoid typing errors;
Encryption- Encryption of data transmitted via VPN is activated here. We leave the option - No encryption.
Authentication algorithm- here you can select the type of authentication that the Aido VPN server supports. Select the option - AUTO or Automatically.
We do not touch the remaining options and checkboxes in this menu. After pressing the button Save, The tunnel to the Aido VPN server should be successfully established:

You can check whether the VPN session is up in the menu Connections. In order for traffic to go through the VPN tunnel, be sure to set the flag Default Gateway opposite the connection PPTP and save the settings via the button in the upper right corner!

Inscription that the PPTP type is in the state Connected indicates successful actions on your part. If the inscription Connected does not appear, then somewhere in the previous stages an error was made...
Configuring routing for access to local resources
The next step when configuring D-Link routers in PPTP VPN mode is usually filling out the routing table. This procedure is necessary for simultaneous access to local resources of the Aido network when a VPN connection is established. Actually, if you are not very interested in local resources, then you can skip this step. For those who plan to use local services such as torrent in the future, they will have to configure routing. You can do this in DIR-320/NRU at Additionally — Routing. This menu is a table for entering static routes.
To create a new local route in D-Link DIR-320/NRU you need to click on the button Add:

In field Destination network you should indicate the destination area of this route, indicate 10.0.0.0 .
In field Destination network mask you should specify the subnet mask for a specific route, indicate 255.0.0.0 .
In field Gateway you should indicate the address of your local gateway (you can find it out from your contract or you could see it in the state of the local network connection on the computer that was connected to the provider’s cable before installing the router).
In field Metrics can be supplied 1 or 10 . This value specifies the priority for this particular routing rule.
In field Via interface leave option<Automatically>, then the D-Link DIR-320/NRU router itself will determine on which interface it is more appropriate to use this route.
To create a rule, all you have to do is click the button Save:

After entering all the necessary routes, all that remains is to save the router parameters by clicking on the button Save. At this point, the routing setup in the D-Link DIR-320/NRU router can be considered complete.

Setting up a Wi-Fi connection
The D-Link DIR-320/NRU router allows you to transfer data over a wireless network when using appropriate Wi-Fi equipment on the client side. Setting up a wireless Wi-Fi network in the new D-Links of the DIR series is done in paragraph. WiFi – General settings. Here you can completely turn off the Wi-Fi module in your router. The router will then change from wireless to wired.

Go to p. basic settings, where you can set the name of the network and select the wireless standard.
Hide hotspot— disables the distribution of network identifier (SSID), this allows you to hide your network from devices running Windows OS, acting as a security tool. However, in this case you will have to create a profile to connect to the wireless network manually.
SSID– name of the wireless network (network identifier). Under this name the network will be visible in wireless Wi-Fi clients.
A country- option Russian Federation.
Channel— forced selection of a channel for wireless communication. We do not recommend dealing with channel number 6 , since most Wi-Fi equipment operates on this channel by default (few users change it). Ideally, we recommend choosing the channel 1 or channel 12 to minimize the likelihood of interference with neighboring networks.
Wireless mode- here you can select the wireless mode 802.11g or 802.11n, or maybe even the outdated 802.11b or a combination of both. In mixed operating mode (802.11 B/G/N mixed), keep in mind that the overall network speed when connecting diverse clients will drop to the level of the slowest client.
Below you can set Maximum number of clients that will connect to the router.

Wireless network encryption is configured in p. Security Settings.
In option Network authentication You can select the encryption algorithm for your wireless network. We recommend choosing the most versatile option. WPA-PSK/WPA2-PSK mixed– this will ensure support for most modern Wi-Fi equipment.
In field PSK encryption key You set a password for your wireless Wi-Fi network. We recommend using a password here that is 8 to 10 characters long, consisting of uppercase and lowercase letters, special characters and numbers. This minimizes the likelihood of password guessing by attackers.
In option WPA encryption You can select an algorithm for WPA encryption. TKIP– less crypto-resistant option compared to AES, nose AES Some wireless clients may not work. We recommend setting the option TKIP+AES, then you will ensure compatibility with most Wi-Fi clients.
WPA key renewal period can be left as default.

I would like to say a few words about one more option in Additional settings wireless network. Here's the option TX power responsible for the radiation of the wireless antenna. You can experimentally lower it to a level where it will be enough to cover an apartment/room, and the network will not look much outside the apartment. This will reduce the likelihood of your wireless network being hacked by your hacker neighbors :) And it will have a positive effect on your health, especially if you quit smoking 😉

At this point, setting up a wireless Wi-Fi network in the D-Link DIR-320/NRU can be considered complete. To use Wi-Fi at home, the manipulations discussed above will be sufficient for you.
Port forwarding for torrent
Setting up port forwarding (port forwarding) must be done if you plan to use programs and devices on your home network that require unsolicited access to them from the Aido local network or the external Internet. For example, this may be required when accessing a home IP web camera or when working with file-sharing services such as torrent. The principle of port forwarding is as follows: You independently tell the DIR-320/NRU router what type of unsolicited traffic from outside the router should be forwarded to a specific IP address of the home network.
Let's look at port forwarding in the D-Link DIR-320 NRU for Utorrent:
You can configure Port Forwarding in a D-Link router in p. Firewall - Virtual servers. In this menu of the Dlink router you can create the necessary rules for port forwarding. Moreover, these rules can be created either based on ready-made templates or for specific traffic. New rules are created after clicking the button Add:

Open the Utorrent settings for connection parameters and put them in the following form. IN Incoming port indicate the port that we would like to forward in our router:

Next, let's go back to the router's port forwarding menu and create a rule for forwarding connections from Utorrent to the IP of our second computer on the home network. When creating a port forwarding rule, take into account that the second computer has an internal IP address of 192.168.0.222. We will forward TCP and UDP traffic on the port 22222 , which we will reflect in our rule:

We also note that for Utorrent to work correctly, you will need to connect your “Real IP” service; port forwarding alone in the router will not be enough! Without a dedicated IP address, you will not be able to fully distribute torrents, because... will interfere with NAT in Aido. In most cases, without a dedicated IP, torrent distribution will be only 1/3 of the channel width.
This is all the necessary configuration that may be required during home use of routers DIR-620, DIR-300/NRU, DIR-615, etc.
Buying a new configured router is not a problem for a domestic user, but there is often a need to make some adjustments to the parameters for yourself. This is where the problems begin, because the operating instructions contain only data on setting global parameters of network equipment for smooth operation on the Internet.
The focus of this article is setting up the DIR-320. The step-by-step guide will not only help the user quickly master the router’s control panel, but will also introduce all the functionality of the network device, which is not advertised in the specifications when purchasing.
First step in setup
Many owners of computer equipment encounter problems when independently connecting a router to a personal computer or laptop. The problem lies in the settings - the computer and the network device operate on different networks. The first step that the owner of the DIR-320 router must take is to reset the settings. The procedure is simple. There is a Reset button on the back of the device. You need to connect the router to the electrical network, wait until the device boots up (15-20 seconds) and hold the reset button with a sharp object (a needle or toothpick) for several seconds. The reboot signal will be indicated by the indication on the router - all the lights will blink simultaneously.
Connecting to a computer
The DIR-320 starts with a connection to a workstation. Using the Patchcord cable included in the kit, you need to connect the router to a personal computer or laptop. There are 5 ports on the network equipment, one of which is for (WAN). The remaining ports are needed to build a local network. It is in one of them that you need to connect the Patchcord cable.

The DIR-320 router is configured in such a way that when it is connected to the Internet, the device automatically gains unhindered access to the global global network. Accordingly, the router's four LAN ports allow the user to connect to the Internet. In fact, the owner of the network device does not need to configure anything. The main thing is to connect the network cables correctly.
Preparing the Workstation
Most users' personal computers are automatically configured for the network, but there are exceptions. Therefore, we have to get acquainted with force majeure. Setting up the DIR-320 router is possible only in cases where the network equipment and personal computer are on the same local network. The default is 192.168.0.1 - 192.168.0.254. The router takes the first value and automatically assigns addresses to all devices connected to it. Accordingly, the computer must automatically receive an address from the network equipment, otherwise setting up the DIR-320 will be impossible.

By going to the “Network Control Panel”, the user needs to go to “Change adapter settings”. Having found the desired connection, click on it with an alternative mouse button and select “Properties”. In the menu that appears, place the cursor on the “IP version 4” field and click the “Properties” button. Then in the menu that opens, set the “Receive automatically” option in two computer settings fields and save.
Downloading the Control Panel
The DIR-320 router is controlled via a Web interface, so the user needs to open any browser and enter “192.168.0.1”. When the router is correctly connected to the computer, after a short delay, the monitor will display an invitation for the network equipment to enter the control panel, asking for a login and password.

The login information is located on a sticker that can be found on the bottom of the router. Often the default login and password are identical - “admin”. Enter without quotes, in capital Latin letters in both request fields.
Safety comes first!
For the D-Link DIR-320 router, hardware configuration begins with updating the software from the manufacturer's official website. To do this, you need to follow the link provided in the user manual and download the current firmware version. Alternatively, software for the router can be downloaded from the provider’s website. After all, the Internet service provider is interested in ensuring that its client has secure firmware. Often, the provider provides users with ready-made firmware with network settings. Naturally, you need to download it before connecting the router to your computer.
The DIR-320 is easy to flash. You need to go to the “Maintenance” tab in the control panel and select “Firmware Update”. It will open and prompt you to specify the path to the file on your personal computer. After clicking the “Ok” button, the download will begin. At the end of the firmware procedure, the equipment will reboot automatically.
Do everything quickly
The DIR-320 can be configured either manually or automatically. At least that's what the manufacturer claims. In fact, all additional settings are made manually. The automatic mode (with an assistant) only provides the user with the correct sequence of menu items for the convenience of entering the necessary parameters. If you need to set up an Internet connection, the assistant prompts you to enter the necessary data for a correct connection. Otherwise, the control panel provides access to wireless interfaces.

In the DIR-320 router, setting up WiFi is simple - you need to specify the name of the access point (the name of the detected network) and set a password. All other parameters are set automatically. In manual mode, the user will have to independently set a dozen parameters. Many users believe that manual configuration is more interesting in terms of learning how to work with a network device, but it is many times more difficult than automatic input.
Working with a modem
In the DIR-320 router, 3G configuration is carried out only in manual mode. Before making changes, owners should read the operating instructions, which describe in detail the operation of the device with several providers simultaneously. The fact is that by inept actions the owner can disrupt the operation of the wired connection.

On the control panel, you need to select the first item “Internet Settings” and go to the “Settings” section. In the window that appears, click the “Manual settings” button located at the very bottom. In the next window, the user's choice must be made in favor of “PPP connection via USB”. Since D-Link DIR-320 is not specifically tied to 3G (even a regular GPRS phone can be connected), the user only has to fill in the required fields. For a 3G connection, indicate: login, password and dial-up number. For the phone, you need to additionally register the operator’s server and specify the command for dialing.
Fine-tuning the local network
Also interesting in the D-Link DIR-320 router is setting up a demilitarized zone. A network hidden from prying eyes can combine all the electronics in the house, providing access to it over the network to only one owner. If we talk about security, the DMZ menu item is required for detailed study by the user.

Fans of online games will have to become familiar with port forwarding, because very often providers close unused ports. This is done to protect your own network, but many people forget about gamers. With DIR-320, everything is simple: the protocol is indicated, then the replaced ports are written opposite each other.
Finally
This is not to say that setting up a router on your own will be easy. Network equipment requires a lot of attention and certain knowledge. Any parameter specified incorrectly will cause the router to malfunction and, accordingly, block the user’s access to the Internet. But any problem can be solved: the router can always be returned to factory settings and started all over again.
And yet, experts in the field of IT technology recommend that owners of network devices read the operating instructions - simply scrolling through will not be enough. You need to read the entire manual. Only after studying the basic parameters and correctly filling out all fields on the device control panel can setting up the DIR-320 bring results.