Tp link ip by default. Setting up WiFi TP-Link: tips for users
Tp Link is a very popular brand of routers and routers, so it is better to consider its connection using a specific example. To do this, we will take the TP-Link TL-WR841N, working with which will fully illustrate what and how to do with almost any similar device.
Equipment and connection of the tp link router
If you buy a router secondhand, check the completeness of the package, as well as the functionality of all parts, simply by asking the owner to demonstrate this. The standard set includes the router itself, a power supply, a network cable, an instruction book that will greatly simplify the handling of the device, and a disk with auxiliary files. We connect the “box” marked TP-Link as follows: connect the power supply to the corresponding connector on the router and a 220 V network, using an adapter if necessary. Insert the WAN wire included in the kit into the socket marked in blue until you hear a slight click. The TP-Link TL-WR841N we use has 4 LAN ports, marked yellow. This means that you can connect 4 more computers to it using a wire (and any number via wireless communication, if your model supports it). Our router also has the following indicators and buttons on the case:
- button to turn the device on and off;
- a button that reboots and returns to factory settings;
- button to enable QSS;
- indicators of connection with local network, Internet, ADSL and others.
How to configure a TP-Link router?
To connect the router and configure it, virtually no special knowledge or specialist assistance is required. All the most common questions, including possible errors, are described in detail in the instructions included in the kit. If it is not there or is difficult to read, follow our recommendations.
- First, you should hold down the button labeled RESET for a few seconds to reset to the recommended parameters.
- Next, to access the router’s web interface, open the browser and enter the numbers 192.168.0.1 in the address bar. or 192.168.1.1.
- The router will ask you for a standard login and password, which by default are admin and admin. You can change them later in the System Tools tab for added security.
- It is better to take the data to be entered in the “Network” and “WAN” sections from your contract with the provider or by calling technical support.
- In the “MAC Clone” item, click “Clone MAC Address” and confirm with the “Save” button.
- The “Wireless” item is responsible for setting up a wireless network. In “Wireless Network Name” we indicate the desired name for our Wi-Fi, and in “Wireless Security”->PSK Password - its password. Sometimes the current password is indicated on the router itself.
- Be sure to save the changes and click the reboot button on the “System Tools” tab. This will allow the changes to take effect.

Firmware update for TP-Link router
Each new update for the router brings useful features and greater ease of use. You can download the latest firmware for your device on the official TP Link website. To install it, go to the router via the web interface, in the “System Tools” -> “Firmware Upgrade” tab. Using the “Browse” button, select the resulting file and click “Upgrade”. We are waiting for the process to finish.
Good afternoon, dear readers!
Today I will tell you how to configure a TP-LINK router using the TL-WR841N(d) model as an example.
My thoughts on this model:
I think that TP-LINK has done a very good job with this model, as it is easy to set up and has a good price/quality ratio. It is perfect for the average home user who just needs Internet and Wi-Fi. I advise you to take this model if you are a simple user who doesn’t require anything more from a router. Many of my friends have had this model (on my recommendation) for more than 3 years. Works stably, performs its function on 5+
!
So, if you have already purchased this router, then let's configure it. Our procedure:
- Setting up a Wi-Fi network on the TL-WR841N(d)
Connecting the TL-WR841N(d) router to a PC
To begin, connect the power supply to the router and plug it into an outlet. If the indicators on it (on the router) do not light up, then turn it on with the button on the back.
You probably noticed the disk that came with the router, so here we are going to configure without its use.

We insert the second end of the wire into the network card of the laptop/computer from which we will configure the router.

If you did everything correctly, then we can move on to the next point.
Setting up an Internet connection (setting up a WAN connection) on the TL-WR841N(d)
We need to go into the settings of the TL-WR841N(d) router. To do this, on the computer to which it is connected, open any browser and in the address bar go to 192.168.1.1 , or 192.168.0.1 . You should be prompted for your username and password. Specify admin And admin (default password and username). By the way, how to enter the router settings, the standard IP and standard login/password are indicated on the bottom of the router on a sticker

So, we entered everything correctly, entered the username and password. The router settings page should open to us.
The most important thing is to configure the router to work with your Internet provider. If this is not done, or done incorrectly, the Internet through the router will not work. A Wi-Fi network will appear, but without Internet access.
In settings go to the tab Network - WAN. Us in the dropdown list WAN Connection Type you need to select the type of connection that your Internet provider uses. It could be: Dynamic IP, Static IP, PPPoE, L2TP, or PPTP. For example, for me personally PPPoE(the most common type of connection).

Setting up PPPoE, L2TP, and PPTP
If your provider uses one of the above connection methods, then select the one you need and set the necessary parameters that the provider should give you: username, password, IP address. This depends on the type of connection and provider you choose.
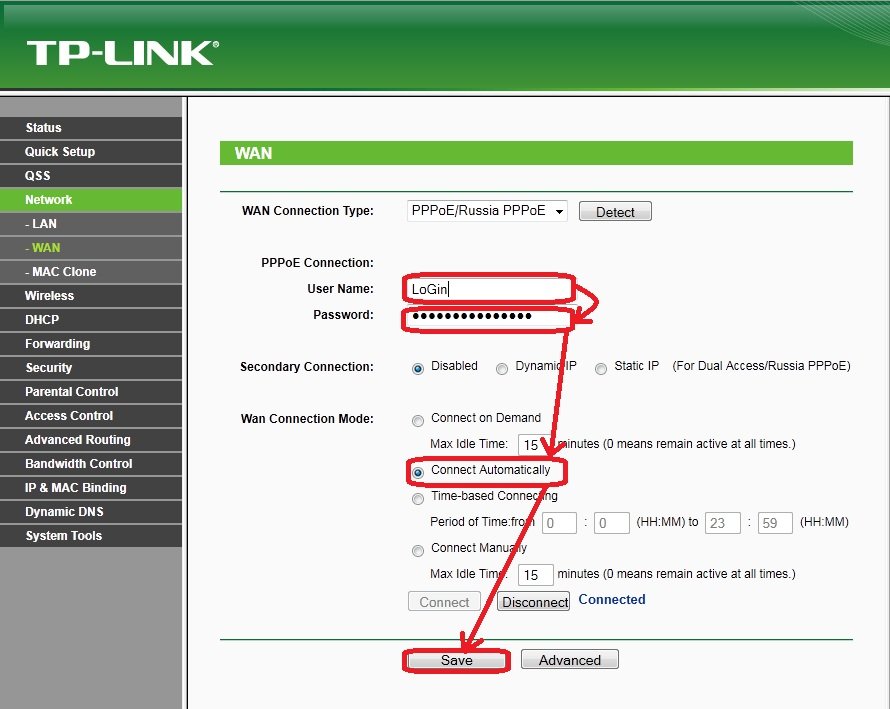
The main thing that needs to be achieved from the settings on this page is that the router connects to the Internet and starts distributing it. If the Internet works, then press the button Save, and we continue. If you can’t set it up, then call your Internet provider and ask them for all the information needed to set up the router.
If your computer has a high-speed Internet connection configured, then we no longer need it. There is no need to run it. Our router will now launch such a connection. You can remove it altogether.
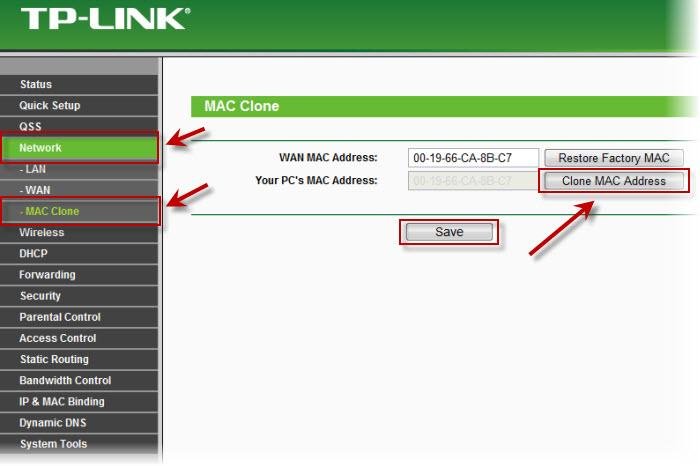
It may also be that the provider binds by MAC address (you need to check with the provider), in which case you can clone the MAC in the router settings, on the tab Network - MAC Clone. Or, there you can change the MAC address of the router. You can also call your provider and ask them to remove the old MAC from the binding and bind your new MAC address.
If the router has connected to the provider and is distributing the Internet, then you can continue setting up. To check whether the router distributes the Internet, just try to go to any website from the computer with which you are setting up the router (which is connected to the router port LAN)
Setting up a Wi-Fi network on the TL-WR841N(d) and setting a Wi-Fi password
To configure Wi-Fi, you need to open the tab on the settings page Wireless - Wireless Settings. On this page we need in the field Wireless Network Name come up with and write down a name for your WiFi network, and in the Region drop-down menu select the country where you live. Leave the rest of the settings as they are in the screenshot below.

To protect our wireless network with a password, go to the tab Wireless - Wireless Security. There you need to select the security type WPA/WPA2 - Personal(Recommended).
In field PSK Password create and write down a password that will protect your WiFi net.

Save the settings by clicking the button Save.
Changing the default admin user password
While we are in the settings Tp-link TL-WR841N, I advise you to immediately change the standard password that is set to protect your router settings. So that everyone who connects to your network will not be able to go into the router settings and change them (for example, we gave the Wi-Fi password to a neighbor/friend).
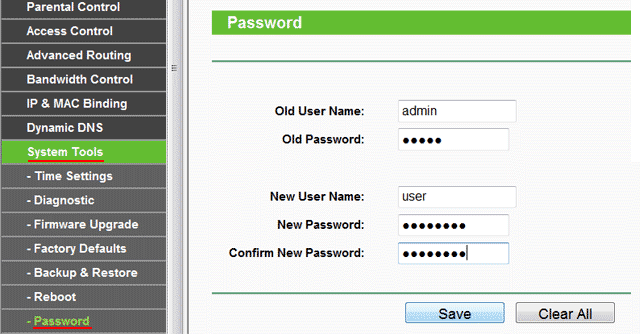
Open the tab System Tools - Password. Enter your old username and password first (default is admin). Then, below, enter a new username (you can leave admin) and a new password. I advise you to write down this password somewhere so you don’t forget. Save the settings with the button Save.
That's all, the configuration of the Tp-link TL-WR841N router is complete.
All that remains is to reboot the router. This can be done by turning off/on the power, or from the settings, on the tab System Tools - Reboot, you need to press the button Reboot.
After setup and reboot, a Wi-Fi network will appear with the name that we set during the setup process. And to connect to a wireless network, use the password that we also set when setting up the router.
I hope this article helped you! I did my best. If you have any questions, ask them in the comments to the post. If you have a suggestion, you can send it to the email address
In the next article I will tell you
Thank you for your attention! See you again!
A router is an ideal device for creating Wi-Fi fi networks. But many people have problems setting it up. In this article we will talk about how to set up tp link router.
You brought your router home and have already opened the box. Great. In front of you should be several pieces of paper, a disk with software, a network cable and the router itself. Let's start setting up:
- Setting up a tp link router starts with connecting the device. It is advisable to place it close to the computer, because The manufacturer provides a small cable in the kit. We connect the router to the power supply and plug it into an outlet.
- Connect the router to the network. To do this, we are looking for a blue socket, under which there is the inscription “Wlan”. We plug the wire included in the kit into it.
- We connect to the computer. We use another wire, plugging it into one of the yellow connectors on the router. The other part of the wire needs to be connected to the port on your PC, which is located on its back side.
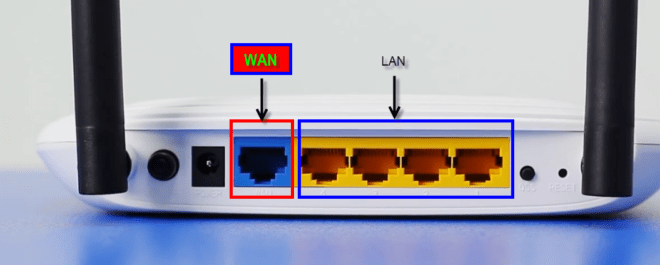
WAN and LAN ports. WAN - Internet input. LAN - local network (connecting local devices)
Let's look at the buttons and connectors that can be found on your router:
- Button to start and shut down the device.
- Connector for power supply.
- WAN. The blue port to which the network cable is connected.
- LAN The yellow port is needed to connect to a computer.
- Button to launch the QSS function. Used to connect your phone, tablet, TV or laptop to Wi-Fi.
- Reset. Designed to completely return the device to factory settings.
Almost all ports and buttons on the router are labeled, which makes them easy to find.
We figured out the router itself and connected it.
Take a thin needle, carefully insert it into Reset and hold for 10 seconds.
Setting up the router
So, you have connected the device to your PC. Now let's go to tp link router settings. For this:
- We launch absolutely any browser. We look for the address bar and enter a special IP address into it. You can find it on the back of your device.
- After the previous paragraph, you are asked to enter your username and password. To find them, just like in that case, turn your router over. If you are too lazy to search, then enter the standard ones - admin/admin.
Let's update the firmware before moving on. Go to the website “tp-linkru.com”. This is the official website of the manufacturer of your equipment. Find your device model there and download the latest firmware. Unzip it. Return to your router's web interface. We look for the “System tools” menu item and go to equipment upgrade. There, using “browse” we point to installed file.
Let's go back to the settings:
- Necessary install login and password for wai fi network. To do this, find the “system tools” item in the web interface. In the drop-down menu, click on “Password”. In the window that appears, you must fill in all fields. In the old lines, enter admin/admin. Fill out the rest as you wish. Save.
- We return to the left side of the web interface. Click on “Network” and then on “Wan”. Next you need to set the network type. It all depends on your provider, so it’s better to check this point with them. After setting, don't forget to save.
- Now in “Network” select the “MAC clone” item. There, just click on the bottom button, which clones the top address. Save.
- We are looking for the “Wireless” item. Open "Setting". Next, enter ssid in the required line. If desired, indicate your region.
- Let's go to wireless security. Enter the password in the password field. Be sure to remember it in order to use the wifi network.
Great. You are completely done with the setup. If you wish, you can reboot your router.
Various problems with the router
Now let's talk about some possible errors during and after setup.
If you have forgotten your password, you need to return your router to factory settings. This is done using a thin needle and the “Reset” button. Press and wait for about 10 seconds. After this procedure set up equipment again.
In cases where it is not possible to log into the web interface of the TP router link, you need to try returning the device to factory settings. You can also use another browser for this.
If your device does not see wai WiFi network, then try bringing it closer to the router. If this does not help, then go to the web interface and enable visibility for all devices.
There are also times when problems are caused by a device failure. In controversial cases, you can contact a professional who will help you resolve this issue.
Let's sum it up
Set up a wifi router not difficult at all. Many people are intimidated by the English interface, but if you follow the instructions given, you will succeed.
Hello! Now we will connect and configure the Tp-link TL-WR841N Wi-Fi router. If you have a TL-WR841ND model, then these instructions will also suit you. Let's look at the entire process of connecting the router, setting up the Internet, Wi-Fi network and setting a password for the Wi-Fi network.
All this with photos and detailed descriptions. So you shouldn’t have any problems setting up the Tp-link TL-WR841N router. Just follow the instructions.
A few words about Tp-link TL-WR841N (TL-WR841ND). A very successful Wi-Fi router model that is very popular. Indeed, a successful model, with an excellent price/quality ratio. It seems to me that for home use, an undemanding user cannot find a better router. I myself, in practice, tested the operation of the Tp-link TL-WR841N. It has been working perfectly for more than five years, distributing Wi-Fi to a large number of devices. It works very stably, I don’t even remember that the Internet was lost on it or something else. You can read more about Tp-link TL-WR841N at. There you will find a short review and my review.
If you have already purchased this router, then it’s time to move on to configuration. Let's do everything according to this scheme:
- Connecting the Tp-link TL-WR841N router.
- Setting up an Internet connection (WAN).
- Setting up a Wi-Fi network on the TL-WR841N.
- Setting a password to protect your Wi-Fi network.
- Changing the admin password, which protects the router settings.
Connection Tp-link TL-WR841N
Connect the power adapter to the router and plug it into a power outlet. If the indicators on the router do not light up, then turn on the power using the button located on the rear panel.
If you configure the router via cable (which comes included), having connected it to a computer or laptop, then take a network cable and connect the computer to the router. On the router, connect the cable to the LAN connector (one of 4):

We connect the second end of the network cable on the computer to the network card connector:


Connecting and setting up a Wi-Fi network
If you want to configure the router via Wi-Fi, and not by connecting via cable, then just connect to the Wi-Fi network, which will appear immediately after turning on the power on the Tp-link TL-WR841N router. The network will have a standard name (something like this: "TP-LINK_084313"), and will not be protected.
You can even connect to this network from a tablet or phone and set up a router without a computer.
You probably found a disk included with the TL-WR841N. There is a utility for configuring the router. So, we will configure without a disk, through the router’s web interface. We will not need the disk in this instruction. If you want to configure via the utility from the disk, you can do this according to the instructions.
The Internet must be connected to the router. And your computer, tablet, laptop, etc. must be connected to Tp-link via cable or Wi-Fi. The router's power must be turned on. If everything is ready, then you can proceed to configuration.
The router settings will open.
And if the router has already connected to the provider and is distributing the Internet, then you can continue setting up.
Setting up a Wi-Fi network and setting a password on the Tp-link TL-WR841N router
To configure Wi-Fi, you need to open the tab on the settings page Wireless - Wireless Settings. On this page we need in the field Wireless Network Name come up with and write down a name for your Wi-Fi network, and in the drop-down menu Region select the country where you live. Leave the rest of the settings as they are in the screenshot below.

To protect our wireless network with a password, go to the tab Wireless - Wireless Security. There you need to select the security type WPA/WPA2 - Personal (Recommended).
In field PSK Password create and write down a password that will protect your Wi-Fi network. You can read more about setting a password on the TL-WR841N router in the article.

Save the settings by clicking the button Save.
Change admin password. Protecting your router settings
I already wrote in a separate article about how to do this in the router settings. Let's, while we are in the settings of the Tp-link TL-WR841N, immediately change the password that is used to protect the settings page. So that everyone who connects to your network will not be able to go into the router settings and change them.
Open the tab System Tools - Password. Enter your old username and password first (default - admin). Then enter your new username below (you can leave admin) and a new password. I advise you to write down this password somewhere so you don’t forget. Save the settings with the button Save.

That's all, the configuration of the Tp-link TL-WR841N router is complete. All that remains is to reboot the router. This can be done by turning off/on the power, or from the settings. On the tab System Tools - Reboot, you need to click on the Reboot button.
After setup and reboot, a Wi-Fi network will appear with the name that we set during the setup process. And to connect to a wireless network, use the password that we also set when setting up the router.
You can already connect your devices to the router. If you set up via cable, but want to connect via Wi-Fi, then the laptop can be disconnected from the router and connect via a wireless network.
You can leave your feedback and questions in the comments!
Hello! Very often they ask how to connect the router? So we bought a router, brought it home, and how to connect it, and what to do with it next, so that it would distribute the Internet via Wi-Fi and cable. In this article we will talk specifically about TP-Link routers. I'll tell you in detail and even take a photo on connecting TP-Link. Where and what cable to connect, how to connect the router to the provider, computer, modem, etc.
In fact, there is nothing complicated about it. You just need a little time and patience :) After purchasing any router, in our case this is a TP-Link device, you will have to connect and configure it correctly. If you connect incorrectly, you will not be able to configure it. The setup process itself is a topic for another article, or for instructions on a specific model. Well, in this article we will analyze in detail the process of connecting a TP-Link router.
The article is suitable for all models: TL-WR940N, TL-WR740N, TL-WR841N, TL-WR842ND, TL-WA701ND, TL-WR743ND, etc. I will show it using the TL-MR3220 as an example. I would like to show you how to connect (it's more popular), but now I only have the TL-MR3220 at hand. Well, okay, they are practically no different.
Connecting a computer to TP-Link via a network cable
First of all, we need to connect the power adapter to the router. Just plug it into the POWER connector. You definitely won’t miss there :) Well, plug it into the mains. If the indicators on the router do not light up, then check to see if it has a power button and is turned off.
Further, if you configure (and/or use the Internet via cable) router from a computer? or laptop, then take the network cable that comes with the router and connect one end of the cable to your computer's network card, and second to the LAN connector of the router. On TP-Link, LAN connectors are usually yellow and there are usually 4 of them.
We connect the TP-Link router to the Internet provider or modem
Everything is clear here. So that the router can distribute the Internet (and this is his main task), you need to connect to the Internet. Most likely, you have a regular network cable installed in your apartment, or your Internet is connected to an ADSL modem.
We need to connect cable from the Internet provider to the WAN connector TP-Link router. The WAN connector is usually blue. Or, connect the cable from the modem to the WAN connector (for connection you can use the cable that comes with the router).
This one looks something like this:

That's all, the Internet is connected, and you can start setting up the router. Go to the settings of your TP-Link (see) and configure the router. You can set it up according to the instructions using the example. The setup will most likely be the same.
It may also happen that immediately after connecting the router, the Internet will work on your computer and other devices that you connect. This is possible if your provider uses a Dynamic IP connection type, or you have a modem connection. In any case, you will need and.
It seems like I haven't forgotten anything. As you can see, the instructions are simple and clear, anyone can connect. If something doesn’t work out, write in the comments, we’ll figure it out.