How to use the new asus laptop. How to start a new laptop? Tips for setting up a purchased computer with Windows already preinstalled

Buying a new laptop is always a pleasant event for any of us. They dreamed about him, they chose him, they read reviews and testimonials about him. And so it was bought. The box is open, the pleasant smell of a new thing. You expect new experiences, new sensations and hopes. But after a little time the unexpected may happen. For some reason, your still-new laptop doesn't work as you expected. It is during the first days of use that it is important to set up your device. Today I’ll tell you what you need to do first to make buying a laptop a joy and bring only positive emotions.
1.Check and install the latest updatesWindows 10
When producing laptops, manufacturers may not install the latest version of Windows 10. After all, your device was not released yesterday. You must install the latest Windows 10 updates immediately when you turn it on for the first time.
This is very easy and simple to do. Click on the button Start, come to Options, find the section Update And safety. Open it and click the first item Center updates Windows. If your manufacturer has set automatic updates, then the update process has already started. If not, then you need to manually start it by clicking on Examination availability updates.

You can safely leave Center updates Windows and continue to use the laptop. The system itself will ask you to restart the device after downloading the updates. Be prepared for the fact that you may have to reboot several times. But you will get the latest version of Windows 10 and also download the latest driver updates, especially the driver Intel HD Graphics, which even some experienced users, sometimes interferes with correct operation, especially when connecting an external monitor.
2.Create a restore point
When starting a new laptop, users should immediately take care of creating a restore point. This is the recorded state of the system on a certain date, for a certain time, with certain system settings and installed programs. You will need it in case some force majeure occurs and you need to restore the system. At the same time, you don’t want to lose any specific settings, applications or programs. Of course, Windows 10 sets up a restore point on its own, but it’s better to do it yourself. Moreover, it is not so difficult.
If you don’t know where to find a tool to create such a point, then use Search near the button Start. Just write Creation points recovery. The required section of the system will open in front of you, where you will need to do several important things. First of all, you should enable Protection systems, if it was not automatically enabled. Next go to the tab Tune.

Here you will see whether the system is turned on and you will be able to set the required amount of memory for the recovery point. Having completed all these manipulations, click on Create.

After a few minutes, the system will notify you that the process of creating a restore point has been successfully completed. Now you can safely restore the system at the right time. Believe me, you will definitely need this.
- Configure display settings
After purchasing a laptop, an important step in setting it up is adjusting the display settings. Even if you bought a laptop and its screen resolution is Full-HD or higher, you may still encounter the fact that the image on the screen will be blurry, the text on the site will be very small. The problem is that you need to configure the display settings. You can do this if you go to Options-System-Screen.

The system will automatically detect your screen resolution, but you can check it yourself by clicking on Define. Now let's move on to the display settings themselves.
You will see a slider with which you can adjust the size of text, applications and other elements. Just don't overdo it, otherwise some applications and programs will not display correctly. Bet on the recommended change, especially since you can later set your scale in any browser.
Just below there is a selection option Orientations screen of your device, which you choose yourself. True, landscape orientation is much more convenient for me, but everyone decides for themselves.
You can also use the slider to set the screen brightness level you need. If these settings don’t seem enough, you can click on Additional settings screen.

In this section, you can configure in more detail and select exactly the display parameters you need.
4.Selection of power scheme
Lately, I often hear and read complaints that a smartphone, tablet or laptop is quickly discharged. This irritates users and they begin to blame the device manufacturer or operating system. But you have to blame yourself first. After all, in any operating system there are power settings settings that help save device power.
So in Windows 10 you can choose a power plan. To do this you need to go through the path Panel management -Equipment And sound-Power supply or in Searching write Choice scheme management food Choice or setting scheme management food.
Windows 10 and manufacturers offer Balanced a power control circuit that will undoubtedly configure and regulate everything itself. But, if it doesn’t suit you, then you can choose a scheme Savings energy, but be prepared that your computer's performance will be slower when needed.

On the left side you can see the settings for turning off the display and entering sleep mode. You can also create your own power management scheme. But, really, I don’t really recommend you do this. Often such actions can lead to disastrous consequences: from failure of the power supply to breakdown of the laptop itself.
From my experience, I can say that I use a balanced power management scheme. True, in Windows 10 the setting came to my aid Batteries where can I use Mode savings charge.

Believe me, it's a great option. You set the required charge level and the device itself goes into Mode savings charge. This has saved me many times.
5.Set default browser
Windows 10 already has a native Microsoft Edge browser. This is a completely new and very good browser that is in no way inferior to its competitors. But, if you are still used to Google Chrome, Opera, Firefox or some other browser, you can immediately set it as your default browser. This means that all links, programs, etc. will open in the browser of your choice. This will make your work easier and save your nerves.
To do this, follow the path Start-Options-System-Applications By default. Select an item Web-browser.
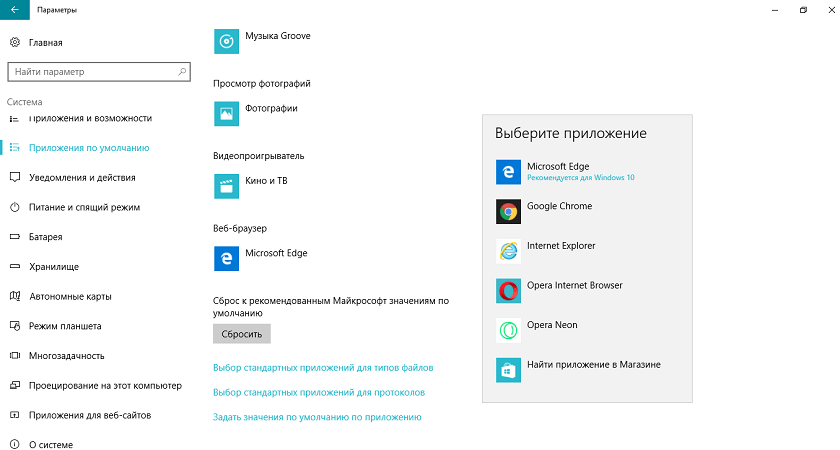
There you will see that Microsoft Edge is already installed by default. If you want to replace it with your browser, then click on it, select yours from the list and set it as the default. And that’s it, now your browser is the main one in the laptop.
6.Select the touchpad scroll direction
The touchpad (aka touchpad) for a laptop was invented as an alternative to control without using a mouse, which was designed to provide even greater mobility of this technical tool.
As practice shows, using this control method is not convenient for everyone - many people, out of habit, prefer to use a regular or optical mouse. However, if you use the TouchPad for a long time, you can learn how to use this feature with maximum convenience and efficiency by making settings that suit you. That's why the question of how to set up a touchpad on a laptop is very relevant for many today, because using this device can make working on a laptop more pleasant and faster, opening up many options that you didn't even know about. When using the TouchPad, you should remember that it is designed based on capacitive technology, which involves contact with the surface exclusively with your fingers.

The settings are very easy to find if you follow the path Start-Options-Devices-Mouse And sensory panel.

Here you can configure the settings for the mouse and touchpad if you have one on your laptop. You may have it turned off, then turn it on and adjust the touchpad scrolling direction below.
If you do not find these settings, you should look for them through Panel management- All elements panels management. Find the section there Mouse and open touchpad settings. You will be able to customize gestures as well as the scrolling direction of the touchpad.

7.Configure notifications about changes in computer settings
It is very important for any user to know about all the changes that will occur in his computer. This is especially important if you are not the only one using the laptop. To avoid unpleasant surprises, you need to set up notifications about changes in computer settings. This will make it possible to control everything that will be downloaded or installed on the device, which will lead to fundamental changes in the settings. Even sometimes this helps when installing various Trojan programs. At least you will at least be notified that something has changed on the laptop without your knowledge.
You can set up notifications if you complete the path Panel management-All elements panels management-Accounting records users. Click on Change options control accounting records.

Use the slider to adjust the notification level. If you are annoyed by pop-up notification windows and don’t want to watch them anymore, then move the slider to the lowest position, click OK. They won't bother you anymore.
8.Remove trial programs and utilities loaded by the manufacturer
Laptop manufacturers always try to stuff their devices with trial and unnecessary software. Someone will say what's wrong with this? If you want to constantly be distracted by pop-ups asking you to register, buy a commercial version of a product, and sometimes just distracting with banal advertising, then you can leave them on your laptop.
You can find and remove trial programs and utilities, as well as manufacturer software, by following the path Options-System-Applications And possibilities. The process itself is very simple and will take some time. Just remember that you cannot remove some standard Windows 10 programs. Such programs can be identified by the absence of a button Delete.

Some programs can only be removed through Panel management. The system will automatically redirect you to the section if necessary. Removal programs.
I performed several manipulations to remove unnecessary programs, not only free up the hard drive, but also save your nerves.
- Show file name extension and hidden system files, folders
The device will store various files with different extensions. To easily navigate this sea, you first need to enable file name extensions. For some reason, Windows hides them, but this can be fixed. Open Conductor, select option View. All that remains is to check the box next to the item Extensions names files.

Now you will see the extension of any file in your folders, which will undoubtedly make it easier for you to work with them.
The system does not always show its files and folders. You need a specific folder or file, but you can’t find it. You can also configure the display of hidden system files and folders in Conductor using the option View. First you need to check the box next to the item Hidden elements, and then go to Options. A section will open in front of you Options folders. Go to the option again View. There, in the list of folders, uncheck the item Hide protected systemic files (recommended).

You will have access to all the system folders and files you need, but be extremely careful not to accidentally delete their contents.

The computer world is just a reflection of our real world, so let's draw parallels. Your computer is your apartment, in which your documents, photographs, films, personal information, possibly confidential information in the form of credit card numbers or electronic wallet numbers are stored, that is, essentially money. To ensure that all your personal files and data are protected you need to install antivirus software.
I have no right to give advice on which antivirus to install. This is a personal matter for each of you. But there must be an antivirus. If you haven’t decided what kind of antivirus software you will install, then you can simply turn on Windows Defender, which is already on your device, since it is built into the system. I have already written more than once that I have been using Windows Defender for the last 7 years and it has never let me down. You can enable Microsoft antivirus in the Update and Security section. Use the slider to turn it on and now your device is protected. If you want to install other antivirus software, Windows Defender will be automatically turned off and will not interfere with the operation of your chosen antivirus.
Summing up
It is these settings that will protect the device from failures and incorrect operation. Your device will faithfully serve you, bring joy and positive emotions.
Steps
on a new computer
You have purchased (or want to purchase) a new desktop computer or laptop with the Windows Operating System installed. I'll tell you about the first steps on a new computer.
How to connect a new laptop
Connecting a laptop for the first time
Initially, you need to connect a power supply to the laptop.
Which consists of AC adapter, connection cable
adapter to power supply (to socket) and connection cable
adapter for laptop.

Of course, the laptop has a battery and may have some
time to work without connecting a power supply. But the battery charge
the new laptop is small. And you won't be able to work on it.
for a long time, without constant recharging.
In addition, the brightness of the screen when the laptop is running without a connected
power supply, significantly lower. Because it's automatic
Power saving mode is activated.
So, connect both cables to the AC adapter.
Cable connecting the adapter to the laptop – available separately
from the adapter or, as in the picture above, initially connected
to the adapter.
The plug for connecting to a laptop also looks different,
from different brands. Sometimes at right angles, as in the picture, and sometimes
and straight. But no matter how the plug looks, you connect it to the laptop.
The connector for connecting DC power to a laptop has
such an icon. On the laptops I worked on, the connector
was located on the left side panel, the bottom of the laptop. Closer
to the back wall.
The second cable is connected to a power source. That is, to the outlet. And you can turn on the laptop, by briefly pressing the power button. On a laptop, it is most often under the LCD screen. For a desktop computer – on the front panel of the system unit.
How to activate Windows OS on a new computer or laptop
Activation
Windows Operating System
on a new computer or laptop
For the first time, after turning on the computer and loading completely
Windows OS - the system will prompt you to activate Windows
on a new computer.
The label with the Windows activation key is pasted by the seller.
On a laptop there is a sticker on the bottom of the laptop.
Simply put, turn the laptop upside down and you will see.
A desktop computer has a sticker on one
from the side walls of the system unit.
The label looks something like this.

The quality of the photo, of course, is not important, but the activation key is visible quite clearly. And the fact that it consists of 5 blocks of 5 characters is obvious. It is clear that there will be a different key on your computer. And the color of the label may vary.
So what are your actions after
the system will prompt you to activate Windows.
Translate the language from RU to EN at the bottom of the screen.
If you want, you can turn on the Caps Lock key to type
capital letters. Or use the Shift key. And enter the key
activation in a line with a blinking cursor. Then you confirm it
action at the bottom of the tab. And that's it... Activation has taken place.
After activation, you are the legal owner
Windows OS on your computer.
And it is you who have the rights
Administrator on your computer.
The operating system on your computer will be
updated regularly. And, if necessary,
You can contact technical support
Microsoft.
It is believed that after purchase a new laptop or computer is ready for use. In practice, this is not true, and there are a number of steps you need to take before you start using your new laptop.
Laptop setup
Our readers often send us questions: I bought a new laptop and what to do next, where to start, how to set up a new asus laptop, how to set up a new lenovo laptop, how to set up a new acer laptop, how to set up a new hp laptop. The procedure for setting up a new laptop is the same and does not depend on the manufacturer. It is worth noting that it is more profitable to purchase a new laptop with a pre-installed operating system, rather than purchasing a laptop and the Windows operating system separately. In addition to the fact that buying a laptop without an operating system and Windows separately will cost more, you may have to use the services of a specialist to install the operating system on the laptop.
Create an account
When you turn on your laptop for the first time on the Windows operating system, when entering settings, the system will ask you to set a username and password. It is not necessary to create a password; if you do not create it, you will be able to log into the computer without a password. If a password was not created upon first launch, it can be created if necessary in the User Accounts section. You should not expect that the password will reliably protect against unauthorized access to the laptop; it will not be difficult for a specialist to quickly reset the Windows login password and gain access to the system. We wrote about this on our website in the article How to reset a password on Windows. A password for the account will help limit access to the laptop for children and not very advanced computer users. To reliably restrict access to a laptop, you need to use more complex settings and special tools.
Partitioning the hard drive
If your new laptop only has one partition that contains both the operating system and data, it needs to be divided into two partitions. This may be useful in the future if you need to reinstall the operating system. When you reinstall the operating system, all user data on the disk on which the operating system is installed will be destroyed. If the data is placed on another drive (after the hard drive is partitioned), it will be preserved after reinstalling the operating system. In Windos 8 and Windows 10, you can partition your hard drive in several ways.
Standard Windows tools. To open the Disk Management tool, press Win+X and select Disk Management from the menu that appears. Shrink your volume (using the right mouse button, click shrink volume) and create a new partition on the free disk space. We recommend leaving the system partition at least 100 GB.
Using third party programs. There are many programs, both free and paid, for partitioning a hard drive, as well as other hard drive management actions. We recommend EASEUS Partition Master Home Edition. The program is free for home use, there is no Russification, the program is in English. When partitioning a hard drive, you need to be very careful and careful. Manufacturers often create hidden partitions on the hard drive where they place a backup copy of the operating system. You can accidentally delete hidden partitions and be left without a system backup. Also, if the hard drive is not used correctly, system areas may be deleted and Windows may not boot.
Removing trial versions (trial) and unnecessary programs on a laptop
Laptop manufacturers make additional money by installing trial versions of various programs. This is often how antivirus programs and the Microsoft office suite are installed. After some time, the program stops working and begins to “ask for money,” offering to purchase the full version. If you do not plan to purchase these programs, it is better to remove them immediately. Each user has programs that he is used to using and trusts. It is better to immediately purchase and install the required paid and free software.
We often receive questions about what programs should be removed from a new laptop or computer. As a rule, laptop manufacturers install a trial version of an antivirus program, which stops updating, and sometimes even working, 30-45 days after launching the antivirus program. Many users are unaware of this and after some time remain without antivirus protection. If you do not plan to purchase an installed antivirus, it is better to immediately uninstall it and install one of the free antiviruses, which provides basic protection against viruses. We have a review of free antiviruses on our website.
There may be many programs installed on a laptop, the purpose of which is unknown to the user. As a rule, most of them are trial versions and programs with limited functionality. To get information about the program, you can type its name in any search engine. After you have received information about the program, you can decide whether it is needed on the laptop. There is a rule that the fewer programs installed on a computer, the more stable it works. It’s better to immediately remove everything you don’t need and install what you need. There is a danger of overdoing it; you should not remove programs from the laptop manufacturer that can be used to update drivers on your laptop. There is an opinion that it is better to immediately reinstall the operating system and install the necessary drivers and programs from the laptop manufacturer’s website on a clean system.
Installing drivers and operating system updates
You must install all available operating system updates on your new laptop. Updates must be installed because they correct detected security problems, eliminate operational problems, and increase the stability and performance of the operating system. On the laptop manufacturer's website, in the support section for this model, you can download and install all the latest drivers and the latest BIOS version. Some laptop manufacturers install special programs with which you can download and install new device drivers.
Installing codecs and flash player to play all video and audio formats
On a new laptop, some video and audio formats are often not played by default; video and audio recordings may not be played on various sites, for example, VKontakte and Odnoklassniki. The solution to playing video and music on websites is to update your Internet browser to the latest version and install Adobe Flash Player and configure its automatic update. To play various video and audio formats on your computer, you need to install the K-Lite Codec Pack. Flash player and codecs can be downloaded from their official websites.
After setting up a new computer or laptop, you can install the necessary programs on it. We have an article on our website that talks about what free programs everyone might need. What programs are needed for a computer and laptop
If your computer or laptop is not working fast enough, on our website you can read Computer or laptop is slow, what to do
Introduction
This material will tell you what you need to do after purchasing a laptop. It’s better, of course, to do all this immediately after purchasing the laptop, but if it didn’t work out right away, then you can do it after a while
Let's get started
When you start the laptop for the first time, you need to enter your name, specify the name of the laptop, select the language...
Then it will take about 15-30 minutes to install proprietary utilities and drivers on the laptop:

There will be a reboot at the end of the installation process. When installing utilities and drivers, it is recommended not to do anything on the laptop.
The first step is to fully charge the laptop, and then work in offline mode without recharging until the battery is completely discharged (charge level is approximately 5-10%). These operations calibrate the battery. They are recommended by many laptop manufacturers.
Creating system recovery disks
Included with laptops Acer Usually there are no recovery discs. It is assumed that the user will create them himself. How to create them will be described below:
Launch the proprietary utility Acer eRecovery Management, press Setup -> Create a New Password and set a password that you should not forget since it must be entered when automatically restoring the system using eRecovery and pressing ALT+F10(alternatively, you can specify it in the field Hint- clue)
Press the button Burn Disc (Burn disc in the Russian version) at the bottom of the window and we get to the disc burning menu:

Here, first click on Factory Default Disc (Create a disk with standard factory settings in the Russian version of the program), and then to ( Create a disk with an archive of drivers and applications in the Russian version of the program). For the first you will need two DVDs, for the second - one DVD:

It is better to put burned discs in a safe place (in a laptop box, for example). I’ll explain what those disks are for:
Two Factory Defeault Discs are used to restore Windows Vista with all the programs and drivers that came with the laptop. To restore, you need to boot from the first disk, then the installation process will begin. To boot from the disk you need to go into the BIOS (press F2 when booting), in the menu Boot and put the IDE CD in the first position (using the F5 and F6 keys), save the settings and exit the BIOS.
Looking ahead, I will say that for successful recovery there should be only TWO partitions on the laptop’s hard drive (not counting the hidden ones, although their presence is not necessary) - C: and D:. C: should be primary and D: should be logical. Disk size C: - at least 20GB. When restoring from these disks, the same as when restoring from hidden partitions (ALT+F10) ALL information from drive C: IS ERASED. Drive D: will remain untouched.
Driver & Application Backup Disc Used for cases where Vista is installed from a disk. Naturally, there are no Acer utilities, no bundled software, or even laptop drivers in the standard Windows Vista package. On Driver & Application Backup Disc it's all there. There are distributions of proprietary Acer utilities, there are distributions of software that comes with the laptop and drivers for the laptop.
Note: If you have deleted hidden partitions and Acer eRecovery does not want to burn discs, then do not despair. For example, if the laptop came with Windows Vista Home Premium, then there should be a piece of paper with the Windows serial number on the bottom. If you want to have licensed Windows on your laptop, then just get any disk with the Windows Vista distribution, run the installation and during installation enter the code from the piece of paper on the bottom. In this case, Windows will be licensed, will undergo activation and receive updates. You can find drivers on this site.
Everything related to Acer eRecovery is discussed in this forum thread:
Creating images of hidden partitions
Having finished with the disks, you can start creating images of hidden partitions. There are one or two hidden partitions on the laptop hard drive. They serve to automatically restore the system with all drivers and programs. To restore, press the key combination ALT+F10 when booting the laptop. Acer Aspire 5920 has two hidden partitions, because in this laptop the manufacturer implemented IOArcade technology - launching a media center without loading Vista. For its operation there is a hidden partition with a volume of 3 GB. The vast majority of Acer laptops have only one hidden partition - PQService several gigabytes in size. The Acer Aspire 5920 has a capacity of 10 GB.
It is mandatory to create images of hidden partitions
To create images of hard drive partitions we need a program Acronis True Image. The version used in this article can be downloaded from these links: /
To create images, the functionality of the demo version will be sufficient. I recommend version 10, although later versions can be used.
During the installation process, you will need to fill out a small questionnaire; the laptop must be connected to the Internet at this time.
Launch the program, click Try Now!(demo version after all)

Choose Backup- that is, creating partition images:


We indicate that we will backup disks:

We select only one hidden section. The hidden NTFS partition is responsible for IOArcade technology - launching a media center without loading the OS. On some laptops, Acer has not implemented this feature and there will not be an NTFS partition; you can skip the steps below for this partition. Your partition sizes may vary from those shown below:

Click OK:

Specify the name of the image of the hidden partition and where to save it:

We choose to create an image of the entire partition:

Select default settings:

Indicate comments on the image. This is not necessary. You can specify the exact size of the partition and its partition name, for example. The exact size can be found on the last tab with a button Proceed in field Size:

Click Next and we get the following:

To start creating an image, click Proceed:

After finishing, click OK:
Now we repeat similar operations for the other hidden section PQService. But this time we use maximum compression and split the image into parts for recording on DVDs. Do not rename parts of the image! The size of this section for different Acer laptops may differ from the dimensions in the screenshots.
We choose again Backup:
Select the PQService section. It is he who is responsible for automatic system recovery:

Specify the name of the image and where to save it:

We choose to create a full image of the partition:

Select manual mode:

Set the maximum compression level on the tab Compression Level:

We indicate how to split the partition image on the tab Archive Splitting:

You can also enable checking the partition image for errors on the tab Additional Settings:

Indicate comments on the image. Although this is not necessary.

To start the image creation process, click Proceed:

After finishing, we get something like this message and click OK:
As a result, there should be 2-3 files on drive D:: one image file of one partition (on some models it may not exist) and two parts of the image of the second hidden partition - PQService. These images MUST be burned onto another computer or onto DVDs.

Do not rename image files!
Disks made by the eRecovery utility and disks with disk images should be placed in a safe place (for example, in a laptop box). Only when images of hidden partitions are made and they are recorded on a DVD or another computer can you begin to manipulate partitions, XP settings, etc.!!!
If you were in a hurry and accidentally erased hidden sections without making images of them, then
BIOS update
First, download the BIOS archive from the Acer website. The archive contains everything you need to update the BIOS, as well as instructions (usually in the Readme.txt or install file). The archive may also contain a text file describing changes in this BIOS version.
You can update the BIOS in two ways:
1) from Windows. In this case, the program that updates the BIOS is launched from Windows. This method is simple, but there is a small chance that the system will freeze during the update and, even worse, the firmware will be damaged. Then you will have to restore the BIOS using a Crysis flash drive. How to do it is described in this material:
2) from under DOS. This method is considered more reliable, but you must first create a bootable USB flash drive with DOS, and then copy the firmware file and the flasher itself to it. The procedure for flashing firmware from DOS is usually well described in the firmware instructions. How to create such a flash drive is described in this material:
Let's look at an example of firmware from Windows for an Acer Aspire 5920 laptop. The procedure for flashing your laptop model may vary significantly.
Questions about updating the BIOS are addressed in this forum thread: . Before doing this, you should read the topic. The most common errors when updating are well described there.
So. Let's begin. Download the program for updating the BIOS from Phoenix from here: /, it should also be in the archive with the BIOS.
Download the version for 64-bit OS from this link: /
Then we unpack the contents into a folder, unpack the file with the xxxxxxxx.WPH firmware into the same folder and run SwinFlash.exe from the folder where the BIOS was unpacked:

In the lower window we indicate the path to the file with the firmware, and in the upper window we indicate the name under which to save the current BIOS
Before flashing the firmware, you must close all other programs, the laptop must be running on mains power, and the battery must be charged.
Click on the button Flash BIOS. After a couple of minutes, the BIOS will be flashed and the laptop must be rebooted.
If you still have questions after reading this material, then we can express them on our website. I very rarely respond to comments.
Edited by: FuzzyL- September 15, 2013
Reason: Material version 2.0
Today, the presence of a huge number of different utilities allows the user to make a choice based not only on the functionality of the program, but also taking into account their individual needs and preferences. Therefore, often the standard set of programs that are installed with Windows 10 cannot fully satisfy all the user’s needs. That is why most users need an approximate list of programs for a new laptop that are most often used by many users. Here are the most popular programs today.
It’s hard to imagine life on the Internet without an antivirus. The standard virus protection program in Windows 10 is not able to protect you from all the threats that await you on various sites. To surf the Internet calmly and not be afraid that all your files will be stolen or damaged in an instant, you need to install a reliable antivirus. Moreover, most users want it to be free.
- 360 Total Security – provided to all users free of charge. Effectively searches for viruses and removes them instantly. It also has a firewall to protect you from data theft and espionage. The program also has a feature for safely running suspicious programs called “Sandbox”.
- Dr.Web is an antivirus that has earned the trust of many Internet users. Known for its effectiveness in finding and destroying viruses. The program includes an anti-virus scanner, anti-rootkit, preventive protection, mail anti-virus, firewall, anti-virus “watchman”. The company offers its users 30 days of free work.
- Microsoft Security Essentials is another free antivirus from Microsoft. It is easy to use. It consumes few system resources and therefore does not slow down the computer. It works in the background and protects all the time from various viruses and spyware, Trojans, and worms.
- Kaspersky Antivirus - experienced PC users remember this antivirus for its unusual virus detection sound. This antivirus continues to update and get better every year. It protects your computer from virus attacks, prevents threats, protects confidential data, and is also very easy to use.
What antivirus do you use?
Kaspersky Internet Security 35%, 289 votes
I don't use antivirus 15%, 121 voice
Microsoft Security Essentials 9%, 74 vote
30.06.2017
Browser

A fast browser is a very important factor in convenient and productive work on the Internet. For some, a minimalistic design with a minimum of buttons is important, while for others, the ability to install many add-ons and different themes is important. However, the most popular browsers are:
- Google Chrome is a fast and lightweight browser that focuses on simplicity and convenience. At the same time, it is not devoid of functionality. It has all the most necessary functions for fast and convenient browsing on the Internet, and also has the ability to install extensions and themes from the store.
- Yandex.Browser - a simple interface and high performance are the most important advantages of this web browser. It has a “Turbo” function, which allows you to increase the speed of browsing pages when the Internet is poor. This browser is also different in that it opens many files directly. Thanks to it, you do not need to install many programs on your computer. The browser opens formats: PDF, DOC, EPUB, FB2 and many others. The browser allows you to install add-ons from the Google Chrome and Opera add-on stores.
- Opera is very similar to its counterparts, although unlike them it also has battery saving features and the ability to enable a free VPN.
- Mozilla Firefox is a browser that calls itself independent and created for the convenience of people, and not for personal profit. It is distinguished by its speed, as well as many privacy settings.
All browsers are distributed free of charge.
Which browser do you prefer?
Poll Options are limited because JavaScript is disabled in your browser.
30.06.2017
Programs for download
A lot of programs, as well as films and games can now be found on torrent resources. To do this you need to have such a program for downloading. μTorrent is the most popular torrent client. High speed, great functionality, minimum advertising - this distinguishes it from other downloaders. You can also install Mediaget, which opens and downloads not only torrent links, but also magnet links. It is very convenient for downloading TV series and movies, since it allows you to watch them directly in the downloader window, without waiting for the download to finish.
Viewing Images

The standard image viewer in Windows 10 is not bad, but has limited functionality and takes a very long time to open images.
- IrfanView is a simple program without designer bells and whistles, which weighs only 1 MB. It is distinguished by its speed. In it you can immediately edit photos, change their format and move them. Can be viewed in a slide show. The program is free and opens all modern image formats.
- Picasa is a program that recognizes many photo formats and organizes them for quick retrieval. The program allows you to set passwords on albums, as well as edit photos. Also free.
- FastStone Image Viewer is a multifunctional image viewer. Allows you to easily manage your images, create music slideshows, quickly edit photos, apply special effects such as watermarks, and much more.
Photo editor
Despite the fact that the standard Paint program is simple and understandable even to a child, its functionality is very limited. You won't be able to open multiple images at the same time, make adjustments, use hotkeys to speed up your work, or use layers for convenience. And this is just the tip of the iceberg.
Paint provides very few tools for working with images. A good alternative is GIMP. It has many tools for photo processing, various effects and filters. But at the same time, the program has an intuitive interface, which allows you to use it without training.
It is also worth noting FastStone Image Viewer, which combines the functions of viewing and quickly editing photos, which helps to significantly save disk space.
Audio player
For those who like to listen to music from a computer, a standard audio player will definitely not be enough. Fortunately, there is now a wide selection of audio players.
- AIMP - nice interface, many functions, support for many formats and much more in one player. There are many skins available for download. The player also comes with an audio converter, which is very convenient for quickly converting one audio file format to another.
- Winamp is a player that has earned trust thanks to many years of work. For some, the name of the program several years ago was generally associated with the music format. The program has huge functionality and supports various plugins.
Video player

At the moment, there are such a huge number of convenient and attractive media players that it has become incredibly difficult to choose. However, the most popular ones are:
- Media Player Classic - in order not to separately install codecs for Windows 10, this player installs them immediately with the player. One of the most popular video players. A simple interface and fast operating speed are the best qualities of this video player.
- The KMPlayer is an equally popular Windows video player that has a wide variety of settings. Supports many formats.
- Adobe Flash Player – you will simply need to install this player, since it is responsible for playing audio and video in the browser, as well as for running web games.
Office programs for Windows

Office programs are the most important utilities for those who constantly work with documents. The standard Microsoft Office package includes:
- Text editor Microsoft Word;
- Editor for Microsoft Excel tables;
- Microsoft Outlook mail manager;
- A program for creating and editing Microsoft PowerPoint presentations.
Less popular utilities in the MS Office package: Access, InfoPath, Publisher, Visio, Project, OneNote, Groove and others. All of them are distributed on a paid basis.
A good free alternative is OpenOffice.org. It is also aimed at working with various documents. Its only drawback is that it sometimes does not read Microsoft Office formats correctly.
Archiver

An archiver is needed to unpack programs, games or other applications packed in an archive. An archiver is also needed when it is necessary to group all files and documents and send them by mail or instant messenger. Using an archiver, you can protect your files by setting a password on the archive. But first of all, the archiver is still designed to save disk space or reduce the size of a file for sending over the Internet.
- WinRAR is a very simple and easy-to-use archiver. It quickly archives any files, can open any archives, and allows you to change its appearance. WinRAR has a 40-day free trial. But after this period, the program is not blocked, but continues to work fully, only a window periodically pops up reminding you to purchase a license.
- 7-Zip is a free archiver with a high compression ratio. It is open source. Lightweight and reads many formats.
System optimization and configuration

Just as every person looks after himself and puts himself in order, you also need to look after your computer so that the system lasts as long as possible and there are no failures. To do this, you need a program that will clean the system of unnecessary files, enable or disable additional functions, speed up the boot and operation of the system, defragment the disk, and much more.
- Acronis Disk Director - designed for quick hard drive optimization. With its help, you can create and manage new disk partitions. You can recover deleted data from disk. The program protects data on the disk and also helps improve the performance of the entire computer.
- Auslogics BoostSpeed is a very popular program that was even advertised on the Discovery Channel. With its help you can speed up your computer and even the Internet. You can also clean up disks and increase free space on your computer, fix errors in the registry, defragment disks, recover deleted files, and protect your private information. It is used to tune Windows 10 for maximum performance. This program combines many functions for which there are usually separate utilities.
- Auslogics Driver Updater - helps you quickly and without unnecessary hassle update all the drivers on your computer.
- Unistall Tool - if you think that by deleting a program you get rid of all its files, then you are very mistaken. In fact, after removing any programs, many small files remain on the disk, which over time heavily load the system. If you delete programs using this utility, then there will be no trace of them left on your hard drive.
- CCleaner is a tool for cleaning your computer from junk. Quickly and effectively copes with its task. It also has functions for uninstalling programs, system recovery, startup settings, and completely erasing disks.
Messengers

If 10 years ago communication on the Internet was maintained through email, now there are many instant messengers that allow you to communicate with people from all over the world. Instant messaging makes life much easier not only at work, but also at home. The most popular instant messengers on Windows 10:
- Skype was the first program that allowed Internet users to communicate with each other through video calls. Until now, Skype has not lost its popularity. A very easy and convenient interface, your own funny emoticons, the ability to hold online conferences with 100 people at the same time and many other functions without which many Skype users can no longer imagine their lives. The program is free, only calls to mobile phones are charged.
- Viber is a very popular program for exchanging free messages to mobile phones. Viber users also actively use the program on their computer, as this allows them not to interrupt conversations, as well as make free calls to the subscriber even without a phone. The program has not only its own emoticons, but also stickers, and has also introduced the function of temporary messages, which are deleted themselves after a while. The program is free, you only charge for additional stickers.
- WhatsApp is another messenger that has gained popularity thanks to its version on smartphones. After a while, an official program for computers appeared. Therefore, if you and your friends or acquaintances communicate via WhatsApp, then it would be a good idea to install it on your computer.