Installing Windows on SSD. Setting up an SSD drive in Windows to optimize performance Installing Windows 7 on an SSD
The developers of SSD technology guarantee high loading speeds and operation of the system software. As noted by programmers who are already using the new drives, they have not identified any features of installing Windows 7 on an SSD that could prevent an ordinary user from doing so.
Initially, the process is divided into two stages:
- the first stage is setting up the media itself for Windows 7, which is easy to do using the SSD Mini Tweaker 2.1 utility;
- The second stage is the direct transfer of the operating system itself to a new device. It should be noted that you should not try to use versions of Windows lower than 7; even using XP will not show any significant differences between its operation on an HDD or an SSD.
Things to consider before installing Windows 7
Before proceeding directly to downloading and configuring the operating system, you must firstly disconnect all other storage drives, for example, HDD drives, check the firmware version of the SSD drive on the website of the manufacturer of the SSD drive and, if necessary, update it, then make changes using the BIOS into disk operation mode by moving from IDE mode to AHCI (Advanced Host Controller Interface) mode.
Physical installation of a new drive can only cause difficulties in cases where it will be used on laptops, since most models have only one connector for connecting the drive to the motherboard. A way out of the situation may be to use an HDD drive as an external device, and place an SSD drive in its regular place.
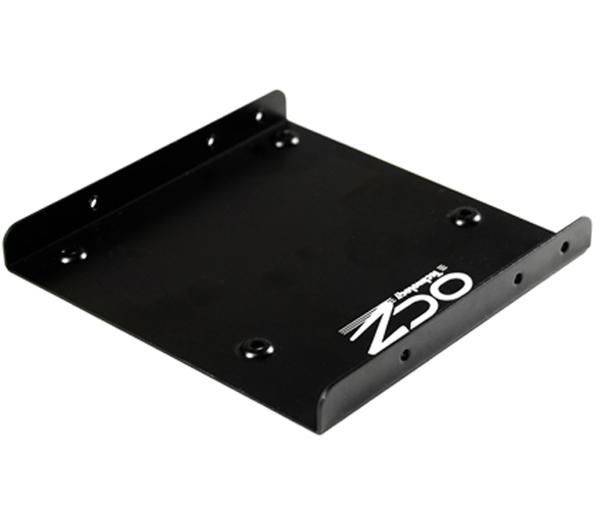
A situation may also arise when there is no space in the computer case to connect 2.5-inch devices, in which case you should use a “2.5-inch to 3.5-inch” adapter, which is often included in the basic SSD drive kit .
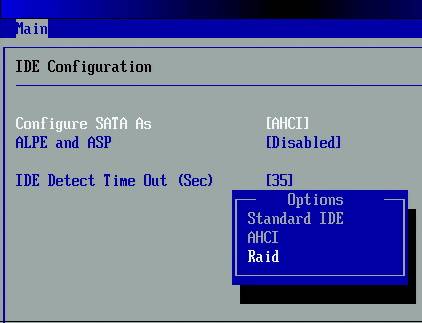
After physically mounting the new disk, open the BIOS, and sequentially go first to the “Advanced” menu tab, then to the “SATA Configuration” item and in it go to the “Sata mode selection” sub-item in which we mark the AHCI mode module.
After this, press F10, which saves all changes made.
The procedures described above are all you need to know and do before installing the OS.
OS installation
It is best to install Windows 7 not by transferring the system image from the HDD, but directly from the installation disk, and disconnect the hard drive itself from the motherboard at the time of installing the OS.
Initially, you need to make sure that the physical installation and connection of the SSD drive to the SATA interface is done correctly and that the BIOS sees it and correctly identifies it. The necessary information is displayed in the “Information” menu item, where all connected devices are displayed.
After making sure that a new disk is present in the list of connected devices, go to the “Boot” section, which indicates the device (CD or DVD) from which the system will be loaded and installed.
The further installation process is completely similar to that carried out when working with a hard HDD drive and, apart from the increased speed of downloading and copying information, there are no differences. You must act in accordance with the prompts of the installation program.

After the installation is completed, you again need to enter the BIOS and switch the boot point from the CD (DVD) to the SSD device, from which Windows 7 will now be loaded on the computer.
Correct installation of the software will instantly affect the performance of your computer.
Important! Before starting the installation, it is necessary to confirm that the SSD disk is formatted for the NTFS file system (New Technology File System - developed by Microsoft Corporation for the NT line of OS).
It is best to do this manually by entering the appropriate commands in the CMD line in the following sequence:
- “Diskpart” - launches the Windows command interpreter;
- “List disk” - displays a list of all connected storage media with detailed characteristics and data;
- “Select disk X” - select the device to format, the “X” parameter is replaced by the letter designation of the SSD drive in the list above;
- “Create partition primary align=1024” - creating an offset parameter;
- “Active” - activation of the section;
- “Exit” - exit from CMD mode.
Video: WINDOWS installation
Setting up the system on SSD
Initially, “Seven” was developed to interact with HDD drives, since although the SSD production technology was already known and proven, it was not intended to be widely used due to its too high cost.
In this regard, for the correct operation of all OS services, it is necessary to optimize Windows 7 so that its operations increase their performance and do not lead to the creation of internal conflicts when interacting with the SSD disk.

Adjustment of OS utilities is also necessary to increase the service life of a new disk, since the technology of solid-state drives itself is critical to frequent rewrites, which wears out the disk, which is structurally similar to a huge “flash drive”.
The optimization process is preceded by the procedure of having drivers loaded and enabled in the system to support AHCI mode and the TRIM command of the ATA interface is activated.
Important! The TRIM command optimizes the performance of solid-state drives by providing them with information about unused blocks by the system that can be used for recording. Full support for TRIM mode is provided only in Windows 7/8/Vista; it was not provided in earlier versions.
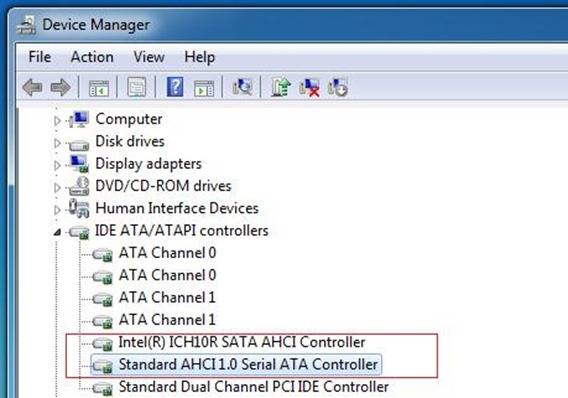
The presence of enabled AHCI controllers is displayed in the “Device Manager” on the “Control Panel” in the “IDE ATA/ATAPI controllers” tab.
Checking the status and activating the TRIM mode is carried out from the line of active commands (the sequence of pressing “START” - “Run” and entering the CMD command) but only if you have administrative access rights to the system.
The CDM command for checking the status is “fsutil behavior query DisableDeleteNotify”.
After entering it, there are two possible answers:

TO TRIM enable command – “fsutil behavior set DisableDeleteNotify 0”.
Now you can proceed directly to the procedure for optimizing the OS for the SSD, namely:
- the paging file is either moved to another disk or disabled;
- SSD caching and indexing processes are turned off;
- defragmentation of the SSD disk is prohibited;
- the TEMP folder is transferred to the HDD and hidden;
- The system recovery and hibernation functions are disabled.
Disable indexing
The information exchange speed of SSD devices is much higher than that of HDDs, for which Windows 7 was developed, so there is no need for indexing and caching. Disabling these two functions will only increase the reliability and safety of information in cases of computer power problems.
Indexing is disabled in the SSD disk properties tab by unchecking the option "Allow indexing for quick search"(Allow files to have contents indexed in addition to file properties).

After clicking “Ok”, the computer may show resistance, but to do this, just click "Ignore All" in the drop-down window.
Defragmentation service
Windows 8 independently detects the media type and automatically disables the defragmentation function for the SSD drive, thereby increasing its service life by eliminating the need to repeatedly move file blocks, to which it is very sensitive.

In Windows 7, disabling is carried out by excluding the SSD drive from the list of drives for which this mode is configured.

Creating restore points
By deactivating the “System Protection” function (System Restore), the user minimizes the number of accesses to the SSD device for writing and saves its space by prohibiting the creation of copy files.
Disabling occurs in the “Computer Properties” folder in the “System Configuration” tab, checking the “Disable protection system” option.

Optimization with SSD Mini Tweaker utility
"SSD Mini Tweaker"- a useful utility with free distribution and a small amount of memory space. When you launch it, only one window appears in which all the settings described above are displayed, enabling or disabling them is necessary to optimize the OS for working together with the SSD drive.
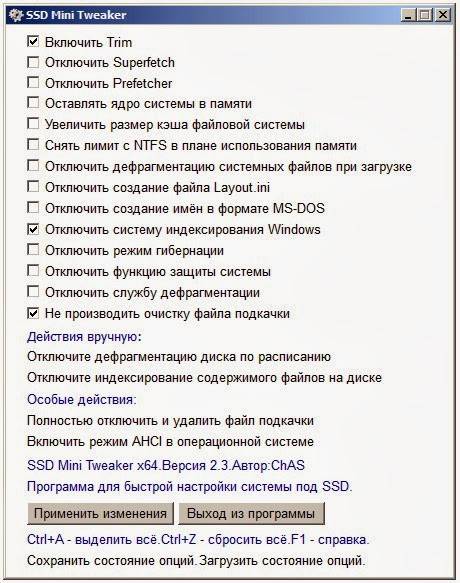
Just check the boxes next to the required functions and click on “Apply changes” and all actions within the Windows 7 OS will be automatically performed.
The transition to a new type of media is completely justified in terms of increasing the performance of the Windows 7 operating system and even with minimal user skills does not cause complications.
Even in very powerful PCs, hard drives (HDD) remained the main brake for a long time. The reason for this phenomenon is that the operating principle of such a disk is associated with the rotation of the spindle, and the rotation speed cannot be increased above a certain limit. This manifests itself in the form of delays when accessing data. Modern solid state drives (SSDs) are free of this drawback, but SSD drives require some optimization to get maximum performance. The article discusses issues related to setting up an SSD disk when working in Windows 7.
Intended use of SSD drives
If we take into account that the cost of SSDs is still significantly higher than the cost of HDDs (although there is a tendency for it to decrease), then the main area of application for SSDs remains the media on which the operating system is installed. The performance of the system partition usually determines the overall speed of the PC, including boot and shutdown speeds, and the execution time of most OS functions while the PC is running, which are sometimes even invisible to the user. Moreover, such an application does not require a large-capacity SSD; usually no more than 80 GB is enough, and the price of such a drive will not greatly affect the user’s wallet.
The need for SSD optimization
Modern operating systems, not excluding Windows 7, were designed to work with SSDs, but many OS functions designed for HDDs were still allowed for solid-state drives, although they did not provide a performance increase, and sometimes even reduced it. These are functions such as indexing, defragmentation, PreFetch, SuperFetch, ReadyBoot and some others.
An SSD, unlike a HDD, has a large but limited number of write cycles, which determines its “lifetime” and the reliability of the entire system as a whole. To achieve maximum effect and maximum lifespan of such a drive, it is necessary to optimize (tune) both the SSD itself and Windows.
SSD optimization
Before installing Windows 7 on an SSD, you must complete the following settings:
- Make sure that the SSD has the latest firmware version. You can find out the current firmware version using the CrystalDiskInfo utility. Then you need to go to the SSD manufacturer’s website and compare the current version with the latest one listed on the website. If the need for a firmware update is discovered, you need to know about this before installing the OS, otherwise after the update all data will be lost! The firmware must be updated in accordance with the manufacturer's instructions;
- Switch the SATA disk controller to AHCI mode. This mode allows you to use the latest technologies to improve disk performance, in particular SSDs. This mode supports technologies such as:
- Hot Plug, which provides “hot replacement” and installation of the drive (without turning off the PC);
- NCQ, which supports deep command queues;
- TRIM, which significantly increases the performance of SSD drives and their service life.
Switching to this mode is done through the BIOS, but this is only if you do it before installing Windows. Switching to AHCI mode when the OS is already installed means getting an unpleasant effect - you will not be able to load the OS;
- In cases where the "seven" is already installed, you can also switch to this mode if you know how to edit the system registry. To do this you need to follow the branch HKEY_LOCAL_MACHINE\System\CurrentControlSet\services\msahci, find the Start parameter and set its value to 0. Then restart the PC, go into the BIOS and change the SATA controller mode to AHCI. After rebooting, Windows 7 will detect the new device and install it;
- When installing the OS, it is advisable to leave about 15-20% of the total SSD capacity unallocated. This area will be used as the drive gradually wears out.
SSD disk and optimization of Windows 7 OS
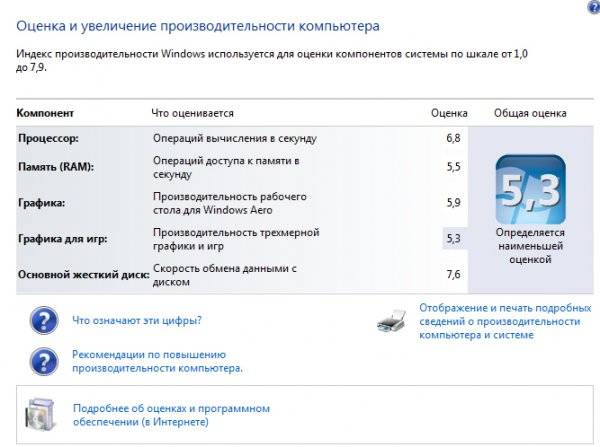
When optimizing, you need to keep in mind that some actions will require editing the system registry. Therefore, before performing optimization, you should create a restore point or a copy of the registry. Also, before optimization, it is advisable to determine the Windows 7 performance index, so that after it you can see the result of the settings made.
Setting up an SSD disk when working in Windows 7 consists of performing the following steps:
- Disable indexing for SSD drive. To do this, click Start - Computer. Then right-click on the system disk and select Properties. In the window that appears, there is an option “Allow the contents of files on this disk to be indexed in addition to the file properties”; you need to uncheck it;
- Disable automatic defragmentation of the SSD drive. The easiest way to do this is to type the word “defragmentation” in the search bar (on the “Start” button) and click OK. A window will appear in which the only thing you need to do is uncheck the “Run as scheduled” option and click OK;
- Disable NTFS file system logging. To do this, click “Start” and enter cmd in the search bar. A command line window will appear (administrator privileges are required), in which you need to enter a command like fsutil usn deletejournal /D C: (if the system drive is C:) and press Enter;
- Disable sleep mode. If the OS is located on an SSD disk, then it will boot very quickly even without sleep mode, so there is no need for it. To do this, you need to do the same as in the previous paragraph, but then enter the line -powercfg –h off and press Enter;
- Disable the page file. It is advisable to perform this action if you have a 64-bit OS and a RAM size of 4 GB or more. To do this, you need to follow the path Computer - Properties - Advanced system settings - Advanced - Performance Settings - Advanced - Virtual memory - Change. Uncheck the automatic size selection option and check the “No paging file” option;
- If the swap file is still used, then disable unloading of kernel and driver codes from RAM. If they remain in RAM, the number of entries on the SSD will be reduced and the system’s response to user actions will improve. To do this you need to open the registry key KEY_LOCAL_MACHINE\SYSTEM\CurrentControlSet\Control\Session Manager\Memory Management, find the DisablePagingExecutive parameter in it and change its value to 1.
Optimization with SSD Tweaker
Many PC users do not have sufficient training to manually configure Windows 7 for an SSD. The SSD Tweaker utility was developed specifically for them. It exists in several versions - free and paid. In the free version, some functions are disabled, but even without them you can achieve optimal interaction between Windows 7 and the SSD, and do this both manually and automatically.
In this article, we will look at the operating system settings for optimal operation of the SSD, features of the operation of Windows services, as well as some “tricks” for more stable operation of the SSD drive and increasing its service life.
Introduction: SSD and HDD drives
Solid State Drive (SSD) significantly superior to a classic hard drive ( HDD) in the speed of reading and writing files.
This is achieved thanks to completely new technology for storing information and methods for reading and writing it. At the same time, solid-state drives have limitations associated with their service life, and also have a number of operational features that affect performance.
Why are classic hard drives (HDDs) slow and what affects their speed?
On a hard drive, data is stored on rotating magnetic plates, and the speed of reading information on different parts of the plate is different. In addition, the different arrangement of files on the platters requires constant movement of the read head, which makes copying or writing a large number of (especially small) files very slow.
Sometimes one file may be written in parts on different parts of the platter, which will also reduce the speed of reading such a file: the reading head must move to a new position and wait for the magnetic platter to rotate to begin reading the next part of the file.
Why is an SSD drive several times faster and what determines the quality of its work?
In SSD drives, data is stored on flash memory chips (usually NAND memory is used). The NAND controller is responsible for accessing the cells, whose tasks include performing cell read and write operations, as well as distributing the load.
The speed of access to an individual memory cell of an SSD disk is much higher than that of an HDD disk. In addition, the SSD disk controller can perform a large number of operations with memory cells simultaneously, which makes it possible to further increase the speed gap over classic hard drives.
The disadvantage of this technology is that memory cells have a limited rewrite cycle.
The guaranteed resource is approximately 300 thousand to 1 million times.
So the qualitySSD disk depends on the type of flash memory, as well as on the quality of the controller, which must balance the load so that all cells are rewritten evenly, as well as implement other important management issues SSD disk.
What operating system settings and services affect the lifespan of an SSD drive.
Freezes, freezes and blue screens of death (BSOD) after installing a new SSD drive.
If you encounter freezes (second-long computer freezes) or frequent blue screens of death after you started using a new SSD drive, then most likely you need to:
- Install all the latest updates to the Windows operating system.
- Update the SSD firmware.
- Update the motherboard BIOS.
Why is it so important to leave 10 to 30% of the space on your SSD unallocated or unallocated?
It is advisable to always leave at least 20-30% of the space on the SSD free.
This is necessary so that the NAND controller, through which all the logic for working with the disk’s flash memory is implemented, has a large number of free blocks. These free blocks can be actively used in the process of garbage collection, wear leveling, and also for replacing flash memory blocks that have failed.
In fact, solid state drives have a special reserve for such purposes.
It is called " reserve zone» SSD disk. This reserve zone is not accessible to the operating system and can only be accessed by the controller.
When most of the free disk space is gone, the controller has to carry out operations to move information to temporary blocks of the reserve area.
You've probably noticed that SSD disk capacities have a strange format: for example, 240GB instead of 256GB. And if you look at the amount of available space, it will be even less, about 222GB. In fact, most likely your disk has a capacity 256GB, and about 8-13% The flash memory of the disk is used as a “reserve zone”.
A large volume of the reserve zone is needed for uniform speed of operation of the SSD disk (especially noticeable under heavy load), as well as its uniform wear, regardless of how much space you occupy on it - 25% or 95% .
But all manufacturers behave differently: some expensive drives from the company Intel may have up to 30% reserve zone(in excess of the volume available to the user), while other manufacturers, trying to make the cost SSD disk as cheap as possible, cut this area to 6-7%
, or even release firmware that allows users to change its size themselves. Using utilities for testing SSD disk performance, you can independently compare the speed performance of the same disk with a large amount of free space and a small amount when the disk is full 95%
.
Only very high-quality disks with a sufficient reserve area should not reduce stability in operating speed.
Which Windows 7 services are useful for an SSD, and which are best disabled?
Defragmentation, temporary files, indexing - all this requires a lot of disk access, which is very undesirable for SSDs due to the presence of a limited number of write cycles, which is definitely not the case in HDDs.
Windows 7 cannot fine-tune services in accordance with the operating characteristics of SSD drives. But you can independently disable some services that definitely do not help the operation of the SSD drive (and sometimes are even harmful, such as disk defragmentation).
You can also decide to disable some services that are not relevant to you. Further in the article you will find a description of such services in Windows 7 and an algorithm for disabling them.
Disabling SSD disk defragmentation in Windows 7
An absolutely unnecessary (moreover, wearing out SSD) process, relevant only for a simple hard drive (HDD), transfer fragments files scattered throughout the drive in different areas to speed up reading from the disk.
Fragmentation is the natural splitting of files into parts on a hard drive, which are subsequently recorded in areas that are physically distant from each other on magnetic information storage.
The SSD disk independently distributes data into blocks using the controller and does not need defragmentation.
Let's look at how to disable the defragmentation service in Windows 7:
Step 1.
Open the menu “ Start
"→ enter in the search bar: " defragmentation
" → select the item " Defragmenting your hard drive"
.  Figure 1. Find and launch the Hard Disk Defragmenter application.
Step 2.
In the window that appears, click on the button “ Set up schedule"
→ uncheck “ Execute on schedule"
→ « OK
»
→ close the dialog box.  Figure 2. Window for setting up a disk defragmentation schedule.
Ready.
Attention! This action disables defragmentation for all system drives, incl. and HDD. If necessary, start the process manually.
Disabling the Prefetch Service in Windows 7.
This service has a fairly good effect on the operation of the hard drive, increasing the loading speed of the OS and user software.
The service accumulates data about which files and programs are opened when the OS boots and the first seconds of its operation in order to optimize methods for accessing such files. But the SSD already works extremely quickly and does not need such optimization.
That's why " Prefetch "You can safely turn it off, freeing the drive from unnecessary (albeit small) wear and tear. To do this, use the registry editor (regedit):
- « Start "→ enter in the search: " regedit » → click right click(hereinafter RMB) on the line with the found program → run on behalf of the administrator. Next, we look in the hierarchy (on the left in the window) for the following key: « HKEY_LOCAL_MACHINE\SYSTEM\CurrentControlSet\Control\Session Manager\Memory Management\PrefetchParameters».
- Now on the right side of the window we find the item Enable Prefetcher , right click on it → « Change… ».
- Change the value 3 (or 1) to 0, save, close the registry editor, and restart the PC.
 Figure 3. Changing the registry key to disable the Prefetch service.
Made!
Note.
Services Superfetch And Readyboot it is not necessary to disable it, because they have virtually no effect on the SSD, sometimes only writing log files of only a few megabytes in size, which help the system work and boot a little better. Now let's move on to controversial functions, disabling which can slightly reduce PC performance, but significantly extend the life of the solid-state drive.
Optimizing useful Windows 7 services
Transferring temporary files to HDD
Quite a controversial decision. Further actions will allow you to transfer:- browser cache.
- temporary software files.
- installation and auxiliary files.
Here the choice is entirely yours.
If you decide to transfer temporary files to the HDD, then below are the instructions using Windows 7 as an example:
Step 1.
Button " Start
" → search: " Environment Variables
"→ select " Changing the current user's environment variables"
.
 Figure 4. Window for changing environment variables in Windows 7.
Step 2.
Now we change the values in the variable column one by one by clicking the “ Change…
" We indicate the full desired path for storing files, starting with the letter HDD (for example, “ D
:\...\
Temp
"), first in case TEMP, and then similarly TMP.
Save the values and close the window by clicking “ OK
».
Warning.
It’s better to leave temporary files in their places, because an SSD is bought precisely to increase comfort during work, and not to constantly blow away dust particles from it, protecting it “like the apple of your eye.”
Of course, programs will open quickly, but, for example, loading pages in a browser will take much longer.
Disabling indexing in windows 7
Indexing speeds up the process of finding the desired file on disk.
On an SSD it is completely disableable, even if you often search for something by typing queries into Explorer. It will take a little more time to search for files, but the disk will no longer be written to logs, which create additional write operations even when the system is idle on the desktop.
Indexing is disabled in " Properties » disk. Let's take a closer look:
- Open " My computer" , find our SSD (based, for example, on memory capacity) → right-click → select the last item “ Properties ».
 Figure 5. Local disk properties window.
- Uncheck " Allow the contents of files on this drive to be indexed in addition to file properties »
- Close the window by clicking " OK ».
Now let’s give an example of optimization methods that are found in many sources, but I strongly do not recommend listening to them for the sake of preserving valuable system files in the event of a virus infection or hardware failure.
Do not disable the paging file completely - move it to a HDD with a smaller capacity.
It is strongly not recommended to disable this file even if there is enough RAM, because mini-dumps of system errors are written to it in case of BSOD (blue screen of death) and other problems with software and hardware.
And it is precisely without a paging file that you will not be able to accurately know the full essence of the problem that has arisen if the OS does not boot for some reason.
Also, data from programs or services can be written to it when installing windows updates or when installing software that will be requested after the computer is restarted.
However, there is a way out– leave a small amount of the paging file on the HDD (by default it is written to the SSD, like any other system drive).
Step-by-step instructions on how to move the page file to another drive in Windows 7.
- On the menu " Start » click right mouse button (RMB) under item " Computer » → further " Properties » .
- In the window that appears we find “ Advanced System Settings "(usually in the middle left) and select with the left mouse click.
- Under the item " Performance "Click on the button " Options… »
 Figure 6. “Advanced” tab for changing virtual memory settings in Windows 7.
- Next in the window that appears “ Performance Options "select the tab " Additionally " and click on " Change " under the item " Virtual memory ", the paging file window will open.
 Figure 7. Virtual memory settings window in Windows 7.
- Uncheck " Automatically select paging file size ».
- We configure it by removing the swap file from the SSD, then install the recommended “ by system choice » on HDD. Save the changes and reboot.
Now dumps will be recorded without any problems, and the solid-state drive will be freed from the unnecessary load of this file.
Do I need to disable hibernation and sleep modes? Advantages and disadvantages.
Disabling hibernation and sleep mode may be relevant in the following situations:
- You don't use these Windows 7 features, but always use the " shutdown».
- When using an SSD, you experience freezes (the computer or laptop cannot wake up from sleep or hibernation mode). BSOD’s (blue screens of death) when using these modes.
Installing an SSD speeds up the startup and shutdown of the OS several times.
So, “Hibernation,” which is familiar and useful to many, becomes less relevant than on a slow HDD. Moreover, when Windows does not shut down completely, it writes files from temporary memory (RAM) to the system disk, and when turned on, it unloads them back.
Consequently, each time the mode is used, the SSD is forced to write to itself a file that reaches approximately 70% of the RAM capacity. And to save already limited SSD write cycles, you can completely (reversibly) disable hibernation (as well as “Sleep Mode”) using the standard “Shutdown”.
This way we will get some advantages:
Disadvantages of disabling hibernation and sleep mode.
Disadvantage there is a small loss of time while waiting for the OS and programs to fully load, which may be needed instantly, which happens, you see, quite rarely.
So, in most cases, “Shutdown” will be the most successful solution when turning off the PC, and it is quite possible to do without “Hibernation” when using a high-speed SSD.
"Sleep mode" no way does not write files to RAM, but only reduces the consumption of the PC by reducing the power supply to many of its hardware parts (all the data that was in the temporary memory remains there).
So you only need to disable it in case of BSOD and other system errors.
Prohibition of turning off disks in terms of power supply.
Stuck in sleep mode.Sometimes, according to the settings, the power supply board, computer or laptop turns off the hard drives to save resources. This can happen at the same time as sleep mode is turned on, or after sleep mode has already begun.
The computer screen goes blank and then, either immediately or over time, windows will turn off the hard drives. Old drivers or firmware for SSD drives may behave incorrectly in this situation, and the computer freezes because... The hard drive does not initialize after turning off the power.
This problem can be mistaken for a computer with an SSD drive freezing in sleep mode.
To do this you need to go to the menu " Start
" → enter in the search bar: " power supply
 Figure 8. Go to power settings.
Next click “
» → go to item « Change advanced power settings
"(Figure 9).

Disable sleep mode and/or hibernation.
4.5.1 Let's start with sleep mode.
As we described above, to do this you need to go to the menu “ Start " → enter in the search bar: " power supply » → select the appropriate item (Figure 8).Next click “ Setting sleep mode " (located approximately in the left middle of the window that appears), and then select the value " Never " in the parameter " Put your computer into sleep mode "(Figure 11).
 Figure 11. Disable putting the computer into sleep mode.
Ready! Sleep mode is disabled.
4.5.2 Let's move on to disabling hibernation.
Hibernation is a shutdown mode in which all processes are removed from RAM copied onSSD, forming a file hiberfil.sys which wastes resources (rewrite cycles, in this case) of the solid-state drive. Disabling hibernation is done by entering a specific command in the command line console ( cmd.exe). First you need to open the command line by entering “ Start " request: " cmd "and run it on behalf of administrator(by pressing RMB and selecting “ Run as administrator »)Now copy (or enter manually) the following into the line:
powercfg.exe -h off
Attention!
Combination Ctrl+V doesn't work in cmd.exe. Use your mouse to insert a command ( RMB → Paste).
 Figure 12. Entering data into the command line to disable hibernation.
Press Enter, wait a couple of seconds, close the command line.
After rebooting the PC, the hibernation file will be erased from our SSD, and writing to the disk will not happen again until you enable the function back (in the same command, change “off” to “on”). Done. Hibernation will no longer plague your SSD drive.
Why you can't disable Windows restore point
It will do impossible the simplest correction of system files in case of incorrect installation or removal of software, drivers, etc. The checkpoint sometimes helps a lot, so disabling it is impractical and even harmful.
Automatically configure an SSD drive using the free SSD Mini Tweaker program
A program that will help you quickly automate some of the actions listed here - SSD Mini Tweaker. This software is portable, i.e. does not require installation, and also free.
The window of this optimizer program (V 2.7) with recommended (universal) settings will look like this:  Figure 13. SSD Mini Tweaker program window for optimizing an SSD drive.
Conclusion
Now, having become familiar with ways to optimize Windows 7 for fast and durable operation of an SSD drive, you can make a choice in the direction of performance and service life of the SSD, or make the most correct balance, in your opinion.
Hello dear friends, today I would like to tell you how to install Windows on an SSD drive and perform the important initial setup.
Solid state drives are becoming more and more popular every day due to their phenomenal operating speeds compared to hard drives.
Half a year ago, I assembled a system unit for myself, with good performance components, but I didn’t buy an ssd, which I now regret!
Then they cost twice as much, but who knew that everything would turn out like this, the fall of the ruble, rising prices and other political clownery, but that’s not about that now.
Well, I couldn’t resist and bought an ssd, I couldn’t resist the temptation. I decided to use this disk as a system disk, that is, the operating system and programs are installed on it. All other data is stored on the hard drive.
Comrades, I’ll tell you, this is the bomb! Booting the system from pressing the power button to loading the desktop takes seven, ten seconds, and on the HDD it was a minute and a half.
Programs open and run much faster. Photoshop with a bunch of plugins opens in a couple of seconds, previously you had to wait about ten. In general, there are a lot of advantages, I recommend it to everyone!
Installing Windows 7 on SSD
First of all, connect the drive to the computer. I won’t tell you how to do this, it’s all simple! The main thing is that your motherboard supports SATA III, to which you need to connect, otherwise on SATA II You won't get the best performance from this type of drive.
Next, it is necessary to BIOS set the operating mode for our SSD AHCI. Since everyone's BIOS is different, the settings will accordingly differ slightly. For example, I need to go to the tab Configuration, then select SATA Controller working mode, and select from the drop-down list AHCI. Next you should click F10, to save your changes.
Now you can start installing Windows 7 on the SSD. It is the same as the usual installation, which I wrote about in detail in my article.
Setting up an SSD under Windows 7
In principle, after installation, the system will work normally, but we need to extend the life of the solid-state drive and disable some system functions that adversely affect the operation of the SSD itself.
To do this you need to download the program SSD Mini Tweaker 2.4 for x32 and x64 bit systems. Launch the program, and in the window that opens, check all the boxes as in the picture below:

Disabling scheduled defragmentation on SSDs

Click on the button Set up a schedule . A settings window will open where you need to click on the button Select drive:

In the window that appears, uncheck our SSD drive and click OK .

Disable indexing of file contents on an SSD.
Click on the inscription Disable indexing of file contents on disk . In the window that appears, uncheck the box and click OK .

A confirmation window for changing attributes will appear. Check the box as shown below and click OK .

After this, a message may pop up stating that you do not have enough rights to perform this operation for some files. Click Skip for all! Due to a few system files, nothing will happen.
After completing all the above settings, click Apply changes , close the program and restart your computer.

Well that's all, now you know how to install Windows on SSD, as well as perform its initial setup.
If you have any comments, suggestions or questions regarding this article, write in the comments, we will try to figure it out.