How to set up a speaker on a Windows 10 laptop. Connecting and setting up speakers on a computer
Much more often the video card driver goes wrong. And then the system writes that it has been restored. If there is no sound in Windows 10, the user is most likely to blame. Very often in programs such as Skype, someone turns off the microphone and speakers, turns off the application and forgets about it. And then they wonder why the sound stopped working. The check is carried out in completely standard ways.
The first thing to check is the volume. The next logical step is to check the power supply of the speakers and the quality of the connection to the analog output connector. Finally, you should turn on the control on the speakers themselves. If all of the above does not help, look at the driver version when installed. Sometimes there is no sound in games after an update.
Step-by-step instruction
Errors are so typical that they can already be classified into groups. This is exactly what we are going to do.
Volume
For most of the population, the I/O ports are located on the rear wall of the system unit, facing away from the user. Therefore, the first step is to click on the tray to see if there is an icon like the one in the screenshot.
In 95% of cases, this completes system recovery.
The cable is not connected to the connector
Another thing happens - someone turned off the speakers so as not to interfere. In this case, the keyword “speakers” will be missing.

Additional verification needed! Right click on the speaker icon and go to playback devices.

Instantly everything becomes clear: not connected!

Fix this problem by inserting a “jack” into the green audio output connector on the motherboard. The screenshot shows only 3 ports; in modern models they will form the bottom row of the two available.

Pink microphone input. Please pay attention to this if the headset has two “jacks”. After this, make sure using the method described above that the speakers are connected.
Driver
A sign that you need to install the required driver will be the absence of any active system devices in the menu.

An empty list is a clear indication that the disk with firewood was included with the motherboard for a reason. The necessary software must be installed. Typically, changes take effect without a reboot. If sound devices are not installed, first check the task manager. Most likely the driver is missing. If the sound does not work after updating Windows 10, work in the same direction. The drivers turned out to be too old.
Device is disabled
From time to time, sound does not work on Windows 10 due to the fact that someone turned off the device completely. This can be done in two ways:
- Program intervention.
- Manually.
The authors cannot prove this in any way, but it seems that devices may disappear due to the installation of crooked drivers. This happens from time to time with USB. At the beginning of December, when I removed any device and installed a new one, the system did not see it. The authors had to turn off the power because the PC became uncontrollable, deprived of a keyboard and mouse. One reason that there is no sound in the headphones is usually more prosaic. Let's go back to Sound and look.

Everything is seen. It says in black and white that the speakers are disabled. To restore sound, right-click and select the desired option.

Just in case, always select the checkboxes shown in the screenshot, this sometimes saves a lot of time.
Sound level
You can set the sound level not only on the speakers, but also on the system mixer. If there is no sound after installing Windows 10, don’t rush to blame Billy Gates and Microsoft. Check the sound level of all devices thoroughly.

Each object has this tab. Don't waste any decibels.
In Game
If the game world does not want to play, the answer to the question of why there is no sound lies somewhere in the settings area of the application itself. There are simply no options here. This is not some emulator that has incompatibility issues. All releases are tested on a Windows 10 computer. This is part of the marketing strategy. Some games, if completed incorrectly, will disrupt the operating system settings. You'll have to install everything manually.
We know for sure that fresh firewood immediately ends up on the Microsoft server list, but we recommend updating from the official hardware manufacturer. Windows has too many system devices to get confused among. Before you update your software, find out:
- Motherboard model.
- Sound card model (if available).
Just in case, we show how to do the same through Device Manager (although we do not recommend using it).

Everything in the Sound... folder needs to be updated. Perhaps the turned on fancy display is not perceived correctly by the system. In this case, the Dispatcher will contain question marks. This is a clear indication that you need to visit the manufacturer’s official website. Some displays support audio and we are updating the driver for this.
Windows users often encounter a problem: suddenly the sound on the computer disappears completely or distorted sound appears that hurts the ear. How to return everything to its place as soon as possible? What causes such problems on a PC?
What to do if there is no sound on Windows 10
There are many reasons for sudden loss of sound. Before performing the steps described below, you must first make sure that your speakers or headphones are working properly: if possible, connect them to another gadget, for example, a smartphone. If everything works, proceed to follow the instructions.
Adjusting the sound volume
The user may not hear the sounds of the system due to the fact that the operating system is currently set to the minimum volume level. The sound can also be turned off. This problem has a very simple solution:
- Pay attention to the lower right corner of the display. Among the icons in this area, find the icon in the form of a loudspeaker. Its name is “Speakers”. Click on it with the left mouse button. Click on the loudspeaker icon located next to the clock and date in the lower right corner of the screen
- If there is a cross next to the icon, it means that the sound was accidentally turned off. Enable it in the panel that appears.
- To do this, press the slider with the left key and hold your finger on it. Move the slider to the right to the desired volume level, but we recommend doing the maximum and checking the sound right away. If there is no cross, try first lowering the volume by moving the slider to the left, and then increasing it again.
 Move the slider to the right to increase the volume
 - If the sound is barely audible, right-click on the same “Speakers” icon. In the list, click on the first item “Open volume mixer”.
 In the context menu, click on “Open volume mixer”
 - Check the volume level for individual utilities that are currently open on your PC. The browser volume can, for example, be much lower than the system sounds. Set it to maximum and make sure that the sound now works as before.
 Increase the volume for each type of sound
Running the troubleshooter
Perhaps there was some kind of isolated failure in the system - which is why the sound disappeared. In this case, simply restarting the device through the Start menu can help. If it doesn't give any results, run the special Windows tool to fix audio problems:
- Right-click on your speakers icon again. This time, opt for the last option, “Troubleshoot audio problems.”
- The system will immediately begin to look for existing problems. Wait a bit.
 Wait until the system detects sound problems on your PC
 - The tool may find some problems. The message will include specific recommendations to resolve the problem. They can be different (depending on the cause of the problem). Follow the recommendations. For example, the tool might tell you to simply turn up the volume. Use the instructions described in the previous section of this article.
 Troubleshooter asks to increase audio volume in mixer
 - Click on "Next". The tool will continue to look for problems.
 The tool can detect other problems that are related to the lack of sound
 - The tool can also detect a problem with the audio driver. In this case, you will be prompted to reinstall it. Click on “Play test sounds”.
 Click "Play test sounds"
 - The system will try to play sounds. Depending on their quality, select a rating in the next window. If it was difficult to hear or there was no sound at all, the system will reinstall the driver. After that, restart your PC and check the sound. If the sound was good, the OS will continue to use the current driver.
 Rate the sound the system just played
 - After checking and performing troubleshooting steps, the tool will provide you with a short progress report.
 Check out the tool's progress report: it will contain information about detected problems and their solutions
Absence or irrelevance of the driver
A common reason for no sound is an out-of-date audio driver. In this situation, it is necessary to update it to return the sound. This can be done in a standard Windows window called “Device Manager”, through special update utilities, for example, DriverPack Solution, DriverBooster, SlimDrivers and others (download them only from official sources). It is also possible to download audio drivers from the official resource of your PC manufacturer. Let's look at installing new drivers using the example of a laptop from Asus:
- In any browser we will open the official Asus company page. In the upper right corner, click on the magnifying glass icon and begin entering the model name in the line. Our device is called X555UB. Click on the desired model in the search results.
 Enter the name of your PC model in the search bar
 - Switch to the third tab “Support”.
 Switch to the "Support" tab in the upper right corner
 - Now we need the first section “Drivers and Utilities”. We left-click on it.
 Go to the “Drivers and Utilities” section to open the list of available “firewood”
 - In the drop-down menu, select your OS version. In most cases this is a “ten”. Don't forget about the bit depth - it also needs to be taken into account.
 Select your operating system from the drop-down menu
 - We are looking for Audio in the list. The driver will be located almost at the very beginning of the list. Click on the corresponding blue “Download” button and wait for the download to complete - it will take some time depending on the speed of your Internet.
 In the list of available drivers, find Audio
 - Launch the downloaded archive with the audio driver suitable for your model. We find in it a file called Setup.exe - an installation document.
 In the downloaded archive, find and run the Setup.exe file
 - Click “Yes” to launch the installer and allow it to make changes to the device.
 Click on "Yes" to allow the driver installer to make changes to your PC
 - Click “Next” on the initial screen of the audio driver installer.
 In the initial installer window, click “Next” to proceed to the next instructions
 - Click on “Next” again to begin removing the previous driver.
 First, the installer will remove the old driver, and after restarting the system, install the new one
 - We are waiting for the uninstallation procedure of the old driver to complete.
 The installer will take some time to remove the old audio driver
 - After this, we immediately reboot the system through the appropriate item in the installer window.
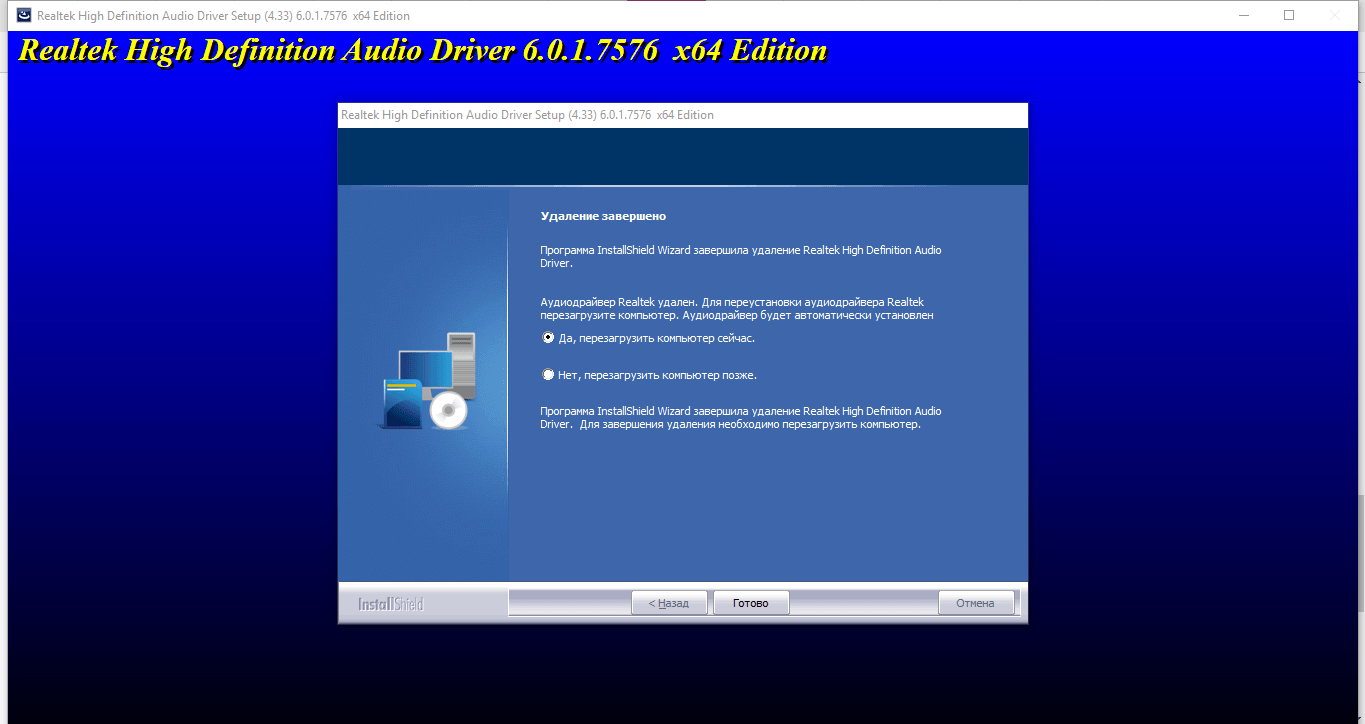 Check the box next to “Yes, restart your computer now” and click on “Finish”
 - After restarting the PC, the new driver will be installed automatically.
Video: how to update the audio driver for a Realtek sound card
Rolling back or uninstalling sound drivers
If you have problems with sound after any updates to the system, in particular, an audio driver update, the driver may have been installed incorrectly or it turned out that it does not suit your equipment for sound playback. In this case, it is recommended to roll back the sound “firewood”:
- First, call up the necessary window - “Device Manager”. In the tenth version of Windows, this is easiest to do: right-click on the “Start” icon and select the appropriate item from the list.
 From the Start button context menu, select Device Manager
 - If the Start context menu does not appear, use the Search panel (the magnifying glass icon on the Taskbar). Start typing a query corresponding to the name of the window - the system will immediately begin to select options for you. Click on the desired result.
 You can open Device Manager through the Windows Search panel.
 - In the list of hardware parts we find the item “Sound, gaming and video devices”. Open it by double-clicking with the left mouse button.
 In Device Manager, expand Sound, Game, and Video Devices.
 - Right-click on Realtek High Definition Audio or another that matches your audio equipment, for example, Conexant SmartAudio HD. In the gray menu, click on “Properties”.
 Open driver properties using the context menu
 - In the second section “Driver”, click on the “Roll Back” button if it is clickable. If not, then this option is not currently available to you.
 If the “Roll Back” button is not clickable, it means that you will not be able to return the previous version of the driver
 - The system will roll back the driver to the previous version. After that we check the sound. If it does not appear, remove the device through the same context menu, which is called by right-clicking.
- Now, on the top panel, click on “Action”, and then select “Update hardware configuration” - the driver will appear in the list again. We check the presence and quality of sound again.
 Click on “Update hardware configuration”
Viral activity
Problems with system components can be caused by malware that has previously settled on the device despite the presence of antivirus utilities. There may be problems not only with sound - there will be a general “slowdown” of the OS.
To rule out this explanation or, conversely, to make sure that the problem is a virus, conduct a full scan. You can use either a third-party antivirus or the built-in standard one - Windows Defender. Let's look at checking and treatment using his example:
- Launching Defender is very simple: it always runs in the background, so its icon is in the Windows tray. Open it and find an icon in the form of a white shield.
 Find the white shield icon in the Windows tray and left-click on it once
 - In Protection Center, open the “Virus and Threat Protection” section.
 Click the Virus & Threat Protection tile
 - On the next page you can start a quick check, but unfortunately it may not give any results. It is still recommended to use a full scan, so click on the “Run a new extended scan” link.
 Give preference to advanced scanning, which will definitely help neutralize the virus
 - Now choose one of three types. The custom scan will search for viruses in specific directories that you specify yourself. Windows Defender Offline will scan for approximately 15 minutes, but the system will have to restart. This option is suitable for removing threats that are best at camouflage. The first item - “Full scan” - will take a lot of time, but at the same time you can continue to work on your PC without worry. After selecting, click on the “Scan now” button.
 Select "Full Scan" if you are not concerned about the time the scan will take and if you want to work on your PC during this time
 - We are waiting for the virus scanning process to complete. The system will present you with a report: if malicious files are found, you will be given the right to choose the action that will be performed with this file. Select deletion. After that, restart the device and check if the sound works. If necessary, update the PC configuration (removing and restoring the driver) using the instructions in the previous section of this article.
 Wait for the system virus scan to complete
Enabling or restarting a service
The system service that is responsible for sound operation may be deactivated for some reason. If it is disabled, the sound, of course, will not work. You can activate it in a special window:
- We call it on the display through the “Run” window: immediately click on the two buttons Win and R, and in the field we paste or type the code services.msc ourselves.
 Write the command services.msc in the “Open” line
 - Another way is the “Search” panel. Click on the magnifying glass on the “Taskbar” (usually it is located next to the “Start” button). We write the request in Russian - “Services”. Click on a section in the search results.
 Enter “Services” into the search bar
 - On the right side of the window, look for the Windows Audio item. If this service is disabled, there will be a “Run” link in the middle part of the window. Click on it - it will start working in a few seconds.
 Using the "Run" link you can activate the Windows Audio service
 - After that, double-click on Windows Audio to open another window. If this click does not work, right-click and click on “Properties”.
 Click on "Properties" in the Windows Audio context menu
 - In the new window, we need a “Launch Type” drop-down menu. In it we select “Automatic” so that the service starts working immediately when Windows boots. Checking the sound.
 For the “Startup type” parameter, set the value to “Automatic”
 - After that, also make sure that three more audio-related services are running on your PC: Media Class Scheduler, Windows Audio Endpoint Builder, and Remote Procedure Call. For all of them you need to set the value “Automatic” for the “Startup type” parameter.
Video: How to start the Windows Audio service
Wrong speaker format
The sound may disappear if you install the wrong speaker format. Switching it will help correct the situation:
- There are also two ways to open the desired window. Call the “Run” panel again (via the Win + R combination): write or paste the request mmsys.cpl into it, and then execute it using the OK button.
 In the “Open” line, write the code mmsys.cpl and click on OK
 - The second method is as follows: right-click and in the list on a dark background, click on “Sounds”.
- In the Sound window, we need the first tab. Right-click on “Speakers” and immediately select “Properties” from the menu. Another way is to double-click on the “Speakers” item or a special button under the panel on the right.
 In the context menu of the “Speakers” item, select “Properties”
 - In the next window with speaker properties, go to the penultimate section “Advanced”. In it, in the drop-down menu, select the format suitable for your speakers (if it was 24 bits, check one of the items with 16 bits). The “Check” button will help you decide on the formats.
 Choose the sound format that suits your speakers or headphones
 - Also uncheck all the boxes in the “Exclusive Sound” section.
 Disable all options under Exclusive Mode
 - Once configured, apply the changes using the button in the lower right corner and click on OK.
Deactivating sound effects
Your audio output device may not work when sound effects are enabled in your speaker settings. To disable them, do the following:

System recovery or reinstallation
If none of the above methods solved your problem, try restoring your system. First, let's look at how to use a restore point, if you have one on your PC:
- To start recovery using a point, we need the System Properties window. There are several ways to open it. The fastest way is through the Run panel. Hold Win and R, paste the systempropertiesprotection code and press Enter.
 Paste the systempropertiesprotection command into the field and click OK
 - If it doesn’t work, open the “Control Panel” through the “Start” menu and find the “Recovery” section there.
- You can also use Windows Search. Use one word “Recovery” as a query.
 In the search bar, type the query “Recovery”
 - Now click on the “Restore” button.
 In the “System Properties” window, click on the “Restore” button
 - On the tool's initial screen, select either the most recent point (recommended value) or check the box next to the second point to choose a state from the list yourself.
 Select the last restore point or check the box next to the second item
 - In the latter case, select a state in the list that appears and click “Next”.
 Select the required restore point from the list
 - Before doing this, you can also familiarize yourself with the list of components that will be restored.
 The tool can show which programs and drivers will be affected by the rollback
 - Now click on “Finish” so that the tool starts restoring the operating system to the previous version - the state when sound was present on the PC.
 Confirm the restore point by clicking “Finish”
 - Confirm your intention to restore by clicking on the “Yes” button. The preparation process for the procedure will begin immediately. After this, the PC will immediately reboot - you will not be able to work on it. All that remains is to wait for the procedure to complete. After that, check the sound.
If you previously made a backup copy of your operating system, you can restore it using it:
- Restart your device. When it starts to turn on again, hold down the key called F8. On the blue screen, click on the “Recovery” button.
- Select your keyboard layout.
 Select your keyboard layout option
 - In the next window, click on “Diagnostics”, and then on the “Advanced options” section.
 In the “Diagnostics” section, open the “Advanced parameters” block
 - Now select the System Image Restore tile.
 In "Advanced Options" select "System Image Restore"
 - The OS will perform the preparatory stage. Wait for it to complete.
 Wait for preparations to restore the system from the image to complete
 - Select your account from the list if there are several. If necessary, enter the password for it.
 Select your “account” and enter its password, if you have one
 - You will see a step-by-step wizard for restoring Windows from a system image on the screen. The tool will default to the last image created. If you want to install another file, manually specify the path to it. Click “Next”.
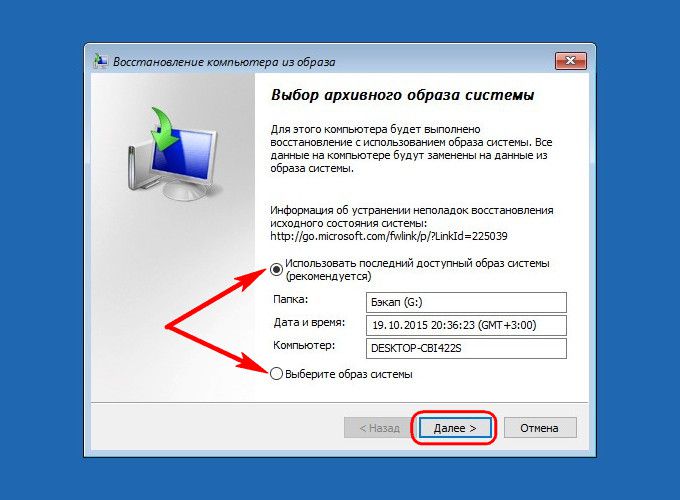 Select the latest image or specify the path to the image stored on your disk yourself
 - Click “Next” again in the next window.
 Click “Next” to proceed to starting the recovery
 - The tool will tell you the date and time the image was created from which the system will be restored. Click on “Done”.
 Click on the “Yes” button and wait for the tool to finish restoring
 - Click on “Restart now” so that your PC will restart and all changes will take effect.
 Click on "Restart Now" to restart your device
If you don't have a restore point or backup, your only option may be to reinstall the operating system. If you are a beginner, it is not recommended to do it yourself - contact specialists at a computer service center.
What to do if the sound on Windows 10 wheezes or automatically changes volume
There may be sound on the computer, but its quality may not please the user: wheezing, interruptions, and random changes in volume can be heard. What to do in these cases? You can use some of the solutions from the previous sections of this article, such as disabling sound effects, updating drivers, and restoring the system using a point or backup. The first two will be effective for constantly changing volume. Recovery will be a universal method for most problems.
Solving the problem using the Command Line
If the sound on your computer is wheezing, follow these steps:

Settings in the “Communication” tab
In the “ten”, by default, a function is activated to reduce the volume of sounds played on the PC when using the device as a phone, that is, for conversations. In some cases, the option may not work correctly. As a result, the sounds on your device are muffled even when you are not using it as a mobile device. In this case, you can do the following:
- Through the “Run” window (Win + R combination) and the mmsys.cpl command, open the “Sound” panel on the display. You can also open it through the “Control Panel”.
 Open the Communications tab in the Sound window
 - Set the last value to “No action required” and click “Apply”. Check the sound.
 Set the value to “No action required” and click on “Apply”
Flash Player Update for Browser
If you are listening to music or watching videos through your browser and the sound is constantly interrupted, it may be an outdated Flash Player. Despite the fact that this technology is now being replaced by HTML5, there are still sites that run on the Flash Player component. We'll tell you how to update it in the instructions:
- In the browser in which you listen to the audio recording, open the official Adobe Flash Player resource. Select your OS type in the first drop-down menu - Windows 10/Windows 8.
- In the second step, choose one of the player types depending on your browser. Before downloading, make sure that in the middle part of the page you do not have a checkmark for installing additional software, in particular McAfee antivirus. Click on "Download".
 Select your OS and browser type and click on “Download”
 - Now wait a while while the browser downloads the installation file.
 Open the downloaded file through the "Downloads" panel
 - In the installer window, check the box next to “Allow Adobe to install updates” or, as a last resort, select the second option with notifications about the need for an update. Click on "Next".
 Select the first or second value and click “Next”
 - Wait again for the download and installation process to complete.
 Wait for Adobe Flash Player to install on your PC
 - Click “Finish” to close the installer window.
 Click “Finish” to close the installer window
 - In the browser that is installed on your system as the default browser, a thank you page will open for downloading and installing the component. Check whether the sound on your PC works well.
 A page with thanks from the developers for installing Adobe Flash Player will open in the browser.
 - If this does not help, update the browser itself, if the sound is played poorly only in it. This can be done through the “About the Browser” section, which can be found in the program menu itself.
 Find the “About Browser” section in your browser menu.
 - The utility itself will begin searching for available updates and download them if necessary. Wait for the procedure to complete - it will take a minimum of time. If there are no updates online, the browser will report that the current version of the program is currently being used.
 In the “About the Browser” section, the program itself will begin searching for updates and, if available, install them on its own.
Video: How to update Flash Player
Heavy load on the processor or other hardware components
If your audio is stuttering on your PC, it may be due to excessive load on your hardware resources. The processor may not have time to process all the tasks assigned to it. In this situation, you need to reduce the load by disabling unnecessary programs and processes:

If you suddenly lose sound on your PC, the first thing you need to do is make sure that the volume is at maximum and then run the troubleshooter. Check if the appropriate audio service is enabled on your device. Update your audio drivers or rollback them if problems arise after updating them. Setting the speakers to a different format and turning off all sound effects may also help. Check your PC for viruses and if there is no result, restore the system using a restore point or OS backup. If the sound quality deteriorates, run special codes in the “Command Line” and update the programs for sound playback.
Problems with sound in Windows 10 have been known since the first days of working in the environment of the new OS originally from Redmond. Today we will try to consider all aspects of problems that arise with the reproduction of audio information: from hardware problems to reinstalling drivers and correct configuration of system audio parameters.
Hardware problems
Problems can arise for several reasons, some of which may be:
- Old audio cards. By installing Windows 10 on an old computer or laptop, you can become a victim of a serious Microsoft flaw. The developers of the “ten” did not introduce support for very old devices, which included sound cards. If you are the owner of a fairly outdated computer, then visit the Microsoft website and look to see if your audio card is in the list of supported ones.
- Malfunction of audio playback devices, ports, wires. We check whether the device functions to play sound on another device. Carefully inspect the audio ports for oxidation, visible physical damage, and check the integrity of the cables connecting the speakers or headphones to the sound card.
- Front panel connectors are faulty. This is relevant for PC users whose devices have pins on the front panel of the case. They should make sure that the ports on the front panel are working and active, which is checked in the BIOS.
Software sources of the problem
- old drivers;
- incorrect audio playback settings;
- CPU load;
- use of sound effects at the driver level.
Audio stutters and cuts out
Users often experience that the sound played through any player or browser stutters. There are two sources of such PC operation:
Zero volume
Due to the fact that the volume on the computer is reduced to 0, the user does not hear anything while playing something. In this case, the speaker icon in the tray is crossed out. Click on it and increase the parameter to the desired value.

Incorrect settings
Due to the presence of several devices for reproducing audio information, including a virtual audio device, the system may transmit digital data to the wrong device that the user needs. The problem can be solved simply:

If the required equipment is not detected, then do the following:

Audio effects
Software filters can cause noticeable audio distortion, which can make the user feel like the sound on a Windows 10 computer is wheezing. You can get rid of this distortion in the output signal by deactivating audio filters:
In a similar way, setting up sound in Windows 10 is done through Realtek HD Manager when using an audio card from and having the "" utility:

Audio format changes
The sound may be distorted if the wrong audio output format is used. It can be changed using Windows 10 and through Realtek Manager:

Or we do the same thing through Task Manager. In the " Standard format“Select also studio quality or click on the DVD Format button. 
Monopoly mode
When activated monopoly regime Audio may be momentarily interrupted. To solve this problem, let's perform the following sequence of actions:

System sounds actually absent. Microsoft has stopped voicing most actions in the system. Still, check if all Windows 10 sounds are disabled, and you can use them like this:

Another cause of wheezing sound
Another reason, known to many, why the sound can wheeze is increased sound volume, especially when playing music with a significant low frequency (LF) component, in this case available in the form of a frequency of less than 100 Hz.
Basically, the source of sound with such frequencies are drums. Most regular desktop and laptop speakers are mid- and high-frequency devices and are not designed to reproduce low frequencies at high volumes.
There are three methods to overcome wheezing in this situation:
- The easiest way is to reduce the sound volume.
- Reduce the proportion of low frequencies using the system equalizer or the player's equalizer.
- If you are a fan of the sound of drums and other low-frequency musical instruments, then of course we recommend purchasing more powerful playback equipment that includes subwoofer, designed for high-quality playback of low-frequency sounds.
To call the Windows 10 system equalizer, you need to work with the previously mentioned Sound system utility:
Sound → Playback tab → Speakers → Properties → Enhancements → Equalizer → At the bottom right of the “Settings” label, click...
Then reduce the volume of the low-frequency components of the sound, which are controlled by the left sliders. You can learn more about the process of calling the equalizer by watching the video at the end of this article.
Reinstalling the driver for the sound card
An outdated sound driver containing errors is most often the source of sound problems in the “top ten”. It should be updated only from the official developer or support resource. Let's look at how this is done using the example of a sound card from:

After this, all problems with sound will no longer bother the user.
Conclusion
This article discussed sound problems in Windows 10 that are caused by hardware problems, incorrect or outdated settings, and drivers. Possible solutions were proposed.
Video on the topic
If you have no sound when connected to the main jack, then try connecting headphones or speakers to the front. If both options do not help, you need to check the functionality of the playback device itself. To do this, connect it to another device - laptop, phone, etc. If the sound is played correctly on the laptop or phone, the problem lies in the 3.5 mm jack on the motherboard or desktop PC case.
You need to check if the front connector is connected to the motherboard. If you notice hissing or distortion, the sound is wheezing or too quiet, but everything is fine on other devices, then you need to look for software problems and adjust playback using Windows 10 tools and the driver.
Sound check
After starting your computer, first check if the sound is disabled in the operating system settings. First, take a look at the Start panel. If you see an icon with a cross, you need to raise the sound level manually:
To do this, click LMB on the icon and drag the slider to a position acceptable to you.
If you have lost sound in a certain application, but all other sounds are played correctly, then you need to use the mixer settings:
- Right-click on the volume icon in the panel.
- In the menu you need to select “Open volume mixer”.
- Here you can adjust the sound level separately for each running application.
If you only have system sounds missing, then you need to do the following:
- Open “Control Panel” through the search bar.
- Go to the “Hardware and Sound” section.
- Open the “Sound” subsection.
- Go to the “Sounds” tab and set the sound scheme to “Default”. To save changes, close the window with the “OK” button.
Now you know how to turn on sound on a Windows 10 computer. If none of the above methods work, move on to checking the driver.
Driver check
If you are using a standard sound card built into the motherboard, then the driver should be installed automatically along with the operating system. However, installation failures and conflicts cannot be ruled out. Therefore, you must manually check your audio drivers and adjust them if necessary.
To reinstall the driver, you must follow these steps:
- Open Device Manager using the search bar or another method.
- Next, open the “Sound, game and video devices” tab. In it you need to right-click on the Realtek HD Audio line. From the menu, select Properties.
- Now go to the "Driver" tab. Here you can carry out all operations related to setting up Realtek Audio.
- Click on "Update Driver". If you have not downloaded its distribution in advance, then select the first option.
- The program will search for drivers that can be installed. After installation, your audio device should work.
If the equipment is not listed in Device Manager, then it must be added manually. Please note that it is the sound card that is displayed here, not the speakers or headphones.
In the Device Manager window, click on “Action” - “Update hardware configuration”. This will help you find and add your sound card to the list of devices.
If you cannot manually find the required driver, for example, for the VIA Audio Driver audio card on Asus, Lenovo or similar laptops, then use Windows 10 Update.
After you have successfully installed the Realtek driver or a similar one for a sound card from another manufacturer, you can proceed to the settings in the manager.
Realtek HD setup
If, after installing the audio driver, the sound starts working, but is not played correctly (too quiet, may disappear, poor quality, etc.), then the parameters are adjusted through the “Realtek HD Manager”:
- Double-click on the speaker icon using LMB. Here you can make detailed settings for playback. You can change the balance between the left and right speakers (1), increase or decrease the volume (2), and select the speaker configuration (3).
- The second tab contains an equalizer and the ability to select standard environmental settings and so on. Using the button marked in the screenshot, you can configure the speakers manually through the equalizer sliders.
- In the third tab, only 5.1 and 7.1 systems connected to the audio output are configured.
- The last tab allows you to set the Audio quality. Also in the setup wizard window you can determine which output jacks are connected to external devices. If the jack into which the headphones or audio system are connected does not light up, then the problem is related to the hardware.
BIOS Settings
If all the settings did not help achieve the desired result, and audio also does not play, then be sure to check the BIOS configuration. To do this you need:
- Restart your computer and go to the BIOS menu. Turn on the “Onboard Audio Function” item to the “Enabled” position. You can do this using the left and right arrows on your keyboard.
- Save changes using F10 and restart the PC again.
Diagnosis of errors
After updating or installing new drivers for your playback device, you may experience compatibility or performance issues. The built-in system diagnostic wizard can help you fix the error. You can fix the problem as follows:
- On the bottom panel, right-click on the sound recording icon. Click on "Troubleshoot".
- If after scanning there are no problems, the program will offer to open the improvement menu.
- If errors were found, you will see a message indicating whether the service was able to resolve the problem.
Now let's figure out what ways you can improve audio quality, enhance effects, increase frequencies, adjust volume levels, and so on:
- Right-click the volume icon on the Start panel and select Playback Devices.
- Select the active device and right-click on it, then select “Properties”.
- The first tab contains general information about the controller and connector. Make sure the device application is in the On position.
- The Levels tab allows you to adjust the volume level for each jack and channel. Using the "Balance" button you can adjust the level in each of the headphones. If you have the sound turned off in one of the speakers/headphones, then you need to set the balance in this tab.
- The “Improvements” section allows you to select playback effects, set the bass, change the equalizer settings and much more. If the voice of the interlocutor in your headphones begins to crack, then check the box next to “Voice suppression” and “Loudness compensation”. Also experiment with other settings. You won't be able to make your interlocutor sound perfect, but you can remove a voice that is too loud or strengthen a weak microphone in your headphones.
- The “Advanced” tab contains settings for bit depth and sampling frequency. You can immediately check the result using the “Check” button.
- “Spatial sound” will be useful for users with 5.1 and 7.1 audio systems.
Installing codecs
Many users have problems with sound output when playing audio or video through various players. In such cases, both the video recording itself may freeze, and the audio track may be interrupted, delayed, or even completely lost. In this case, all system sounds are reproduced correctly.
- After installation is complete, restart your PC.
Skype settings
Another application that may require audio adjustments is the Skype messenger. It often happens that you have difficulty hearing your interlocutor, but he cannot solve the problem on his part. In such a situation, you need to change the volume level in Skype yourself:
- Launch Skype. Click on “Tools” - “Settings...”.
- Go to the "Sound Settings" section. Uncheck the box next to “Automatic speaker setup” and set the slider to the “Loud” position.
- Click the "Save" button and check your changes.
These actions can be carried out with other similar programs. For example, in Discord, a user can level the volume level of each interlocutor as desired.
Conclusion
We figured out all aspects of setting up sound on Windows 10 and looked at the main problems that may arise. As you can see, incorrect playback through headphones or speakers can be caused by both hardware and software problems. It is better to start checking with the hardware to make sure it is in good condition. Then you should carry out all the above steps in Windows 10.
Video instruction
To make it easier for you to understand all the steps, we suggest you watch the video tutorial, which clearly shows all the instructions on this topic.
Problems with sound performance on Windows 10 are not uncommon, especially after updates or switching from other versions of the OS. The reason may be in the drivers or in a physical problem with the speaker, as well as other components responsible for sound. All this will be discussed in this article.
The causes of sound problems vary. You may need to update or reinstall the drivers, or maybe replace some components. But before you start performing the manipulations described below, be sure to check the functionality of your headphones or speakers.
Method 1: Adjusting the sound
The sound on your device may be muted or set to minimum. This can be fixed like this:

Method 2: Update Drivers
Your drivers may be out of date. You can check their relevance and download the latest version using special utilities or manually from the manufacturer’s official website. The following programs are suitable for updating: , . Next, we will consider the process using DriverPack Solution as an example.

Method 3: Run the troubleshooter
If updating the drivers does not produce results, then try running an error search.

Method 4: Rollback or remove sound drivers
If problems started after installing Windows 10 updates, then try this:

Method 5: Check for viral activity
Perhaps your device has been infected and the virus has damaged certain software components responsible for sound. In this case, it is recommended to check your computer using special anti-virus utilities. For example, . These utilities are quite easy to use. Next, the procedure will be discussed using the example of Kaspersky Virus Removal Tool.

Method 6: Enable the service
It happens that the service that is responsible for sound is disabled.

Method 7: Switching Speaker Format
In some cases, this option may help.

Method 8: System Restore or OS Reinstallation
If none of the above helped you, then try restoring the system to a working state. You can use or.
- Restart your computer. When it starts to turn on, hold down F8.
- Follow the path "Recovery" - "Diagnostics" — "Extra options".
- Now find "Restore" and follow the instructions.

If you do not have a restore point, try reinstalling the operating system.
Method 9: Using the Command Line
This method can help with wheezing sound.

Method 10: Turn off sound effects

If this doesn't help, then:

This is how you can return sound to your device. If none of the methods worked, then, as was said at the very beginning of the article, make sure that the equipment is in working order and does not need repair.