Windows 7 won't load. Why won't Windows load? Ways to fix the problem. You may need to reinstall Windows
The causes and solutions to the problem of the inability to start the OS are determined by error messages or their absence. The main situations are listed below.
Error disc boot failure Insert system disc and press Enter
This least critical error and it is the easiest to solve. It is caused by the fact that the system does not detect the boot disk due to the boot device sequence settings in the BIOS. Enough for a start remove the CD from the drive and disconnect devices such as flash drives, card readers, disconnect external hard drives, and other USB drives. To restart a computer. If the system does not boot or you want to completely eliminate the reasons, you need to reboot again and enter the BIOS.
You will need to fix the download queue. To do this, you do not need to know the computer or open its case. You must follow the instructions of the PC or motherboard manufacturer. Usually needed immediately press the Del key as soon as the computer turns on. A menu will open in which you need to set correct order.
If after this the system does not want to start, then you need to use installation disk Windows. Put it in the drive and reboot. A window will appear with a choice of keyboards and languages. Click the cursor on the desired one. Proceed like this:
If the OS does not see the hard drive at all, then you need to check its connection to the motherboard. This is appropriate if you do not have a warranty on your computer. Otherwise, the check is done in the workshop.
Error Bootmgr is missing
It is caused by an incorrect modification of the hard disk boot record. There can be many reasons. Her viruses damage or unthought-out user actions, the operation of different programs. But the most dangerous reason is physical damage to the media, as it can lead to the loss of important data.
In this case you need check disk a special utility. It is most convenient to use Victoria or MHDD products. You need to do this:
- Download image You can download the boot disk from the official website;
- Write down it on CD;
- Load up from CD;
- Check disk.
If bad sectors highlighted in red are detected, you should immediately copy important information to external media. Next, solve the problem with the device.
If no damage is detected, proceed as described in the previous paragraph. You can also enter command line mode and run the commands bootrec.exe /fixmbr And bootrec.exe /fixroot by booting from the installation disk.
Ntldr is missing
The message appears after an incorrect shutdown of the PC due to viruses or changes in the boot sector. In this case it is necessary find ntldr files and file ntdetect.com. They can be taken from other computers in the \i386 folder or from Live cds.
Then the following work is done:
- Specified files copied to the root of the system disk;
- Computer I'll downloadandseems from the installation disk;
- When prompted to launch the recovery console with the R key, the user clicks on it;
- By using cd c commands: a transition is made to the system partition of the hard drive;
- The following commands are executed fixboot And fixmbr. The first will create the boot sector, and the second will copy the mentioned objects.
- If the system partition is inactive, it is activated using programs for working with hard disk partitions, then you need to check the paths to the operating system specified in the boot.ini file.
Loading stuck when black screen and mouse pointer appears
This usually occurs as a result of a virus and its incorrect removal. For example, a ransomware virus.
Then give the PC the following commands:
- When stuck, press Win + R;
- A window will pop up Execute;
- Print regedit;
The Registry Editor will appear. Look for lines HKEY_LOCAL_MACHINE/Software/Microsoft/Windows NT/Current Version/Winlogon/ And HKEY_CURRENT_USER/Software/Microsoft/Windows NT/Current Version/Winlogon/.
Having found the parameter in them shell, change its value to explorer.exe.
It happens that boot problems appear when you change the PC configuration. Then the recovery screen will appear on its own or you need to press F8 and select troubleshooting.
Windows 10 won't start
The new OS may refuse to work such reasons;
- Error when updating;
- Black screen while loading;
- Incorrect operation Internet connection devices;
- Crashes when exiting hibernation mode;
- Malware;
- Flaw free disk space;
- Errors in the operation of different programs or drivers.
Rolling back updates
If the update fails, you need to use the options restore previous state provided in this Microsoft product. When starting the device, press F8. The recovery menu will open.  You need to click on Diagnostics, and then on Restore. Everything will recover on its own. If unsuccessful, use the restore point by clicking on Extra options. Then a suitable recovery point is selected.

Black screen on boot
The system will come back to life either after a normal reboot or after operations similar to those described in the previous paragraph. The reason for a failed download is usually malware. The most effective way to get rid of it is formatting and a complete reinstallation of the system. All important information should be copied. Or check as described below.
Internet connection devices do not work properly and crashes when resuming from hibernation mode
Users of the operating system have long noticed that if the boot fails, it’s worth trying disconnect from the network and turn off the power to Wi-Fi routers, network cards, modems or other devices. As a rule, this is due to malfunctions in the operating system. If you exit hibernation mode incorrectly, you just need to press the power button on the case and hold it for 3-4 seconds, and then turn on the PC again.
Checking your computer for viruses
To exclude infection of the device as the reason for the refusal to start, you need to carry out antivirus scan. To do this, download a Live CD with antivirus programs and check your computer. It's better that it contains several antiviruses. According to tests by independent laboratories, it is best to use Kaspersky Internet Security, a product from Bitdefender, and scan with several similar programs.
Lack of free disk space
Owners of devices with Windows 10 installed often either save money by installing a low-capacity hard drive, or fill it with downloaded movies, unnecessary games, large files and do not monitor the availability of free space. Therefore, the OS may not start, since it is simply not enough space for work. You can clean it using the software installed on boot disks, or you can simply delete what you don’t need by viewing the contents using a file manager.
Errors when running programs or drivers
To remove the problematic driver you need to log in to safe mode. If it works, then most likely the problem is in the driver of some component or equipment or in the functioning of some program. You can either delete them or edit startup.
» » » Why won't Windows 7 start and how can I restore it to start?
Why won't Windows 7 start and how can I restore it to start?
Why won't Windows 7 start? Loading the operating system may fail for a variety of reasons: due to a hardware failure, due to incorrectly installed software, due to viruses, but most often due to problems in Windows itself. To make the description of the process of searching for the source of the failure more clear, we will first analyze the startup sequence of the seven.
Windows 7 Boot Steps
The launch of Windows 7 is conventionally divided into three stages, which are divided into phases.
OSLoader
OSLoader is the first stage of loading Windows 7, which begins immediately after executing the BOIS code. At the beginning of this stage, a small group of basic drivers is loaded, necessary for further reading data from the hard drive. Next, winload.exe, the Windows 7 loader, proceeds to initialize and begin loading the kernel, loading the SYSTEM registry hive and the next batch of drivers with the BOOT_START launch parameter into RAM.
The OSLoader stage lasts 2-3 seconds. By the time the system logo appears on the screen, it is already completed.
MainPathBoot
MainPathBoot is the main and longest stage of Windows boot. Consists of several phases. Visually, this stage continues from the appearance of the system logo on the screen and ends with the start of loading the desktop. The duration of this stage can vary - on average, from ten seconds to a couple of minutes.
PreSMSS phase
During this phase, the Windows 7 kernel is fully initialized, the plug and play hardware manager is launched, and previously running BOOT_START drivers and hardware drivers are initialized.
Errors that occur during this phase are often associated with problems with the main computer devices or their drivers.
SMSSInit phase
The phase begins from the moment control is transferred to the session manager - SMSS.exe. At this time, the remaining registry hives are initialized and drivers are loaded with the “auto” launch parameter. At the end of the phase, control passes to the Winlogon.exe file, the Windows user logon program. Visually, the completion of SMSSInit is indicated by the appearance of a login prompt on the screen.
Crashes and slowdowns during this phase are often due to delays in loading the video driver or problems with the video subsystem.
WinLogonInit phase
This phase begins with the start of Winlogon.exe (the welcome screen) and ends with loading the desktop - the start of the Windows shell - the Explorer.exe file. During its progress, the system reads and executes group policy scripts and starts services (system and third-party). The phase can last quite a long time and be accompanied by high processor load.
Failures at this stage are often caused by third-party application services, including antivirus.
ExplorerInit phase
It begins with the start of the shell and ends with the start of the desktop window manager process. During this phase, desktop icons appear on the screen. At the same time, services are further launched, startup applications start, data caching, etc. All this is accompanied by a high load on hardware resources - hard drive, memory, processor.
Problems and delays during ExplorerInit are often due to insufficient power or hardware failure.
PostBoot
The PostBoot stage begins with the appearance of the desktop and ends after everything that is specified in autorun has been loaded. During this period, the bulk of applications launched with Windows begin to work. After the end of the stage, the system goes into inactivity.
Delays and failures at the PostBoot stage are associated with startup programs, and sometimes with virus activity.
Failures at various stages of system boot
As already briefly mentioned, problems at different stages of Windows 7 startup manifest themselves in different ways: some are related to hardware, others to drivers, and others to the system registry or other boot-critical files. By understanding what processes occur at each stage of system startup, you can determine the range of possible problems.
Briefly about hardware problems
We will not dwell on hardware problems in detail, since our topic concerns Windows 7, but sometimes it can be very difficult to determine what is broken - a physical device or a system.
- Repeated failure of the same driver at the Windows startup stage may be due to a malfunction of the device controlled by this driver.
- A series of various errors (blue screens of death) that occur at different stages of boot are often caused by problems with RAM.
- The absence of an image or artifacts on the screen, while the sounds of the system booting can be heard, may indicate problems with the video card.
- If Windows does not even start loading or suddenly stops – “freezes” in one place – it is possible that the hard drive is failing.
- Sudden shutdowns of the computer while Windows is loading indicate problems with the power supply or motherboard, and sometimes something else.
Corrupt boot files
During the early stages of Windows startup, damage or missing critical files may indicate “Bootmgr is missing” or other error messages on the screen. But it happens that no messages are displayed, and the user simply sees a black screen with or without an arrow cursor.

Bootmgr - the bootloader of the Windows 7 and 8 operating systems, like other boot elements, is inaccessible to the user - it is located in a separate hidden partition and cannot be deleted accidentally. However, the user may unknowingly format this partition by booting from external media. Then Windows will not boot.
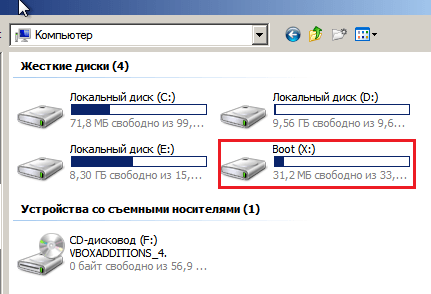
The screenshot shows the boot partition of the hard drive, accessed from the recovery environment.
Another part of the files important for downloading is located on the system disk in the C:Windows directory and subdirectories. The system registry is also located there.
Registry corruption
If the registry is inaccessible or damaged, Windows may not even start loading.

The system itself will inform you about the failure and automatically launch the built-in recovery wizard. It often helps to identify and fix the problem - the registry will be restored from a backup copy.

But self-healing Windows 7 booting is not always possible. Thus, it does not occur if the recovery wizard cannot find backup copies of missing or damaged data. In these cases, the system needs the user's help.
Windows 7 startup recovery
Recovery Environment
Restoring the boot of Windows 7 is much more convenient than Windows XP, because the seven is equipped with a set of Windows Recovery Tools (WRT), which is available from the recovery environment. The recovery environment during Windows installation is installed on the hard drive, in a separate partition, and has its own boot loader. Therefore, it remains operational no matter what happens to the system.
To get to the recovery environment, select “Troubleshoot your computer” from the F8 menu (Windows 7 advanced startup options menu).

To access the recovery options, the system will ask you to enter a password. If you do not have administrator rights or have forgotten your password, you will have to run Windows 7 Recovery Environment from the installation disc.
After the “System Recovery Options” window opens in front of you, select the first option from the list: “Startup Recovery”. After self-diagnosis, damaged boot files, registry or individual startup parameters will be restored.
This tool helps solve the problem in most cases, and should be used when you don’t know exactly why Windows won’t start.

Two ways to restore the system
If a failure occurred after installing the program, due to a virus infection or due to changes in the registry, “System Restore” will help restore the seven’s ability to boot. But it will only be useful if recovery checkpoints have been saved on the hard drive.

The way this tool works is familiar to many: you select a suitable checkpoint when the system was functioning normally and perform a rollback. Any changes made after the selected date will disappear and you will be able to boot into Windows normally.
If there are no points, but you saved a backup copy of the system on an external drive, the “System Image Restore” tool will help. Connect the media with the archive image to your computer and follow the instructions in the recovery wizard.

Manual registry repair
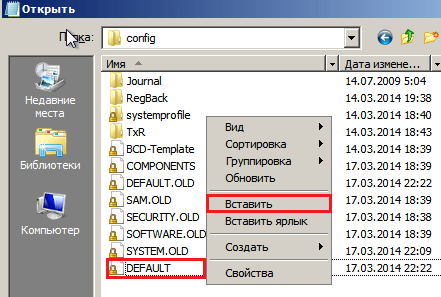
If the above manipulations did not help and Windows is unclear why, but does not start, you can try to manually restore the registry from a backup copy. A copy of the Windows 7 registry is automatically created every 10 days and stored in the C:WindowsSystem32configregback directory. To restore the system, you need to copy all 5 files from the above folder to the C:WindowsSystem32config folder, where the current registry files are located. It is better not to delete old files, but to rename them (as a last resort).
- From the list of options, select Command Prompt. Open it and command notepad Launch Notepad - you will need it to launch Windows Explorer.

- In the notepad window, go to the “File” menu and select “Open” from it.

- Go to the C:WindowsSystem32config directory. To see everything in this folder, change the file type from .txt to “all files”.
- The files Default, Sam, Security, System and Software (without extension) are the current registry. Rename them to something - add at least the .old extension to them.

- Open the Regback folder with your backup registry files and copy them one by one to the config folder.

- After you have copied everything, restart your computer. If Windows failed to load due to the fault of the registry, the problem will be solved.
The reboot button is located at the bottom of the Recovery Options window.

File recovery
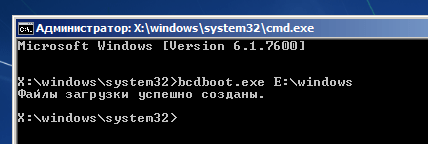
Windows' own tool for restoring protected files, the sfc.exe utility, can be successfully launched in the recovery environment. It is usually launched with the /scannow parameter to automatically search for and fix problems found. In the recovery environment, you will also have to specify additional parameters: the location of the offline boot directory and the offline Windows directory (for the recovery environment, the Windows folder and the drive where it is located are offline directories) These are the /offbootdir and /offwindir parameters.
The complete command is written as shown in the picture:

In offbootdir you need to specify the path to the system disk, and in offwindir you need to specify the path to the Windows folder. Just remember that in the recovery environment, the partition letters may not match those that you see in Explorer when you normally boot Windows. The “correct” letters can be viewed by opening Explorer using a notepad.
If Windows 7 still won't start after this, you may have to manually repair your boot files, as well as rewrite your hard drive's Master Boot Record (MBR) and the system partition's boot code. Windows' own tools will also help you with this.
To recreate the boot files, open a command prompt and run the following command: bcdboot.exe C:Windows. Don't mix up the partition letter.
To rewrite the MBR and VBR (partition boot code), run the following commands: bootrec/fixmbr And bootrec/fixboot.

After that, check the download.
The problem of Windows failing to boot is quite common, despite the fact that Windows 7 and Windows 10 are very reliable operating systems and rarely crash. Of course, equipment also plays a huge role in this, which is very diverse for home systems, and has a low fault tolerance factor for budget solutions.
In most cases, errors in loading the OS are either the fault of the users themselves, who, for example, performed an incorrect shutdown of the PC or accidentally deleted a system file, or a hard drive on which a bad area has formed on the boot sector.
CHIP suggests using our tips for solving Windows boot problems and restoring system functionality.
Let's try to start
When faced with the impossibility of loading the Windows operating system, you should first restart the computer a couple of times, because the problem may be a one-time problem. If this does not help, then try turning off the power to the computer for ten seconds by unplugging it from the mains. In this case, you need to turn off the power to the uninterruptible power supply, if one is connected, and if we are talking about a laptop, then remove the battery.
It also doesn’t hurt to temporarily disconnect external equipment: mouse, keyboard, printer, removable drives, wireless communication modules, etc. If the reason lies precisely in external devices, connecting each of them in turn will help determine the culprit.
Of course, the problem cannot always be solved with the simplest manipulations, which means you will have to start analyzing the text of the error message that appeared during the computer startup.
The bootloader may be damaged
If you see a message on the screen with the text “BOOTMGR is missing”, then the Windows 7 operating system boot loader is damaged or missing. To solve the problem, you will need a Windows 7 installation disk.
Restart your PC and during the first seconds of booting, press the function key to open the BIOS. These may be different keys for different PCs, such as ESC, F2 or F6. Pressing the F8 key in Windows 10 will bring up a menu of special boot options, including Safe Mode. If this doesn't work, hold down the Shift key when rebooting Tens.
 So, if you managed to get into the BIOS, go to the “Boot device priority” section using the “+” or “PgUp” key and assign the CD/DVD drive as the first boot device. Then boot from the Windows installation disc and select the "System Restore" menu item. From the list of installed operating systems (if there are several of them), you need to select the one you need and click the “Next” button.
 In the “System Recovery Options” window that appears, we are interested in two items: “System startup recovery” and “Command line”. The first option will automatically fix the problem with starting the operating system, and if it fails, you will have to turn to the services of the second.
At the command line, type:
"bootrec /rebuildbcd"
press “Enter” and agree to changes to the boot configuration data by alternately pressing the “Y” and “Enter” keys. After this, all that remains is to create a new boot sector using the “Bootrec / FixBoot” command and reboot the computer.
Boot disk not detected?
 The error message “No bootable device” and its numerous variations (“No Boot device found”, “Invalid boot device”, “Non system disk or disk error”, etc.) indicate that the computer has not even started to start operating system, since it does not see the boot sector or even the hard drive.
To understand whether the problem lies at the software or hardware level, just go into the BIOS to the already familiar “Boot device priority” section. If the hard drive (HDD) is not visible among the proposed options, then the problem is related to the equipment. It is possible that the power data cable or power cable of the hard drive has come loose, or the drive has completely outlived its usefulness.
If the computer normally recognizes the hard drive, the reason is software in nature and lies in the master boot record (MBR) - it is damaged or missing. Unlike those discussed above, this situation is relevant for both Windows 7 and XP, but can be solved extremely simply.
After booting from the installation disk, you just need to run just one command in the recovery console:
bootrec/fixmbr
Blue Screen of Death: Driver IRQL not less or equal
Windows critical error messages, which are called “blue screens of death” (BSOD, Blue Screen of Death) because of the background color, are quite common problems not only in Windows 7 but also in Windows 10 (especially due to installing the wrong update). Moreover, in the top ten this screen can be green or red. The cause of a critical error may be malfunctioning hardware, for example, RAM or the absence of some system files.
 Most often, early boot BSOD messages appear after updating device drivers and contain the text “DRIVER_IRQL_NOT_LESS_OR_EQUAL” along with a file name with the SYS extension. To remove the problematic driver in Device Manager, you can try starting Windows in safe mode, because it uses only a minimal set of drivers. To do this, press the F8 key while loading the OS and select “Safe Mode.”
If you still get the blue screen of death when you boot into safe mode, you need to revert to a previous version of the driver that didn't have any problems. This can be done using a restore point, if one has been created previously.
 In Windows 7, to do this, press the F8 key while the OS is loading and select “Troubleshoot computer problems” in the menu that appears. After which we find ourselves in exactly the same “Recovery Options” menu as when using the Windows installation disk.
This time we are interested in the “System Restore” item, where you can select one of the available restore points.
Returning a copy of the system file
The absence of some important system files in the system, primarily drivers with the SYS extension, is often found in Windows 7 and 10. The most effective way to solve the problem is to return the loss to its place by finding a copy of it on the Windows installation disk, borrowing it from another computer with the same OS version or simply by searching on the vast expanses of the Internet.
If you don’t have a second computer at hand, then to search, download and copy files you will need a LiveCD with an OS that does not require installation, for example, Kaspersky Rescue Disk 18.
 One of the most convenient options is the Puppy Linux operating system, which will be ready to work in less than a minute. This OS includes drivers for the most common models of network cards, which means that accessing the Internet will not be difficult.
The exception is the system registry files: System, Software, SAM, Security and Default, which are stored in the “C:\windows\system32\config” folder. Of course, it won’t be possible to replace them with copies from another computer, so the only option is to roll back to a restore point, if it was made at one time.
Restoring Windows 10 Boot
And to use the Windows 10 recovery tool, you need to open the menu of additional boot methods (by pressing F8 after turning on the computer) and go to the “Troubleshooting” section.
The chance of having time to press the desired key at this time (more precisely, the combination of F8 and Shift) is great if the system is installed on an MBR hard drive and the fast startup option is disabled. For fast SSD system drives, you will have to try to press quickly or you will need bootable media.
In any case, you will need an installation disk with Windows 10. In our experience, a Windows 10 emergency recovery disk will often not be able to help restore the system. It is worth considering that the system image must be the same bit size as that installed on your PC. In addition, if you use a bootable flash drive, it must be with the FAT32 file system.
As an alternative, you can use the downloadable package of MS DaRT 10 utilities (Microsoft Diagnostic and Recovery Toolset for Windows 10). You can download it from the official Microsoft website. Windows 10 images are available for download from the Microsoft website.
Using Windows 10 bootable media
Connect the media to the computer, reboot, set this disk first in the BIOS settings and boot from it. After booting from it, select the system language. If Russian is selected, click Next.
 You will then be prompted to proceed to install or restore Windows. Click System Restore. On the Select Action screen, click Troubleshooting.
Tens launch recovery options
 In the recovery options section (Advanced Options screen) there are 5 subsections:
- System Restore. When you select this option, the standard utility rstrui.exe is launched, the purpose of which is to roll back the system to one of the saved checkpoints.
- Restoring the system image. Launches the Windows Deployment Wizard from a backup created by the OS's own tools.
- Boot recovery. Corrects errors in boot files and partitions.
Command line. Allows you to run various system utilities. - Return to the previous build. Rolls back to a previously installed version of the OS if it was upgraded to Windows 10.
Repair utilities
Almost all of the Windows boot problems discussed in this article can be caused by damaged hard drive sectors (bad blocks). Even if, with the help of one of the manipulations discussed in the article, the operating system was brought back to life, it is not possible to check the working condition of the hard drive.
 You can do this using the free MHDD application (you can download it), which can be launched directly from the boot CD. In the program menu, you must select from the list the channel to which the hard drive with the OS is connected, indicating its number. Then you can view the S.M.A.R.T data, a kind of “medical map” of the hard drive (F8 key), or start scanning sectors for errors (F4 key), having previously allowed their correction - “Remap | ON".
If there are a lot of problem sectors, the procedure may take hours or even days. Considering that bad blocks, as a rule, are concentrated at the beginning of the hard drive, it will be easier to move the OS partition away from the problem area - an indent of 2 GB will be quite enough.
 A boot disk with a free partition editor MiniTool Partition Wizard FE is suitable for this purpose. In the program menu you need to resort to the operation “Partition | Move/Resize".
As we noted above, the cause of BSOD may be RAM, which is not capable, for example, of operating at higher frequencies. In such cases, the following text may appear on the blue screen: “PAGE_FAULT_IN_NONPAGED_AREA”.
The free Memtest86 application allows you to test RAM modules. Like MHDD, Memtest86 can be run from a bootable CD. The application does not require configuration and immediately after launch it begins diagnostics using a number of tests. The “Pass” menu item displays the number of completed test cycles, while “Errors” displays the number of errors recorded.
Users often encounter a problem when they cannot boot a computer or laptop running Windows 7 not only in normal mode, but also in safe mode. This problem can be caused by a variety of reasons. System and hardware failures often lead to the fact that the operating system cannot boot or spontaneously reboots, or a blue screen of death appears after turning on the PC. What to do if Windows 7 does not enter safe mode, how to solve this problem and restore the functionality of your PC. In this article we will try to solve these problems.
What is safe mode and why is it needed?
Safe mode in Windows OS (Safe Mode) is a special diagnostic mode of operation of the operating system, which is used to identify and eliminate errors in the OS registry. If you run Safe Mode, unnecessary system components will be disabled by default. In other words, when you turn on a computer or laptop with this option, only the most necessary system components of the device and important drivers will be loaded.
If the PC on which Windows 7 is installed encounters any malfunctions after turning it on, you can try starting the device through safe mode with a basic set of services. After the system boots into Safe Mode, the user can perform the same actions as during normal Windows 7 startup.
This download method will help detect the presence of virus, adware, and spyware in the system that interfere with the normal functioning of a desktop computer or laptop.
If Windows 7 only boots into safe mode immediately after turning on the PC, this indicates that there is a problem that is preventing the operating system from starting normally. In this case, the reason, as a rule, lies in recently installed software.
To solve the problem, you can try to restore the system. To do this, go to “ Start» - « Control Panel» - « System Restore».

But what to do if a device with Windows 7 not only does not enter safe mode, but does not want to start even in normal mode. Let's try to understand this issue.
Reasons why Windows 7 cannot boot into Safe Mode
As already noted, most often the need to enter safe mode on any version of Windows OS, including the “seven”, is due to the need to scan and check the PC for viruses and the presence of virus software. Of course, if the computer does not turn on in normal mode.

Despite the fact that Windows 7 currently occupies a leading position among all operating systems presented, it cannot be said that this version of the OS is the standard of absolute quality. Unfortunately, Windows 7 has many of its own bugs and shortcomings, which affect the stability of your device. Especially if you neglect to install licensed software.
If Windows 7 Safe Mode does not turn on, this problem may be caused by:
- the presence of viral, potentially dangerous software (viral advertising, software);
- hardware power failure;
- file system damage;
- technical problems.
As a rule, if Windows 7 does not want to turn on in safe mode, according to experts, this problem lies in the presence of “evil” viruses in the registry due to the installation of applications and software from unverified, dubious sources. Most likely, under the influence of modified spyware, the registry branches in the system files that are responsible for entering safe mode were deleted.
How to boot your PC in safe mode
Everyone knows that you can boot your PC in safe mode by pressing the F8 key immediately after turning on the PC. But pressing this key does not always bring up the safe mode menu, which can be caused by a number of problems.

If Windows 7 does not boot in safe mode, there are several ways to fix this problem:
- reinstalling the OS;
- changing the system configuration;
- using the special AVZ utility.
The most radical method is complete OS reinstallation. The only thing worth noting is that this option is only suitable if you have removable media on hand, a distribution kit with this version of the operating system. That is, the one that was already installed on the PC. This will require " System restore point" The most recently saved system restore points will open in a special window when this feature is activated.
It is worth noting that if the system has important files and it is not possible to install the system from the installation disk, this option cannot be called the best solution to the problem.

Sometimes, if turning on the computer is impossible in Safe Mode, you can perform the so-called “knurling” ( system rollback) - a process that is identical to a complete reinstallation of the OS, allowing you to save all previously installed important programs, applications, software. If necessary, you can back up data and important information on your PC.
If you completely reinstall the system, you can restore lost registry data using a utility application, namely System Restore. But you need to remember that using this console is not effective in all cases. To ensure that the OS boot option is restored in Safe Mode, we will need a recovery REG file that is fully compliant with this OS.
The best option that will help if Windows 7 does not want to boot or start in safe mode is AVZ utility, which can be downloaded without any problems from the official web portal. In addition to restoring the functionality of your PC, this program will help eliminate various threats and malware from the system of your laptop or personal computer. To do this, you need to perform the following sequence of actions:

To boot Windows 7 in safe mode, you can also try change OS configuration. At the same time, the main thing is to avoid mistakes in your actions by adhering to the following sequence:
- Go to the menu " Start", click " Execute».
- In field " Open"We enter the msconfig command and press the OK button. After which you can see the window that appears “ system configuration", as well as other active tabs at the top. ", after which the line " Safe mode».
- Check the box " Safe mode", confirm the action by pressing OK.

Now you need to restart your PC and check the functioning of safe mode. To do this, during the reboot process, at the very beginning of the system boot, press ". Now you need to re-enter " system configuration» - «» - « Safe mode" Uncheck the box next to “ Safe mode", click OK.
As you can see, if Windows 7 does not boot in safe mode, you can solve this problem using several of the methods presented above. The main thing is to adhere to the established sequence. If the system continues to be unstable, the computer does not boot in safe and normal mode when turned on, the system reboots spontaneously, perhaps the main reason is technical malfunctions. In this case, qualified specialists will help you troubleshoot the problem after conducting a comprehensive diagnosis of your laptop or PC.
Video on the topic
Friends, many of you have repeatedly had problems loading the operating system and asked the question how to restore Windows 7 boot and make the operating system boot normally. In this article, we will look at the most common ways to restore the Windows 7 bootloader, which help in most cases.
1. Restore Windows 7 boot using the recovery tool
Boot with your version of Windows 7. The main thing is that the system bit size matches (32-bit or 64-bit). Also, it is desirable that the release coincides (Home, Professional, Ultimate).
Instead of installing, select System Restore.

Go to the System Recovery Options window and select the Startup Repair tool.

After this, the recovery program will search for errors in the boot sector and boot partition of Windows 7 and, if found, will try to fix them. After this, you will need to reboot the system and Windows 7 may boot normally.
If you were unable to restore the boot using the Windows 7 recovery tool the first time, try repeating this process 1-2 more times. This often helps since a repair tool can't always fix multiple problems in one pass.
2. Restore Windows 7 boot using the command line
If you were unable to restore your Windows 7 boot using the automatic repair tool, then try using the command line. Boot into your version of Windows 7 and select System Restore instead of installing.
Go to the System Recovery Options window and select the Command Prompt recovery tool.

After this, a window with a black background will appear in which you will need to write several commands.

Enter the following commands in turn:
| bootrec/fixmbr |
| bootrec/fixboot |
| bootsect /nt60 ALL /force /mbr |
| exit |
Switching the language is done using the key combination “Alt” + “Shift”. After entering each command (line), you need to press the “Enter” key.
Then restart your computer.

After this, in most cases, problems associated with the boot sector and bootloader of Windows 7 will disappear and the operating system will boot normally.
If, after using the command line, Windows 7 still does not boot, then try again using the automatic boot repair tool, as we discussed above.
3. Restore Windows 7 boot with system reinstallation
If you were unable to restore the operating system boot using the methods described above, you will most likely have to delete the partitions.
Before reinstalling Windows 7, copy all important files from your hard drive to or. This can be done using any bootable LiveCD. Please note that the external drive or flash drive must be connected to the PC before booting from the LiveCD, otherwise it may not be detected.
If, due to boot errors, you cannot reinstall Windows 7, then remove all partitions from the disk using a third-party utility, for example, Acronis Disk Director boot disk. After that, try again by creating new partitions.

If, when reinstalling Windows 7 at the stage of setting up the disk (creating partitions, selecting a partition for installation) or when restarting the computer during the installation process, you encounter the same boot errors, then launch the command line and run the commands that we discussed above.
In order to prevent loading problems in the future, you need to determine what exactly led to the problem and not repeat these mistakes. If you are unable to restore Windows boot, or other errors occur with the installation and operation of the system, please visit the website http://esate.ru where you will find instructions for solving various problems with the operating system.
ASP900S3 75E120BW F120GBLSB
SSDSC2BW240H601 75E250BW SSDSC2BW240A4K5 7KE256BW