How to find a common language with the ASUS RT-G32 router. Asus router version RT-G32: model description, installation, configuration How to configure rt g32 as a switch
Step 1. Check for yourself the parameters of your ISP - Internet service provider, which will need to be entered on the router configuration page:
- On what Protocol your operator provides you with Internet ( PPTP, L2TP, PPPoE, - Static or Dynamic);
- Automatically or manually your PC is assigned an IP address and DNS;
- Is access provided via Login and password;
- Is there a connection between the PC’s network card and the operator’s server? physical address (MAC address).
Step 2. In the properties of the local network connection, in the properties Internet Protocol Version 4 (TCP/IPv4), if you see numbers, you should copy them into a notepad, and then set the automatic configuration of the IP address, mask, gateway and DNS from the provider:
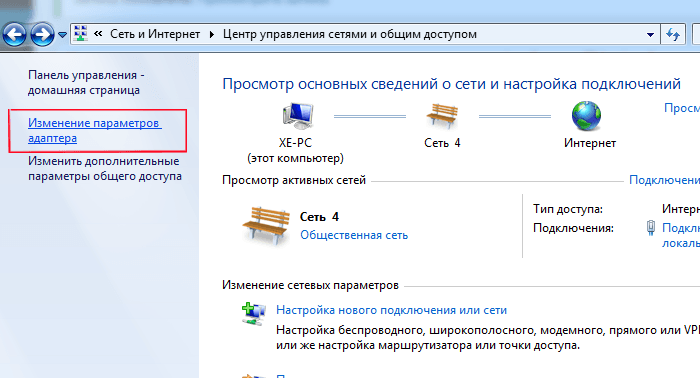
- Start – Control Panel – Network Connections or Network and Sharing Center – Change adapter settings – Local Area Connection – right-click properties:
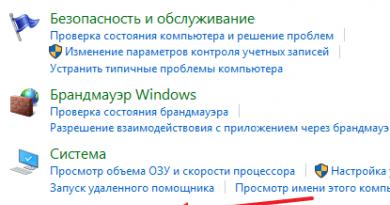
Step 3.Physical adress You can find out if you right-click on the icon:
- Local network connections – Status – Details – In the window, third line in the list – Physical address
Let's start setting up the router (router)
Turn on the router, insert the cable from the operator into the connector INTERNET, connect with a cable (usually included in the kit) the network cards of the router (LAN connector 1) and the PC (Ethernet network card connector). The router should light up at least power diodes (PWR), active first port and WLAN ( AIR), although it happens that the latter is disabled in the router settings. Before setting up, we recommend that you perform a complete reset of the router; hold the button in the hole on the back for about 10 seconds. Reset.
Setting up the RT-G32 wireless router
Step 1. Launch on PC Internet Browser(default, Internet Explorer, but there may also be Mozilla Firefox, Google Chrome, Apple Safari or Opera). In the address bar we indicate the IP address of the router, which is usually indicated on the bottom of the router: http://192.168.1.1
To enter the router configurator, use Username, usually, admin And Password – admin, but it’s better to check the information on the bottom of the router or in the instructions for use.

Step 2. If your provider provides you with Static IP address and exactly 192.168.1.1 , which matches the IP address of the router, in this case you should enter the section “ LAN"and change the router IP address to 192.168.100.1 , then press “ Apply"and reboot the router:

Step 3. After changing the address, you can begin the basic configuration of the router. On the page in the section " WAN» from the list, select your operator’s protocol and specify the IP address parameters WAN:


According to Figure 6, you can change the network name default whatever you like. We choose encryption in order to protect our home network from connections from inquisitive neighbors :) WPA-PSK TKIP - reliable encryption that will ensure our security. All you have to do is come up with and indicate a password in the “ WPA Preshared Key", remember it and write it down in your notebook.
Step 6. Click " Apply", after applying the network parameters, click "", then " Exit»
After the reboot is complete, our router is ready for service.
WHEN SETTING UP YOUR WIRELESS NETWORK, THINGS TO BE CONSIDERED:
- We recommend changing the Wi-Fi signal broadcast channel from automatic selection to a specific one, for example, 6 or 9 .
- To achieve maximum data transfer speeds over the network, do not use encryption types
ASUS is a well-established manufacturer of electronics with good performance, including modems for Internet access. But any device of this type must be configured to the parameters of the provider with whom the contract for the provision of communication services has been concluded.
This instruction will give you the answer to the question of how to configure the asus rt g32 router, while it is worth remembering that the configuration algorithm and interface of devices from the same supplier are very similar, so the article will be useful to all buyers of ASUS modems with Wi-Fi support.
Preparing for setup
Technical preparation of the router for configuration is carried out in several stages:
- Connect the power supply to the Asus rt-g32 and turn it on.
- Connect the Ethernet cable provided by your provider to the modem connector labeled “WAN”.
- Connect the router port labeled “LAN1” to the computer’s network card using an Ethernet cable, which is included in the Wi-Fi modem kit.
- Reset the Asus RT g32 to factory settings by pressing and holding the “Reset” button recessed in the case for ten seconds.
Computer settings
Often the characteristics of a computer's network card are manually configured for other connections. To work with the Asus RT g32 Wi-Fi router, you need to configure the card:
1. Open the network settings section of the OS. For example, for Windows 7 you need to open the settings window shown in the following figure (located in the control panel), where you click on the highlighted link.
2. Go to the connection properties by right-clicking on its icon and selecting the appropriate item in the menu that appears.

3. Open “Properties” of the item indicated in the following figure:

4. Set the protocol characteristics as shown in the figure:

We repeat the procedure for the remaining connections, if any.
Setting up the router
To configure the Asus RT-g32 according to the settings of your provider, follow the steps of the following instructions:
1. Launch any browser, enter the address 192.168.1.1 and go to it.
2. In the loading authorization dialog, enter “admin” in both fields and click on “Submit”

3. Click on the “Go to Home Page” button

4. The software shell of the Asus RT g32 Wi-Fi router supports Russian, select it in the “Language” field.

5. To configure access options for the global network, click on the “WAN” main menu item.
6. Find out your connection type from your telecom operator.

7. If the provider provides the Internet using dynamic IP technology, then nothing needs to be changed on the “WAN” page. Click on the "Accept" button.
8. If the Internet is provided using static IP technology, then in the “WAN connection type” item, select the appropriate type and fill in all the form fields with the data received from the provider and click on “Accept”.

9. When selecting the PPPoE connection type, specify receiving an IP address automatically or fill in the address field if it was provided by your Internet provider. Z Fill in the fields in the “Account and connection settings” section with the data specified in the contract for the provision of communication services, and in the MTU field enter the value 1472 and click on “Accept”.


11. Apply the changes and configure the wifi module for a wireless connection. If this option is not needed, reboot the modem and use the Internet.
Wi-Fi setup
To configure the characteristics of wireless access to the global network, open the “Wireless Network” tab of the main menu. Where you will set the following parameters:
- In the “SSID” field, enter the name of the Wi-Fi network displayed on subscriber devices. It can be arbitrary, but must consist only of numbers, symbols and letters of the Latin alphabet.
- Enable the “Hide SSID” option if you want to use this method of protecting your wifi network from unauthorized access. When activated, the setting hides your network from subscribers, and you can connect to it only by knowing its exact name.
- In the “Authentication Method” line, set “WPA-Personal”. And in the “WPA encryption” line, select “TKIP”. These are the most well-established and widely used methods of network security.
- The “WPA Pre-Shared Key” line contains the password that users must enter when logging into your wifi network. The length of the code combination must be at least eight characters; any characters can be used.
- To fix the settings, click “Apply”.

This completes the setup of the Asus RT g32, all that remains is to reboot it and use the Internet, both via a wired interface and via Wi-Fi.
Found a typo? Select the text and press Ctrl + Enter
Asus RT G32 is one of the most popular routers due to its low price and excellent quality. If this is your first router, then you probably don’t know how to configure the Asus RT G32 router so that it distributes Wi-Fi. It's actually very simple, but first you need to understand the basic concepts.
Router and router are the same thing. With its help, you can set up Wi-Fi, organize a home local network and use other useful functions.
On the back wall of your Asus RT G32 you can see the following inscriptions: the abbreviation WAN means external Internet network, LAN means local home network (computers connected to the router by wires).
Reset – reset settings to factory defaults and Power – connector for the power supply. WPS is a feature designed to simplify the setup of the Asus RT G32 router, but in reality it can only complicate everything, so you shouldn’t pay attention to it.
First start
As soon as you turn on the router to the network, it already distributes Wi-Fi. This can be easily checked using a laptop or smartphone: Asus RT G32 should appear in the list of available wireless networks. But to ensure that the Wi-Fi signal is not “empty”, you need to connect the Asus RT G32 router to the Internet.
The WAN connector is intended for the wire from your Internet provider going into the apartment, any LAN - for connecting to a computer using a short wire (patch cord) from the kit. In most cases, it is enough just to connect all the necessary connectors to the wires to make the Internet accessible through the router, but not always.
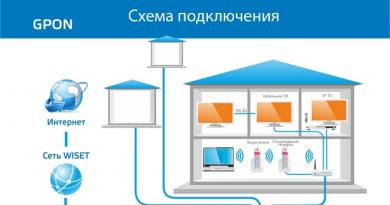
Approximate connection diagram:

Understanding the settings panel
After connecting the router to your computer or laptop, open your favorite web browser and enter the numeric address in the line 192.168.1.1 . This is the standard address for accessing the router settings. It may differ - in this case, look for it in the setup instructions or on the bottom cover of the device itself. Ideally, you should be taken to the admin panel login page. Standard login and password are admin/admin.

If the Internet is already working, and you can easily check this by opening any website in your browser, this means that your provider supports DHCP, that is, it distributes IP addresses automatically. This means that you are in luck and all that remains is to configure the Asus RT G32 Wi-Fi router in terms of wireless signal. By default, it is called the router name and does not have a password. Open the "Wireless Network" tab.

You can enter any name of your network in the SSID line. You shouldn't hide the name unless you want to make it difficult for each new device to connect to your Wi-Fi. WPA pre-shared key – Wi-Fi password. Just enter your desired password. The best authentication method is WPA2-Personal. The remaining points are unimportant. Click Apply.
Now you can connect to your Internet via Wi-Fi from a laptop, smartphone or tablet.
If it doesn't work right away
Connecting and setting up the Wi-Fi router Asus RT G32 does not always go so smoothly. Your Internet provider plays an important role, namely what type of connection it uses. It could be:
- dynamic IP address;
- static IP;
- L2TP connection type;
- PPTP;
- PPPoE.
If, when you plug in the Internet cable into the WAN connector, the network is not picked up automatically, open the “WAN” tab in the router’s control panel and enter the required data.

The first thing you need to set is the type of WAN connection. You can find out by calling your provider. There you will also be informed of other parameters, such as your login and password for connecting to the Internet (if any). Advice: if the first half of the instructions did not help, it is easier to immediately call technical support than to search for solutions on the Internet and spend hours trying to configure something yourself.
Connection type, login and password (possible, but not required), VPN server address for connection via L2TP and PPTP types - this is what you should find out from your provider. All you have to do is enter this data in the appropriate fields and save the settings. Access to the Internet via the Asus RT G32 router should appear within 20-30 seconds.
Important: if you previously used the Beeline or other provider icon to launch the Internet, then after connecting and setting up the router on this computer you will no longer need it.
One of the most popular router models, which does not lose its popularity despite its age. The favorable balance of adequate price, stability of operation and ease of setup has made the new product a popular solution not only for private use, but also in the modern practice of various Internet providers and mobile operators.
Despite its rather “respectable” age (having appeared on the world market over 6 years ago), the model still retains wide popularity as a real giant in the budget router market. The model remains one of the bestsellers among many leading providers and cellular operators. This approach is quite logical, given the fairly good characteristics for its price segment.
The device uses a standard frequency of 2.4 GHz; it is recommended to select the freest communication channel. To ensure the security of data exchange, today's current encryption methods are used, with a nominal wireless signal speed of 150 Mbit/s.
Let's move on to connecting our router
Let's look at the basic connection method using an Ethernet cable. In this case:
- Place your router in a safe place, near an outlet. We connect the power adapter with the plug into the router connector, and the “plug” into the outlet.
- We connect the Internet cable - after this the router indicators should light up.
- We connect the router to the computer using the included device.
If this router was already in use before the installation, you should reset its settings to factory settings. To do this, use some thin straight object by pressing the Reset button - a needle, straightened paperclip, stick and other objects are quite suitable. We hold the button pressed for 10–15 seconds, after which you will notice that the router itself has rebooted.

Most router firmware supports a colorful menu in Russian. To launch it, make sure that the router is connected to a computer or laptop, then enter 192.168.1.1 in the address bar of any browser. To enter the menu, enter the login and password admin in both fields.
In the interface that opens, go to the WAN section of the side menu. To enter the appropriate data here, you should first find out about the connection method provided by the provider - it and other connection information are indicated in the contract. Also, if you wish, you can always contact the technical support of your provider and clarify this issue.
You should immediately take into account that the vast majority of domestic providers rely on connecting using the PPPoE method. Therefore, in the “Connection type” line, you must specify PPPoE by entering the login and password that the provider provided for the user’s connection.

Beeline setup
To connect to Beeline, a connection using the L2TP method is usually provided. Therefore, we set this option in the “Connection type” window, and you need to specify tp.internet.beeline.ru as the VPN address.

Setting up iptv
To do this, go to “Advanced settings” in the WAN section. Here we select the appropriate port to which the set-top box is connected, set a dynamic IP address.
After completing all these procedures, do not forget to save your changes. To do this, use the button at the bottom of the page. After making changes to the operation of the router, it will automatically reboot, and the new parameters will take effect from the moment it is restarted.
This usually completes the process of setting up and connecting the router. All that remains is to wish you to enjoy a stable Internet connection without unexpected failures. You can always find all other information on the nuances of setup and correct operation on the pages of our portal.
If you have already configured your router, we advise you to perform a factory reset before following the configuration recommendations below. This needs to be done as follows: on the back panel of the router there is a recessed “Reset” button, which you need to press for about 10 seconds.
1. Login to the router
Open your browser and enter 192.168.1.1/ in the address bar. In the "User" field enter admin and in the "Password" field - admin. Click "OK".

2. Firmware update
To update the router firmware, select the “Administration” section on the left and go to the “Firmware Update” tab. You can download the firmware on the ASUS website. Next, click the “Browse” button and specify the path to the downloaded firmware file, and then click the “Submit” button.

Attention! The router is flashed in several stages. If all connections are disconnected, do not under any circumstances try to turn off the power to the router! It will decide on its own in about 5-10 minutes. Failure to comply with this condition results in the loss of the boot sector in the main drive of the router, which turns it into an ordinary switch (switch) without the possibility of recovery.
3. Internet setup
Make sure the settings on your router match the picture.

4. Wi-Fi setup
To set up a wireless network, you need to go to the “Wireless Network” section and fill out the fields in accordance with the picture below, and then click the “Apply” button.
The password can consist of Latin letters, numbers, symbols, without spaces. Password length is from 8 to 64 characters. For security reasons, do not enter personal information (date of birth, mobile phone number) as a password.